SoundZapper user manual
Find a sound.
Make it yours.
Go straight to the control you need. Each chapter breaks the job into small steps, with real app pictures and shortcuts alongside the instructions.
Chapter 1What SoundZapper is
1.1 Your presets, ready to explore
After a scan, SoundZapper turns your rendered Serum presets into a playable library. Hear a sound with one click, search by name or character, and explore related sounds on a map. Previews become available as scanning progresses, so you can begin browsing before the whole collection is ready.
No more clicking through folders hoping to stumble on the right patch.
Chapter 2Getting started
2.1 Set up your library
It walks you through everything in a few short steps, and shows what it's doing as it goes:
Step 1 · Looking for Serum
it checks whether Serum is installed. If it's there, SoundZapper can render and play every preset. If it isn't, that's fine — you can still browse and search everything that's already been rendered.
Step 2 · Your preset folders
it finds the usual Serum folders and shows how many presets are in each, split by engine (“X Serum 2 presets · Y Serum 1 presets found”). Add or remove folders as you like. These are only ever read: SoundZapper never changes, moves or deletes anything inside them.
Step 3 · Where SoundZapper keeps its files
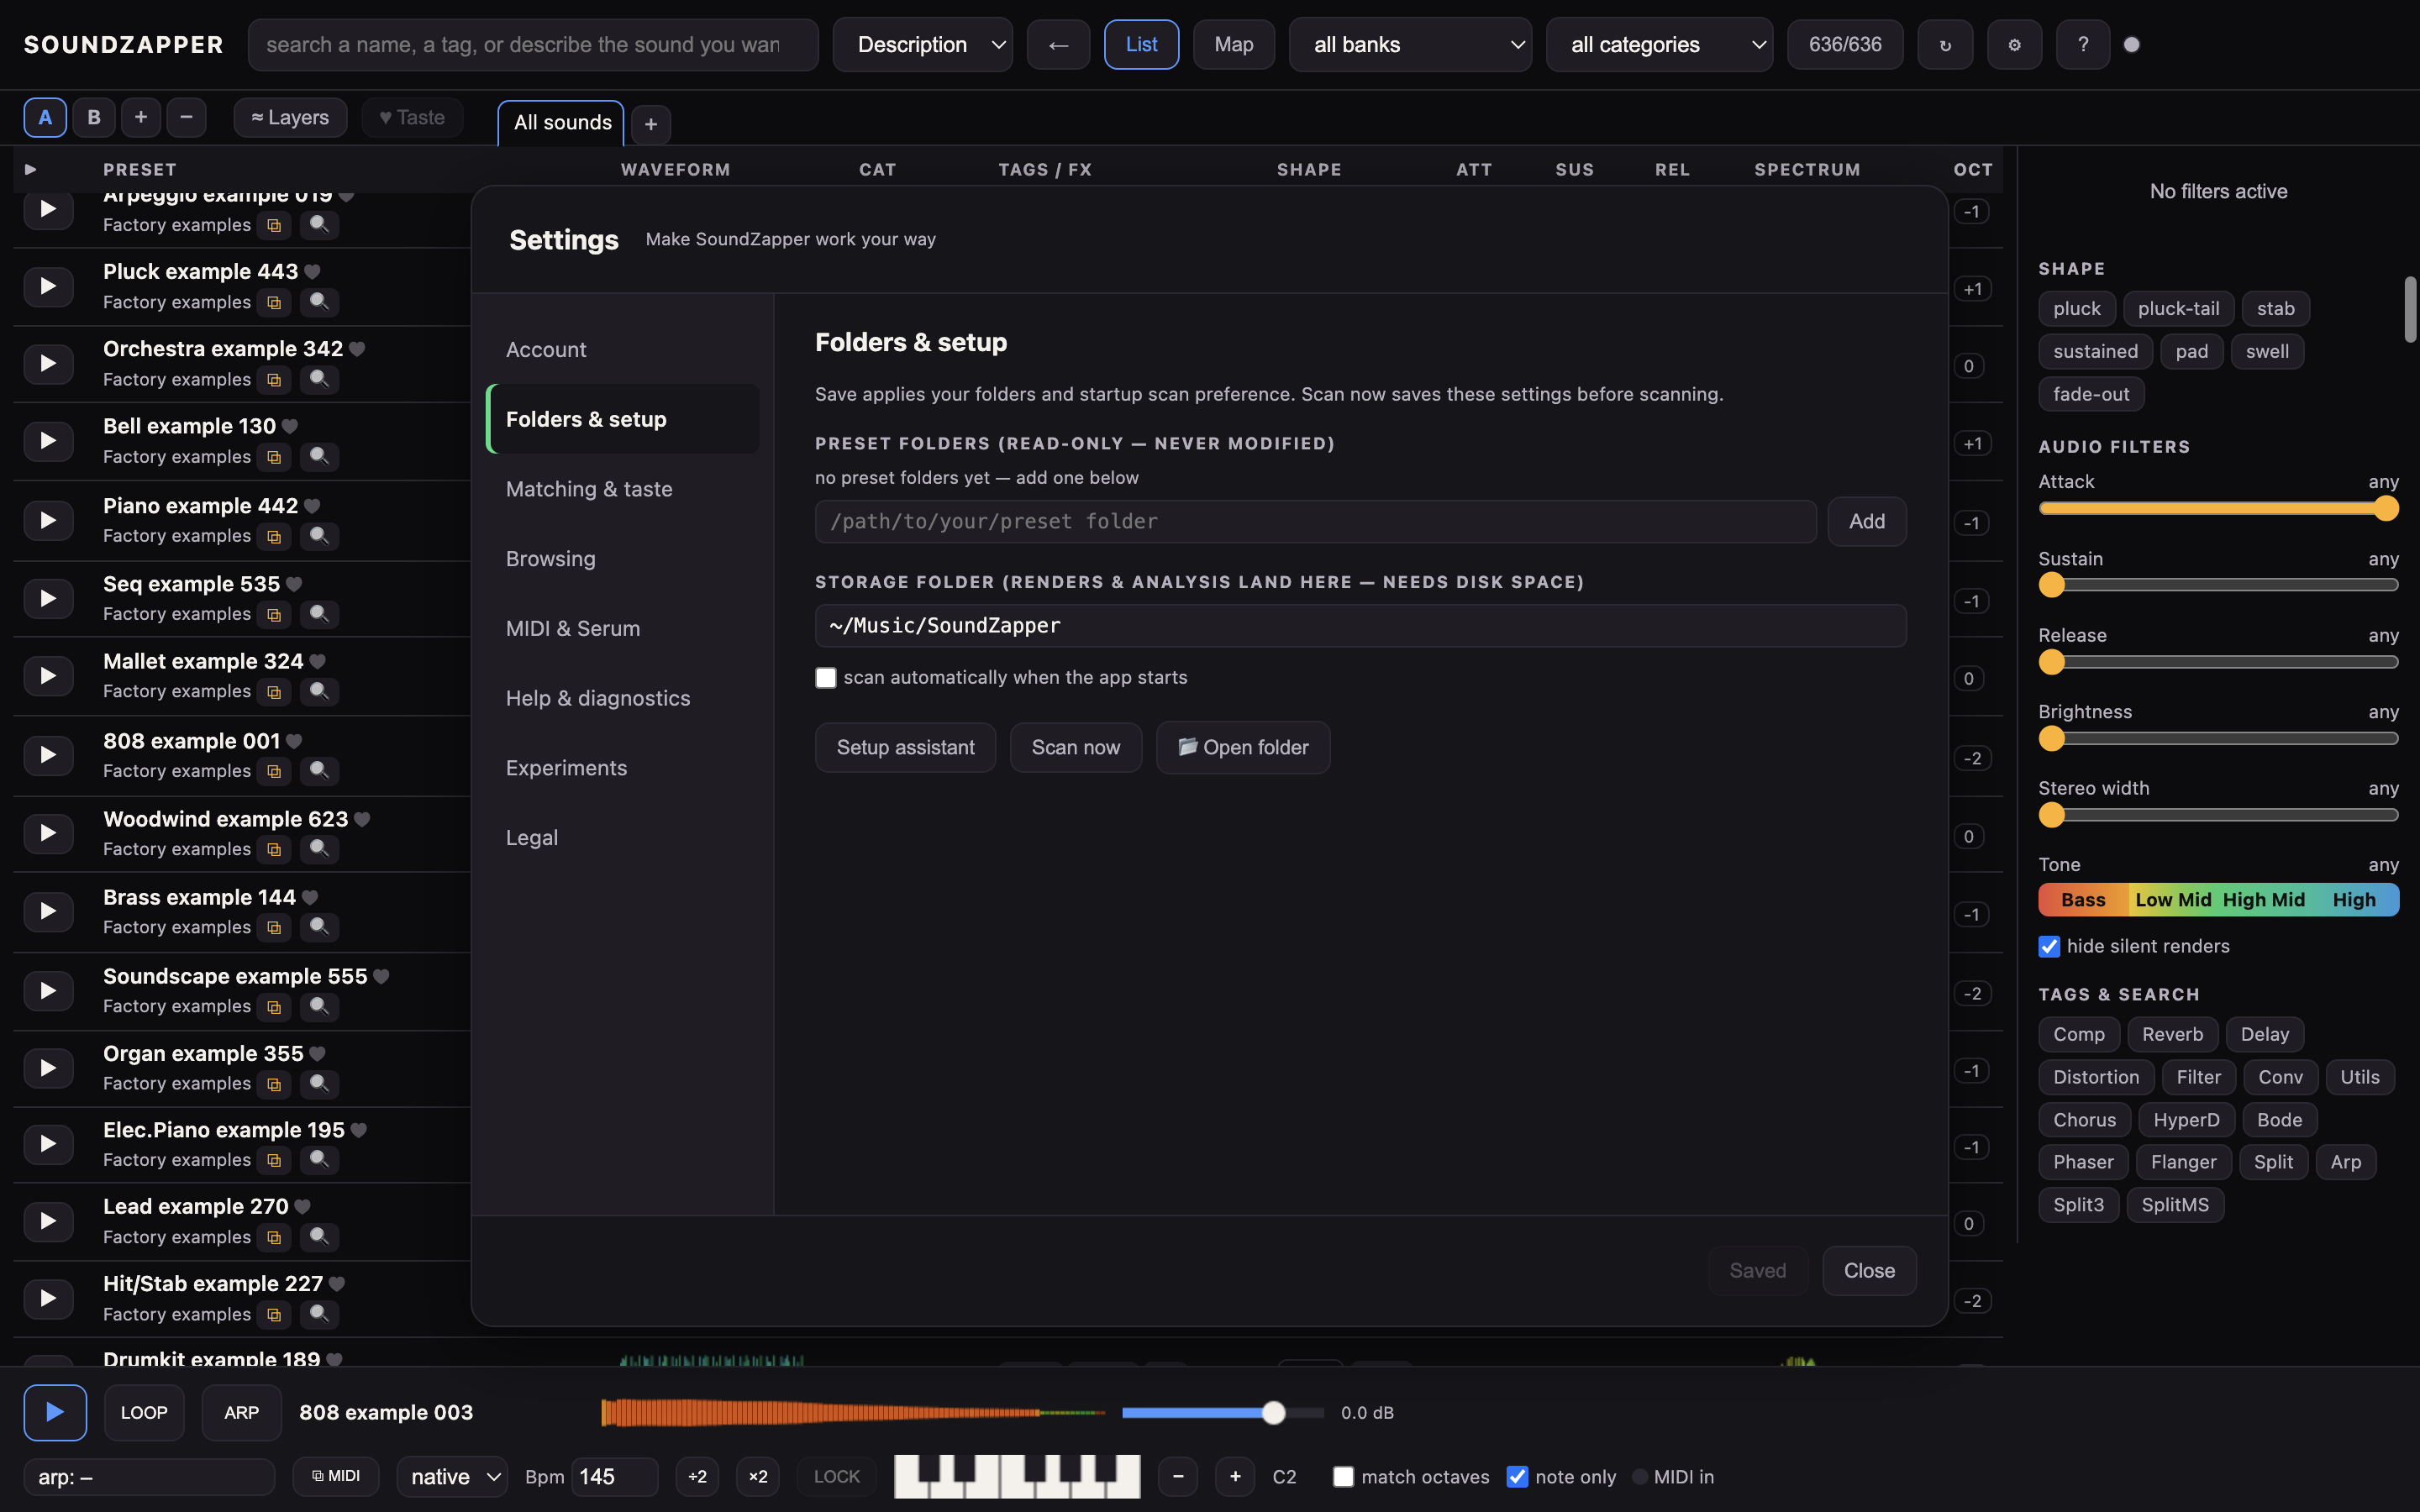
Choose a parent folder for your shared sound library. Presets copied into the library, previews and analysis stay together in one SoundZapper folder. SoundZapper offers its own empty SoundZapper child folder, shows required space and free disk space, and keeps it separate from preset and sample libraries.
If that parent contains files, a prominent warning explains that they stay untouched. Protected library roots and whole drives cannot become mixed app storage. Avoid cloud-synced folders: sync can move files during writes, and two computers can conflict.
Step 4 · Build your library
two tick boxes. Scan my presets is always on (SoundZapper needs it to build your library). Download the sound model for search-by-ear (2.2 GB) is optional and ticked by default when your drive has room — it lets you search by describing a sound in plain words.
Press Start & continue and the ticked jobs start in the background while you go straight to the summary. If you untick the sound model, the assistant reminds you once what you'd lose (no search-by-ear) — you can always add it later from Settings.
Step 5 · Summary
confirms your setup and shows a live checklist of what's happening: folders and storage done, the scan running (with how far along and time left), and the sound model downloading. It reminds you up front that you can close this window and scanning keeps running in the background.
It also warns honestly that scanning uses serious CPU, so audio previews may crackle until it's done — you can pause the scan any time from the bottom bar.
You can close the assistant at any point with Skip for now or Esc — it remembers where you were. If the library is still empty, the main window shows a “Your library is empty — open the setup assistant” card so you always know the next step.
Reopen the assistant whenever you want from Settings → Setup assistant.
2.2 Where SoundZapper writes on your Mac.
SoundZapper separates your original libraries from the files it creates. Preset, sample and Ableton project sources remain read-only.
- Owned storage: previews, analysis, model files, favourites, taste history and small history backups. The default is ~/Music/SoundZapper. Older hidden storage remains in place until you choose another folder.
- App-owned files: settings, private profiles, update/model caches, diagnostics and temporary work files. These are separate from your original music files.
- Explicit preset exports: only the dedicated Serum User SoundZapper subfolder may receive a new generated preset. Existing presets are never overwritten; the rest of your preset library stays read-only.
Only one window uses a storage folder for writes. A second window or computer runs read-only to protect favourites and taste history. A refused write gives a plain explanation and points you to Settings.
2.3 Browse during the first scan
You can browse as previews finish. The bottom strip counts the whole scan across all packs and Serum versions: “Scanning your presets — X of Y · time left”.
- Load arrivals: every few minutes, a green “N new sounds ready — click to load” banner offers the newly built library. It waits until you are ready.
- Pause when producing: scanning uses substantial CPU and may make previews crackle. Pause it from the bottom strip.
- Browse early: List works while the library grows. Initial map positions use available sound features; full analysis refines the similarity map. If a layout is not ready, the app explains what to do rather than leaving a blank canvas.
2.4 Finish the first scan
A green “Your library is ready — click to reload” banner appears along the bottom. Click it (or just wait a moment while you're not typing) and the app reloads with your freshly rendered sounds.
If you downloaded the sound model, search by sound switches on in the same session as soon as the scan finishes — no need to restart the app. It shows a brief “still warming up” note while it loads, then just works.
Right after your library is ready, a short for-dummies tour spotlights the main features one card at a time (search, the map, the player, dropping a sample, your taste). It waits until there are actually sounds to point at, so it never runs over an empty screen.
Skip it with Esc whenever you like, and restart it any time from Settings → Help & diagnostics → Restart the tour.
2.5 Find the main controls
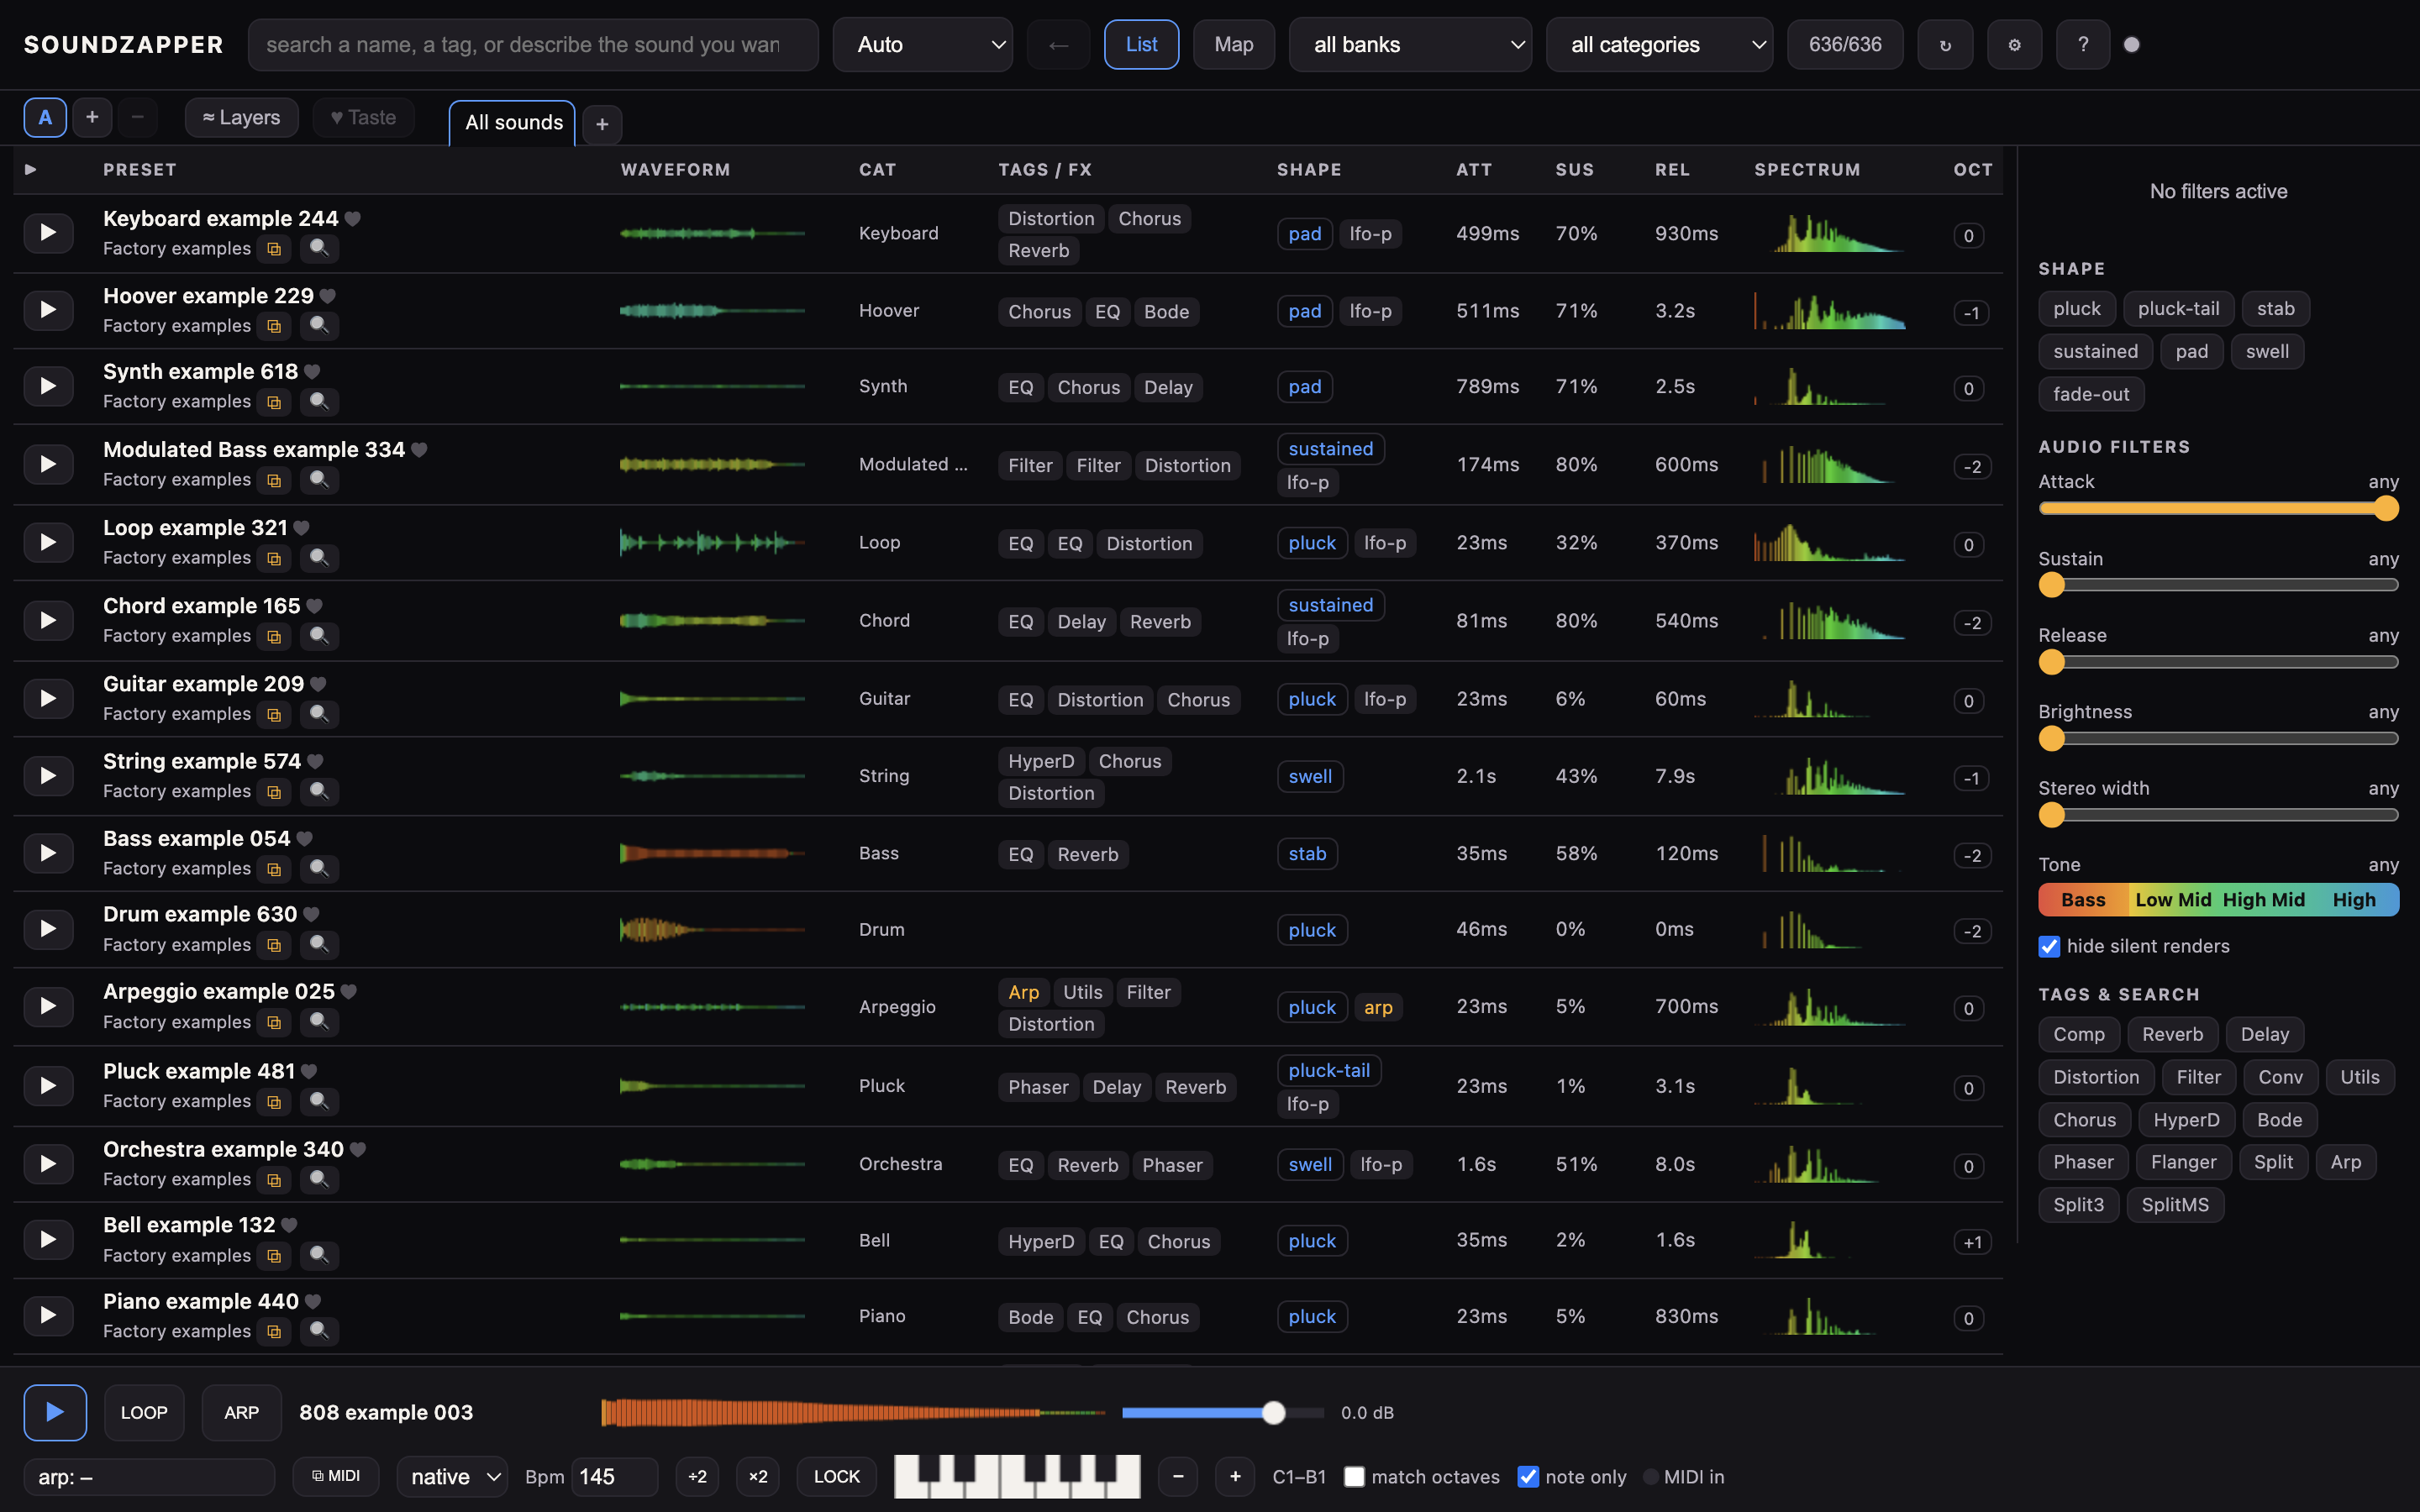
At the top is the search box. Next to it are two buttons: List and Map. The app opens on the Map — every preset as a field of dots, with similar sounds sitting close together. List shows the same presets as a plain table you can sort.
Use whichever you like — you can switch any time (Shift+Tab flips between them).
Down the right side are your filters (shape, tone, sliders, tags). Along the very bottom is the player bar, where a sound plays.
2.6 Choose safe storage
When you choose where to keep your sound library, choose a parent folder. SoundZapper offers to create its own empty SoundZapper folder inside it. If the parent already contains files, a prominent warning explains that those files stay untouched. Existing libraries remain where they are until you choose a replacement.
If an older library folder is not owned by SoundZapper, you can keep browsing cached sounds; choose a separate empty folder before creating new sounds.
Chapter 3Searching
A name, a tag, or a few words such as warm bass are enough. Text searches put matching preset names first, then tags and categories, then descriptions and matches by meaning from the model. Your chosen sort applies within each group; an audio reference keeps its sound-match order.
A complete-name result is marked 100% name match in the list and highlighted on the map. Committed Words and Tags still narrow the search; other view filters do not hide an explicit full-name lookup. Capitalization and extra spaces do not matter.
3.1 Search names and words
Type any words — a name, a tag, a description, an effect. The list narrows as you type. For example, type bass to see bass sounds.
3.2 Describe a sound
With rendered presets and the sound model ready, describe a sound in plain words — like "warm analog bass" or "airy bell pluck" — and it ranks presets by how they actually sound, even if those words are nowhere in the name. (This needs the app's helper running — see If something looks wrong.)
3.3 Match a reference sample
Have a sound you love from a song or a sample? Drag the audio file (wav, aiff, mp3, flac…) from Finder or your DAW straight onto the list or the map.
SoundZapper finds the presets that sound the most like it and marks the closest matches — a ♫ chip with the file's name appears in the tag bar while this is active.
You can then narrow it down: type a word or click a tag and the results stay ordered by similarity within that filter (great for e.g. dropping a zap and typing "zap"). Click the ♫ chip to go back to normal browsing.
3.4 Dropping a preset's own sound
If you copy or drag a preset's audio straight back onto the map, you get exactly the same matches as right-click → Find similar sounds on that preset — SoundZapper recognises the sound and ranks from it.
This even works when the file has been re-encoded, trimmed or normalised (export a render as an mp3 and drop it back — the status line says "recognized as <name> — same sound, different file").
Only if you've deliberately changed the sound itself first (repitched it to another key, or put an arp on it) will the results differ, because then you're dropping a genuinely different sound.
3.5 Where to let go
The drop zone is the list and the map. If you drag a file over anything else — the toolbar, the player bar, an open panel — the status line says so while the file is still in the air, so a drop never just vanishes.
3.6 If a drop doesn't come back with anything
The status line explains a failed drop and the next step. A failure clears the previous sample’s matches so they cannot masquerade as the new result.
- Signed out: sign in under Settings → Account.
- Account cannot be checked: reconnect, then try again.
- Sound helper warming: wait a moment and retry.
- Over 32 MB: trim the sample and retry.
- Link to the sound engine lost: restart SoundZapper and retry.
3.7 How many matches?
Settings has a Similarity matches control: Tight (the default) keeps only the closest matches — the ones with white rings (top 15). Narrow widens to the closest cluster (roughly the top 60, about 1% of the library), Medium to around 250, and Wide shows the full ranked list (up to 800).
Change it any time; if a sample is already dropped, the results re-slice instantly with no re-analysis. The status line tells you how many matches are active and which setting you're on.
If a tight setting would leave fewer than 10 matches, SoundZapper widens automatically until it finds 10 (or the library runs out) and says so in the status line, so the setting never quietly hides everything.
3.8 Keep a search as chips
Choose a search type
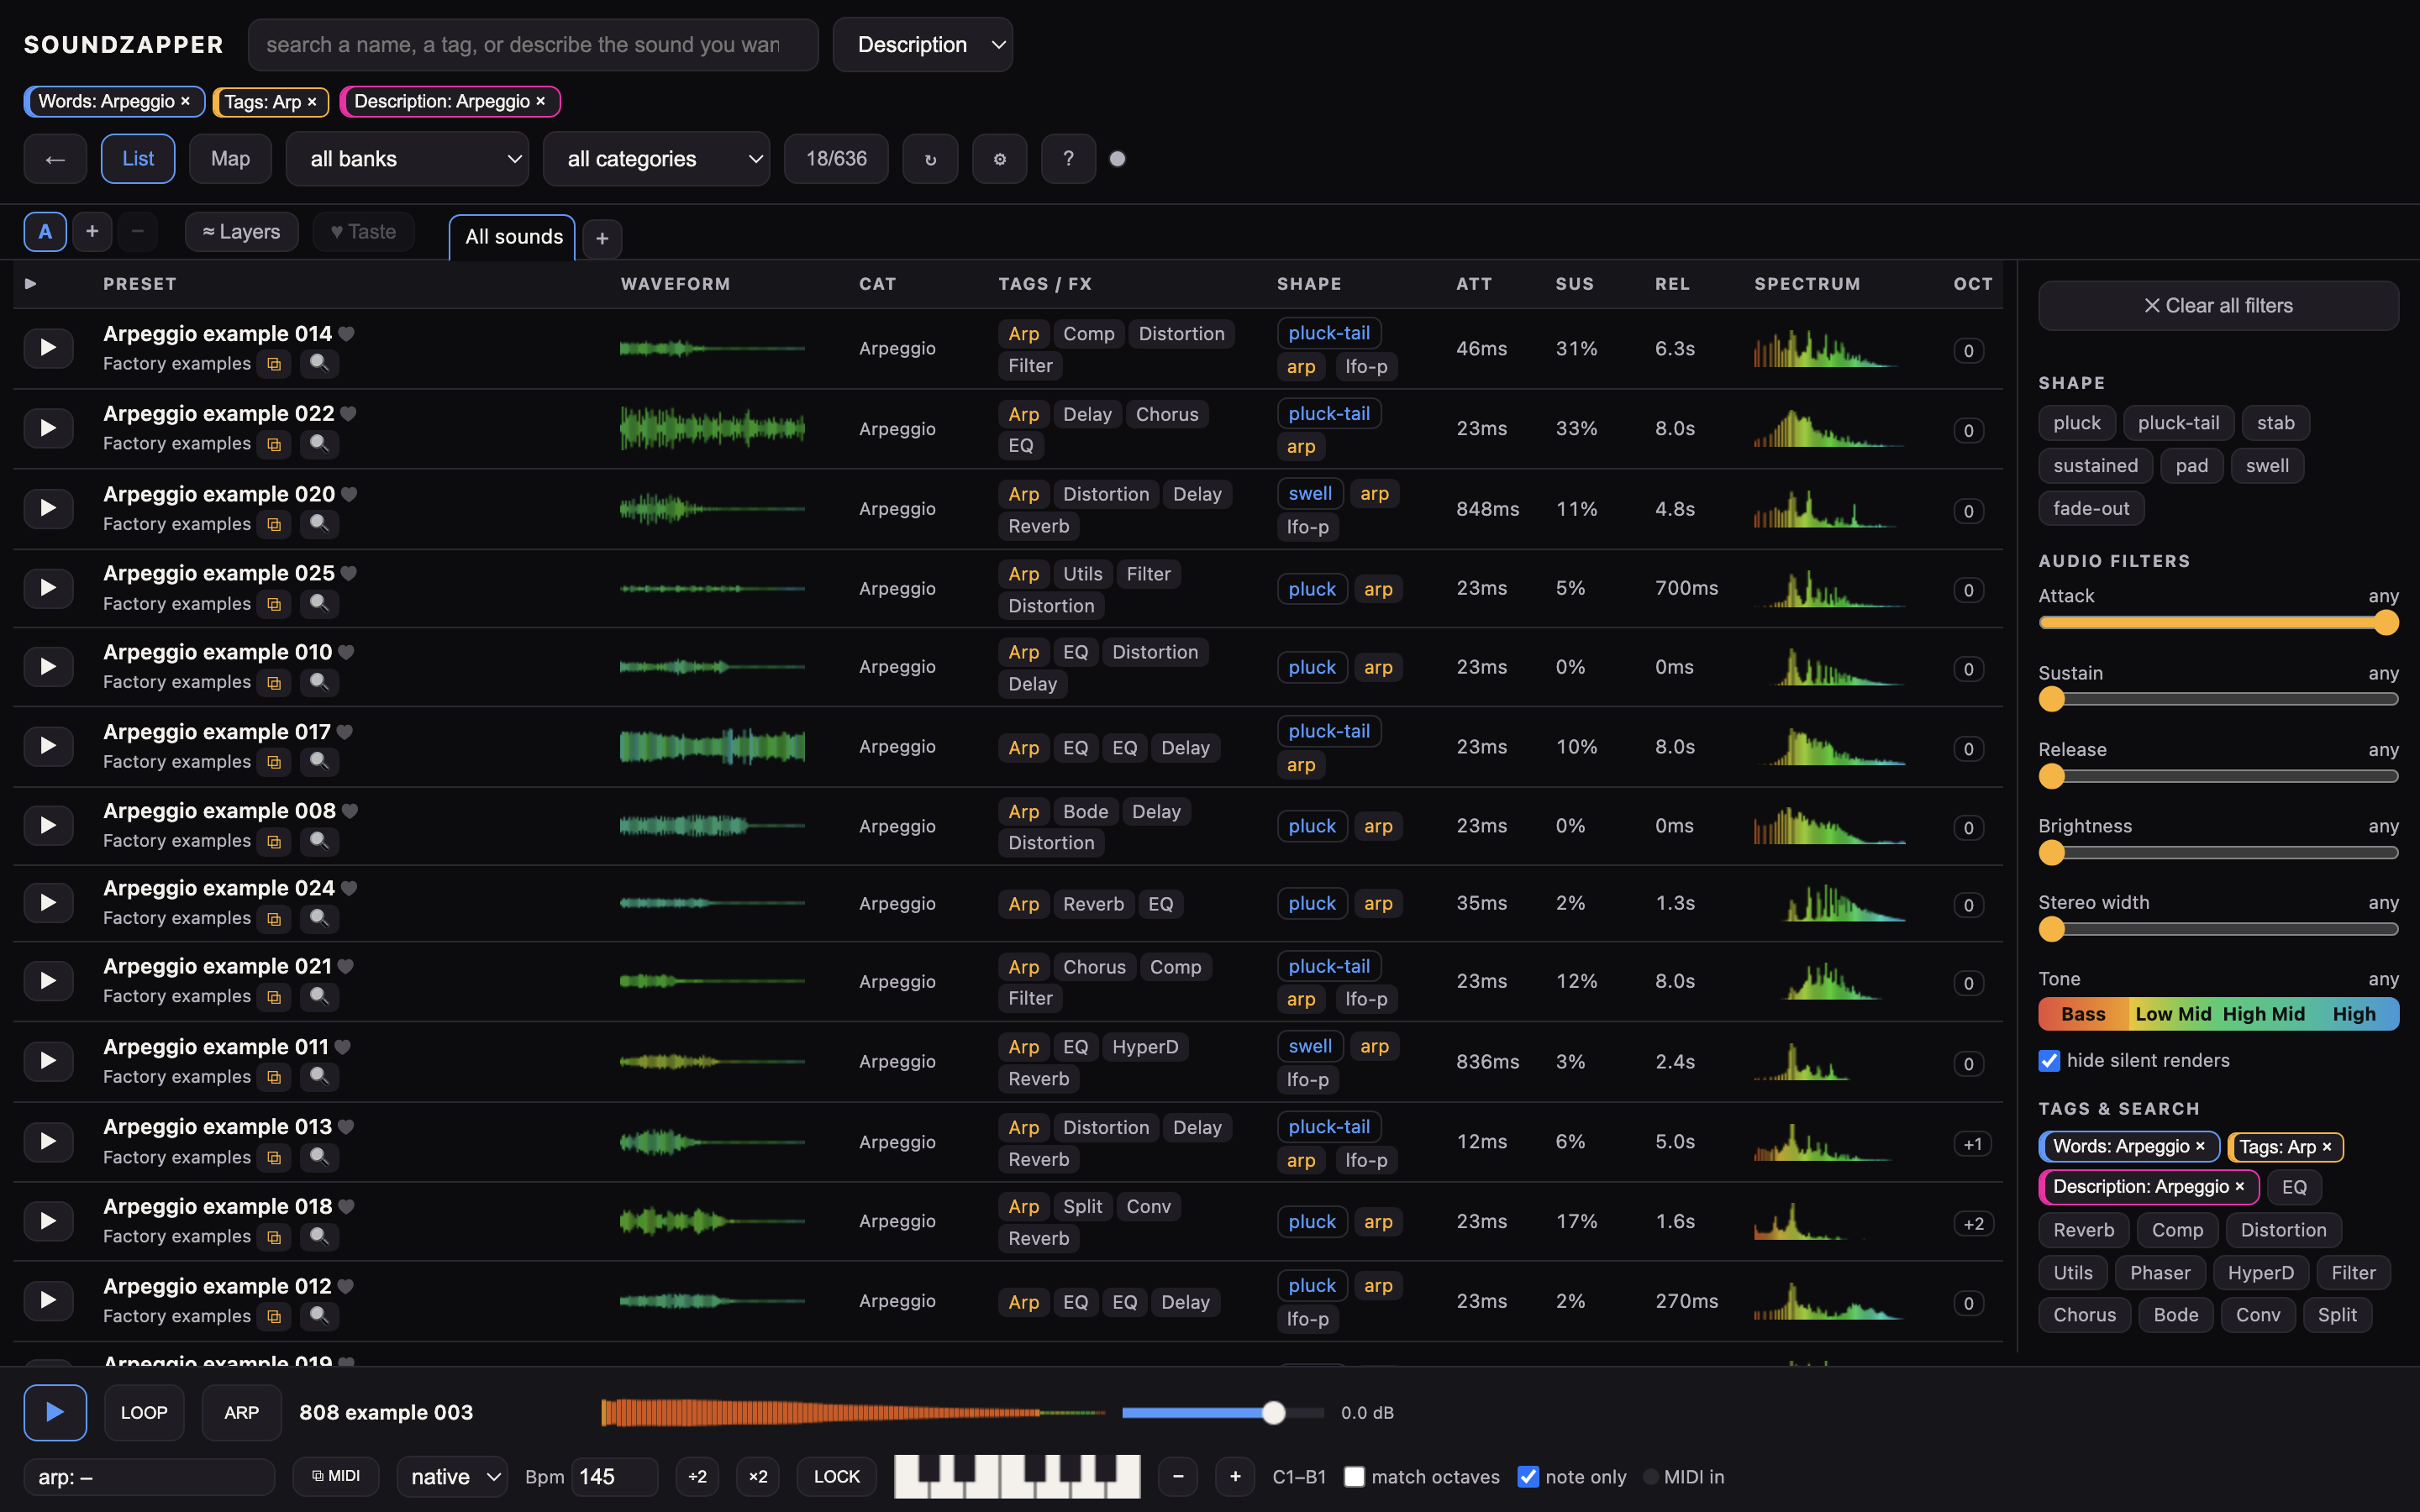
Type freely. Auto recognises an exact real tag first, then preset-name words; other phrases describe a sound. Use the type menu to override an ambiguous term such as “Warm”.
| Type | What it does |
|---|---|
| Blue · Words | Requires literal names or text, even when Description also ranks the results. Name words are not sent for sound ranking. |
| Amber · Tags | Matches exact preset metadata. Bank, category and effect facets remain separate. |
| Pink · Description | Finds sounds by how they sound. While the helper is unavailable, it falls back to text matches. Only Description chips and the uncommitted draft go to sound ranking. |
Add or exclude
Press Enter to keep a chip. Alt+Enter, or Alt-click on a real tag suggestion, excludes that tag.
Each chip appears in the search bar and lower-right Tags & search panel. Hover either copy for its type explanation. Clicking a real tag in the right-hand suggestions controls the same chip, never a second hidden filter.
Remove or keep your search
- Click either copy to remove the chip.
- Focus a chip and press Delete or Backspace to remove it.
- Backspace in an empty search removes the last chip.
- Clear all filters removes every chip. Filter tabs, saved sessions and browse history keep them.
Chapter 4Filtering
Choose a topic · 11 short sections
4.1 Choose a filter
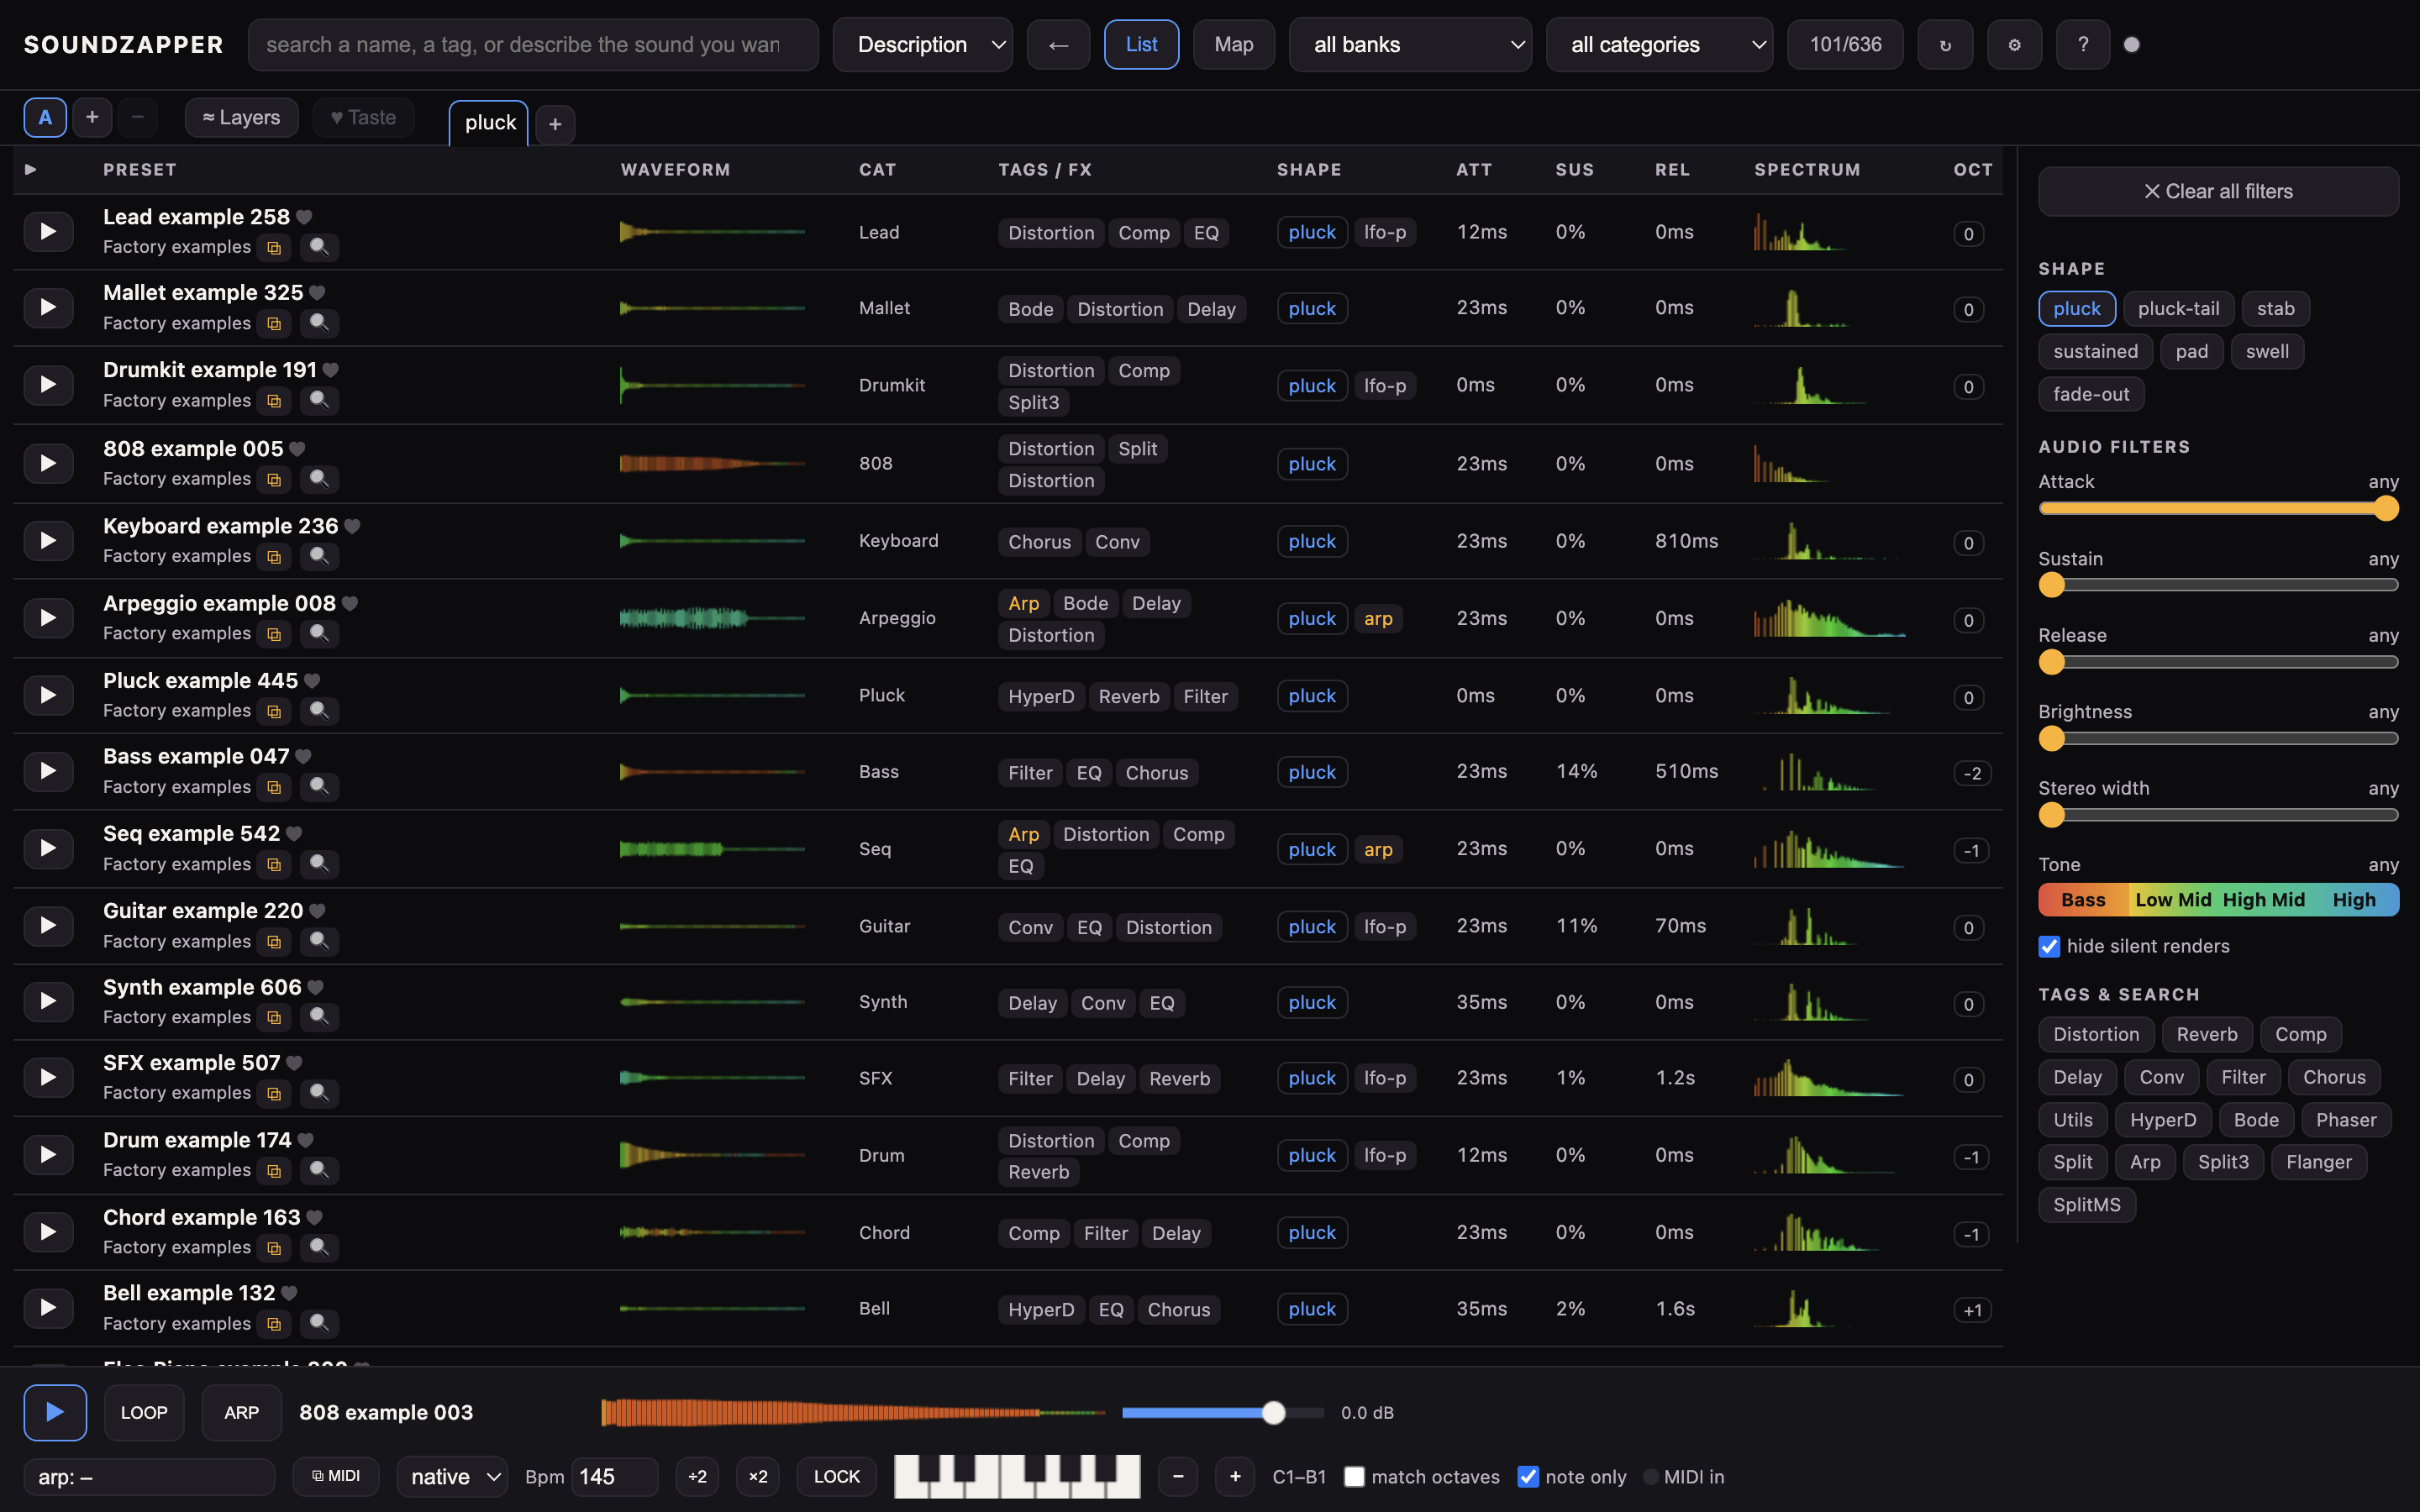
4.2 Shape chips
tap a shape to keep only sounds that behave that way:
- Pluck — starts sharp, dies away quickly (like a plucked string).
- Pad — soft and slow, holds and swells behind the music.
- Swell — fades in gently, no hard start.
- Stab — a short, punchy hit.
- …and more. Tap again to turn a chip off.
4.3 The Tone bar
(Bass → Low Mid → High Mid → High) — pick where the sound's main body sits. Bass keeps deep, low sounds; High keeps bright, airy ones.
4.4 The sliders
drag each to keep sounds in that range:
- Attack — how fast the sound starts (snappy vs. gentle).
- Sustain — how much it keeps holding while you press the note.
- Release — how long the tail rings out after you let go.
- Brightness — dark and mellow vs. bright and crisp.
- Stereo width — narrow and centred vs. wide and spacious.
4.5 Tags
tap a tag chip to require it. The tags shown are the ones common to what you're already looking at, so they help you dig deeper. Alt-click any chip (tag, bank, category, shape) to exclude it instead — everything except that. Press Enter to keep a typed search chip.
Auto recognises real preset tags; choose Words or Description to override it. Hover a chip in the right-hand panel to read what its type does. Typed search chips are removed by clicking; Alt-click exclusion applies to the suggested metadata facets; Alt-Enter also excludes typed real tags.
4.6 Hide silent renders
the checkbox under the sliders drops presets whose preview came out near-silent (dead patches, or ones that need a mod-wheel move to make a sound). It's on by default; untick it to see everything.
4.7 Banks & categories
the two menus at the top pick a preset pack or a musical category (bass, lead, pad…). Each one you pick becomes a chip you can remove.
4.8 Clear all filters
the button at the top of the panel takes you back to the whole library in one tap. Two shortcuts do the same reset: click the results counter at the top (it reads “N sounds match”), or press Esc when nothing is open to close.
4.9 Filter tabs
the + next to ♥ Taste makes a new tab that remembers a whole search (its filters, sliders and any similarity result). Switch tabs to jump between searches; ✕ closes one.
4.10 List drill-down
- Filter from a row: click its pack, category or shape; Alt-click excludes it.
- Shuffle neutral browsing: use ↻ or ⌘+R in List view. It mixes packs and categories so one bank does not dominate your scrolling.
- Ranked results: ↻ dims while similarity (♫) or Taste (♥) decides the order. Clear that ranking to shuffle again.
- Keeper: a small amber ★ and an amber name identify your kept sounds.
- Favorite: click the row’s ♥ to mark it pink; click again to undo. Favorites and keepers are independent, so a sound can show both.
4.11 Long lists
When a filter still leaves thousands of sounds, the list shows the first few hundred and says "showing 400 of …". That's just to keep scrolling snappy — narrow with a search word, a tag or a slider to reach the rest. The arrow keys still walk the whole list, not only the visible rows.
Chapter 5The Map
Choose a topic · 8 short sections
5.1 Browse the sound map
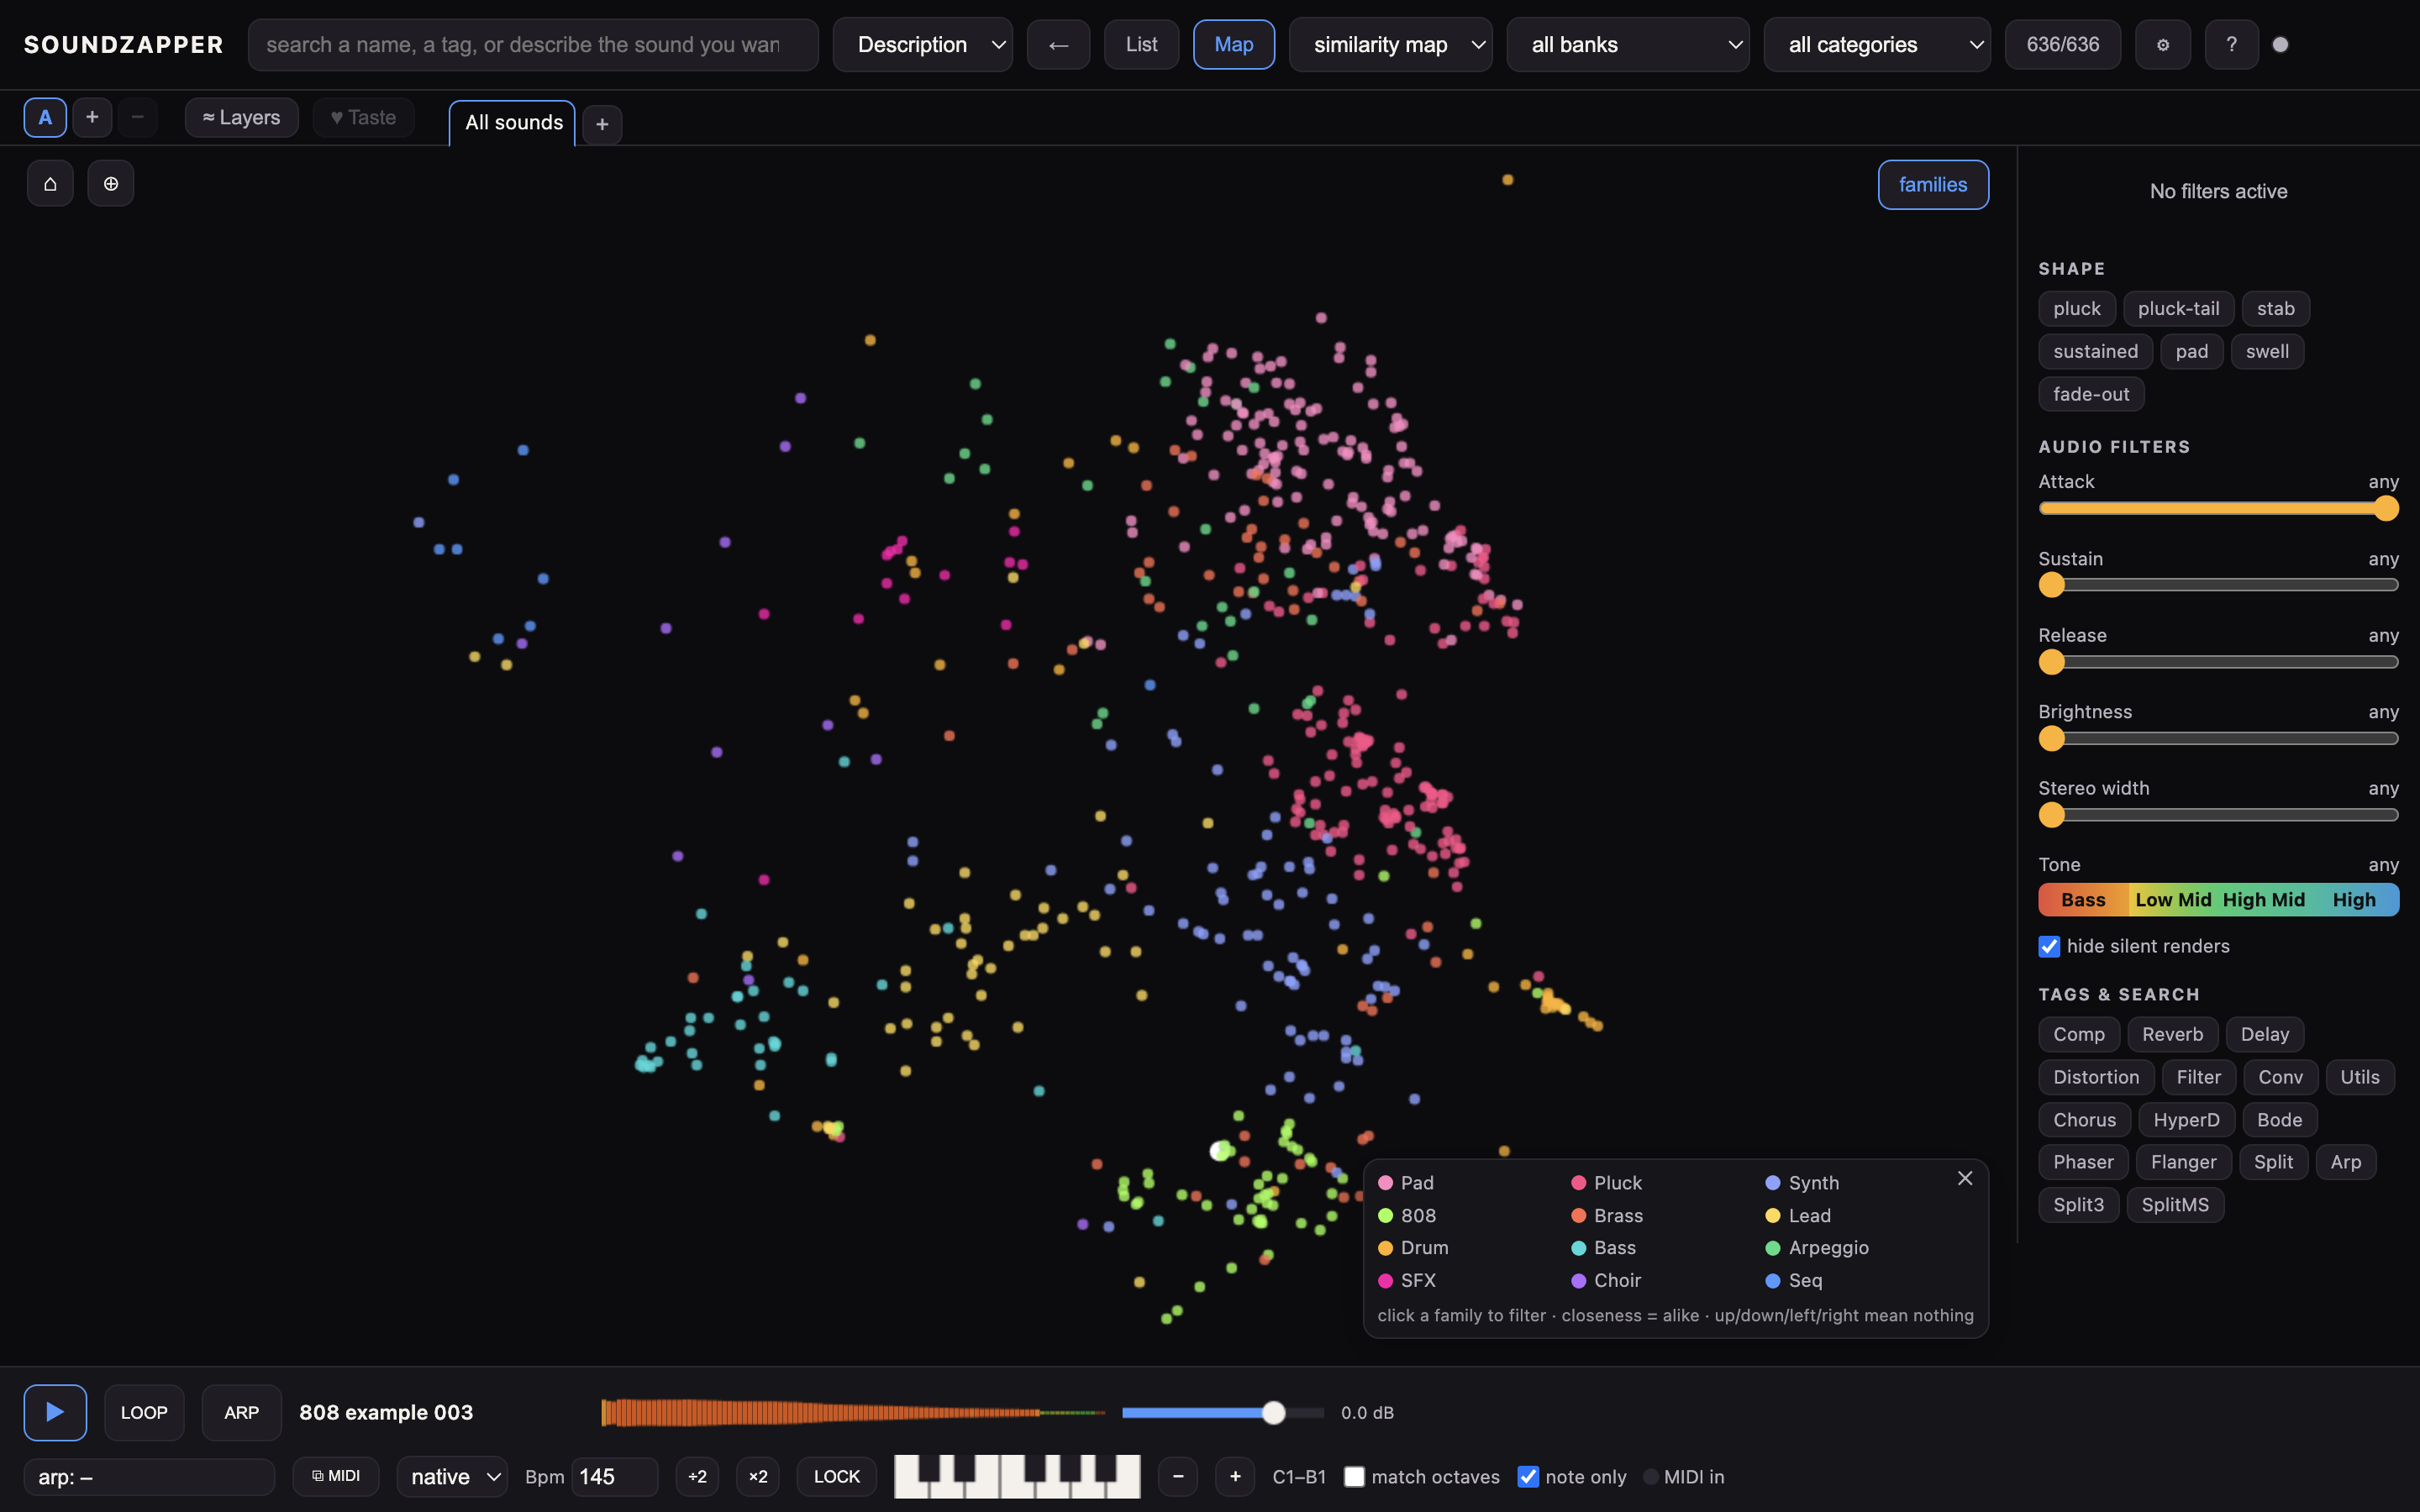
5.2 Closeness means similarity
Sounds that are alike sit close together; sounds that are very different sit far apart. Wander around and you'll find whole neighbourhoods of related patches.
5.3 What the rings mean
The map sometimes decorates dots to tell you something:
- Solid white dot — the sound you have selected right now.
- White ring — one of the closest matches to an audio file you dropped in (the same sounds get a white edge mark in the List view).
- Ring in the dot's own colour — a suggested layer partner: it would sit nicely underneath or on top of your selected sound (see Layering).
- Big bright ring — the sound you are pointing at in the layer suggestions list, so your eye can find it on the map.
5.4 Colours mean families
Family colours group related sounds. An odd-coloured dot among a group can be a hybrid borrowing from two families.
- Family legend: the map’s families button names each group by its most common sound type, such as Bass, Pad, Lead or Pluck.
- Filter a family: click its legend entry; Alt-click excludes it. Close the legend with ✕. The same clickable legend is in ? help.
- Hover details: the card names the family and marks ★ keeper and ♥ favorite when relevant.
- Keepers: brighter dots grow as you use them, in three steps up to a cap. They have no ring because rings mark layer partners.
- Favorites: a pink ring marks them. It dims while layering so it cannot be mistaken for a layer-partner ring.
5.5 Getting your preset out
To drag a sound off the map into Serum or Finder, just drag its dot straight there — the drag starts immediately, exactly like dragging a name from the list. To pan the map instead, drag an empty patch (not a dot). A quick click on a dot (no drag) still selects and plays it.
The cursor tells you which you'll get: a pointer over a dot (drag it out / click to play), an open hand over empty space (drag to pan).
5.6 Explore with the arrow keys
With a dot selected, press ← ↑ ↓ → to step to the nearest sound in that direction and hear it. Whenever there's a dot that way, an arrow always takes you to it (no dead ends).
To retrace your steps, press the opposite arrow: it steps back to exactly the sound you came from, one hop at a time, so you can wander out and walk right back. Hover any dot to see a quick card about it.
Very isolated sounds stay within a comfortable distance of the main sound map. The map turns automatically to fit wide or tall windows while keeping the spacing between the other sounds, and similarity results stay the same.
5.7 Move around the map
Scroll to zoom in and out (it zooms toward your cursor), drag an empty patch to pan, and double-click anywhere to fit the whole map back into view.
The ⌂ button in the top-left corner does the same reset in one tap, and the ⊕ button next to it zooms straight in on the currently selected sound and centres it.
One key does both: press 0 to toggle — zoomed in (or panned) snaps back to the whole map, and from the whole map it zooms in on the selected sound.
5.8 Swap the axes
By default the map is a pure similarity map — close means alike, and the directions carry no meaning.
The two small menus at the top can instead pin each axis to a real measured value (brightness, attack, sustain, release, stereo width, pitch or loudness), so you can lay the library out as, say, brightness across × attack up. Set the X menu back to similarity map for the default view.
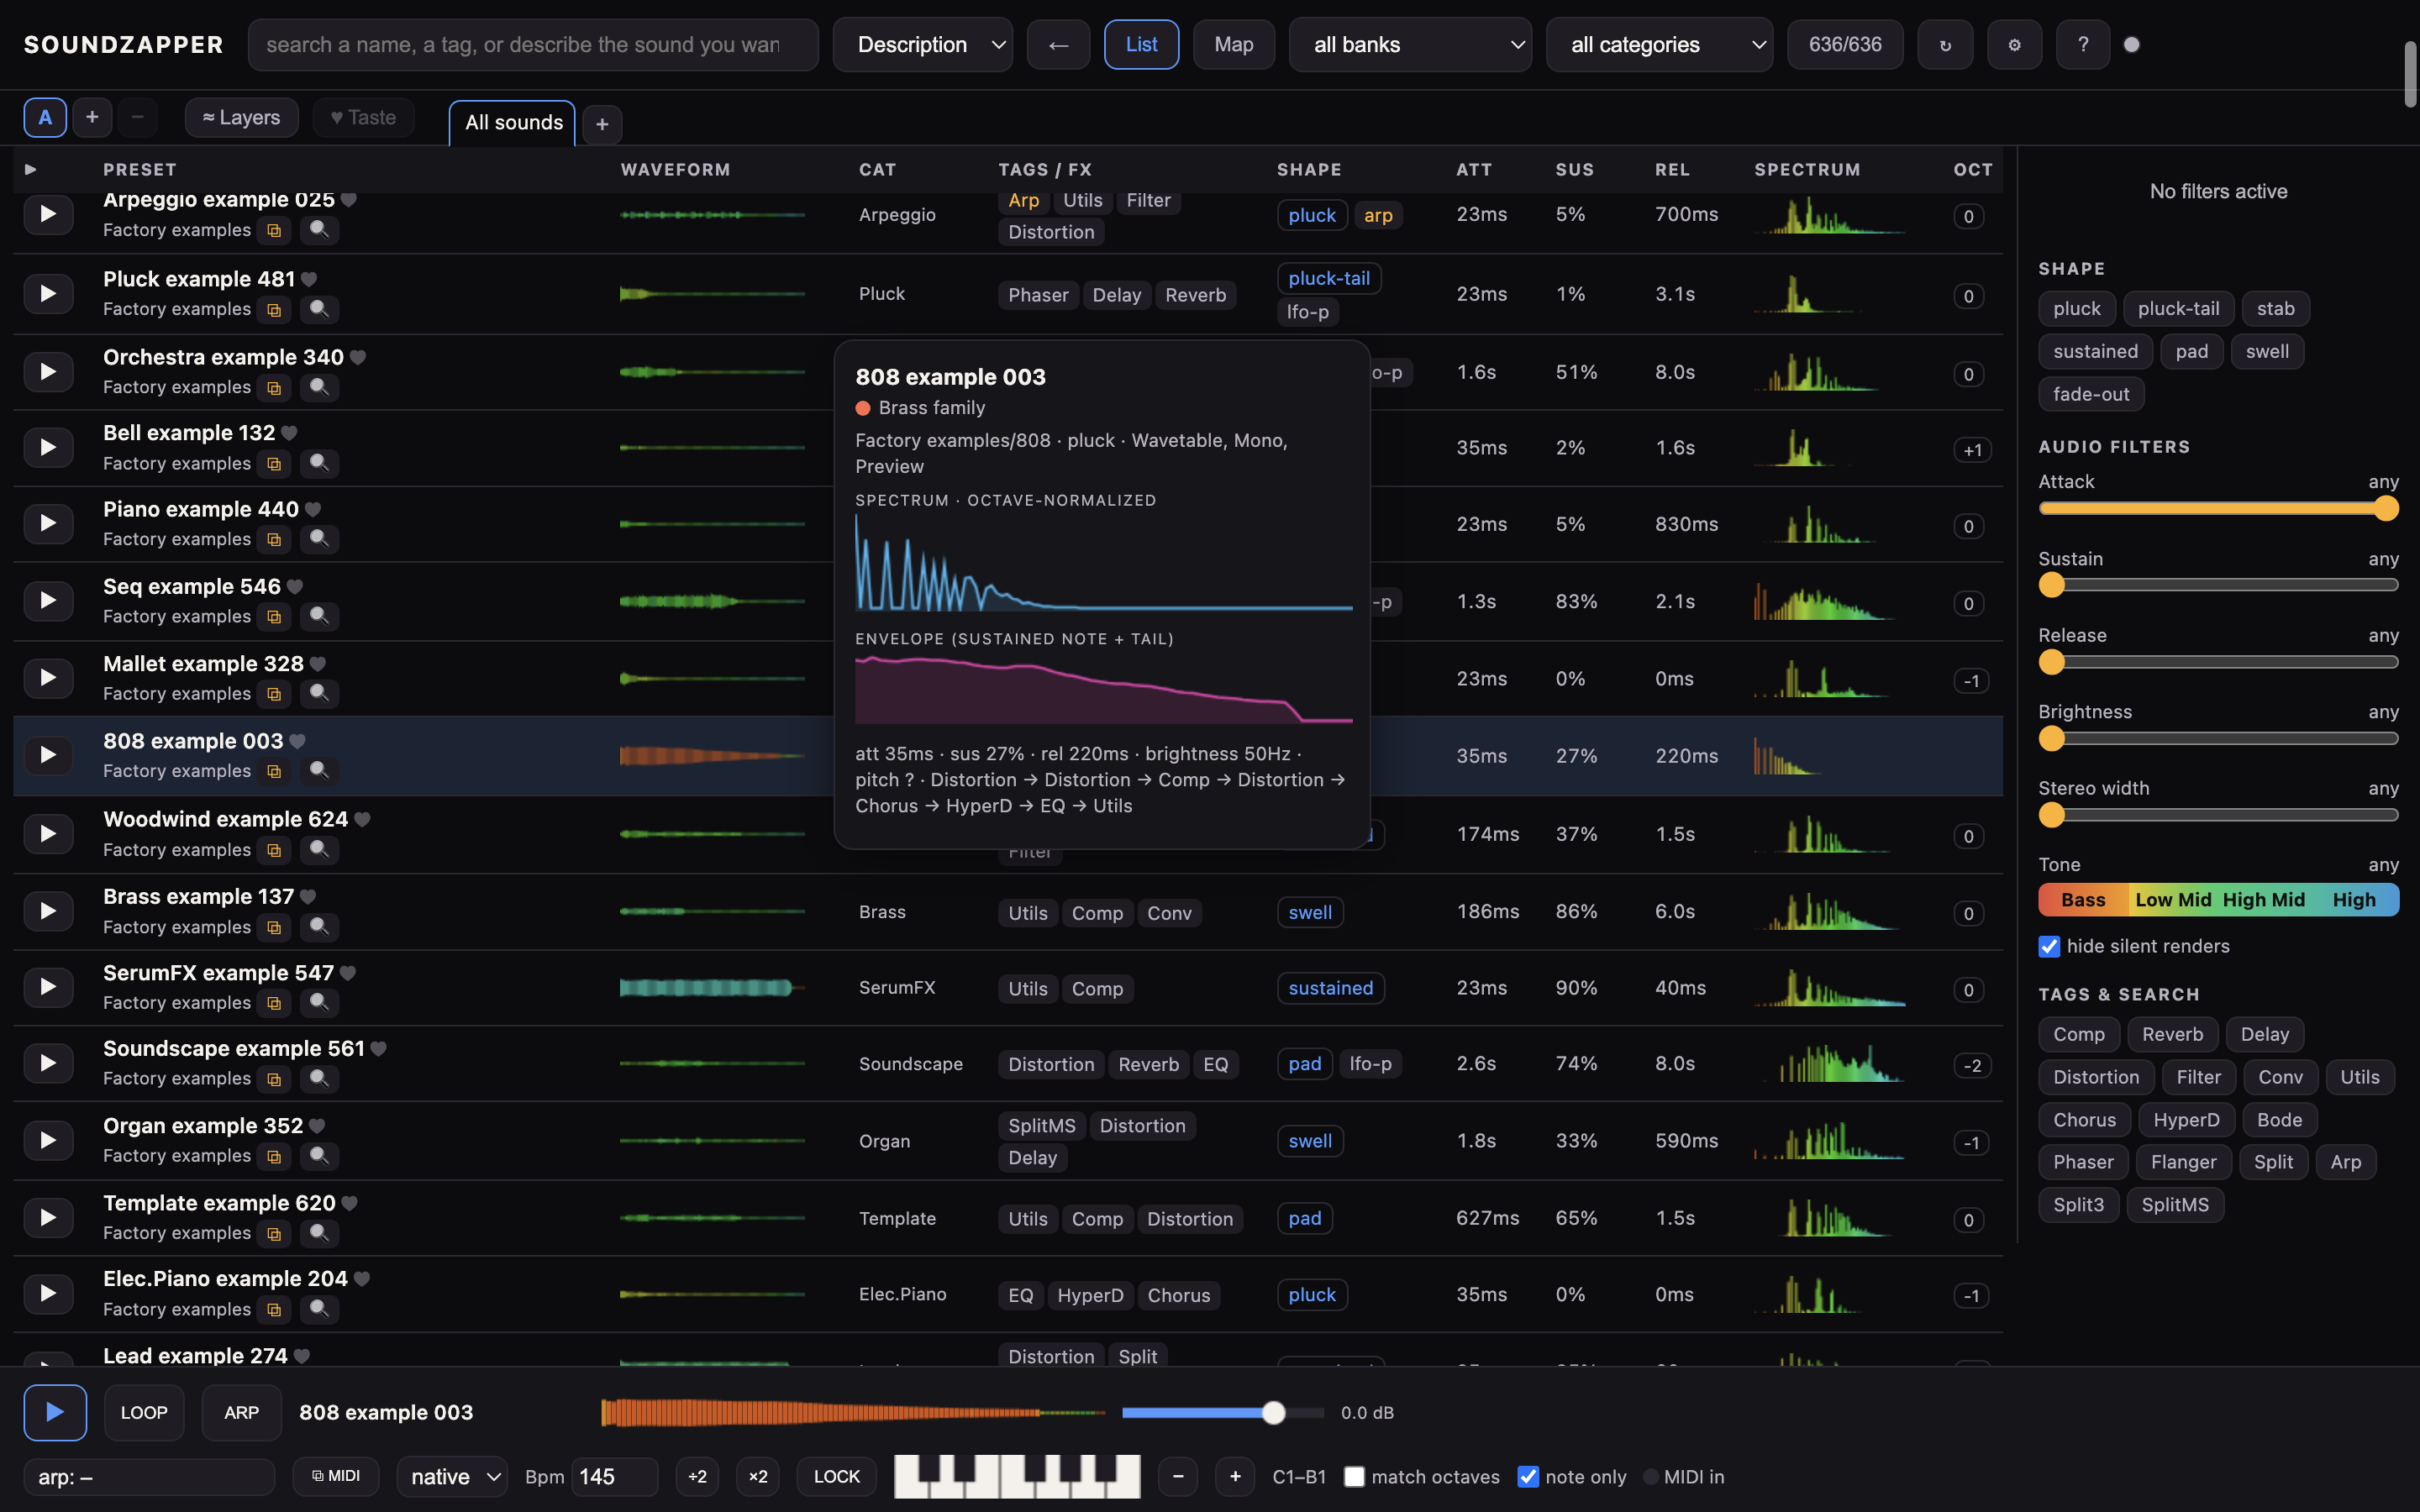
5.9 Hover any sound to peek at it.
Rest your mouse over a row or a dot and a little card pops up with its details — plus two small pictures. On each one, warm colours mean a deep, bassy sound and cool colours mean a bright, airy one.
If the preset has its own built-in arp, the card also shows a tiny piano-roll of that pattern and its length (e.g. "12 steps · 1/16").
Chapter 6Hiding presets
6.1 Hide a sound
Got old or throwaway sounds cluttering the view? Select one and press H to hide it.
6.2 Hiding never touches your library
Nothing is deleted, moved or renamed — hiding is just a personal declutter that lives on this computer. Press H again on a hidden sound to bring it back.
- On the map a hidden sound shows as a dimmed grey dot — still there, just pushed into the background.
- The arrow keys skip it. Stepping through the list or walking the map with the arrows jumps straight over hidden sounds, so they never interrupt your browsing.
- A direct click still plays it. Clicking a hidden dot or a hidden row selects and plays it as normal — hiding only affects the arrows and the visual emphasis, never a deliberate click.
6.3 Push them out of sight completely
In Settings → Browsing turn on hide hidden sounds fully and hidden sounds vanish from the list and the map entirely (no grey dots at all). Turn it off to get the greyed, arrow-skipped dots back.
6.4 Bring everything back
The same Browsing panel shows how many sounds you've hidden and offers an Unhide all button that clears the whole hidden set in one click.
Chapter 7Playing a sound
Choose a topic · 13 short sections
7.1 Click any row or dot to hear it.
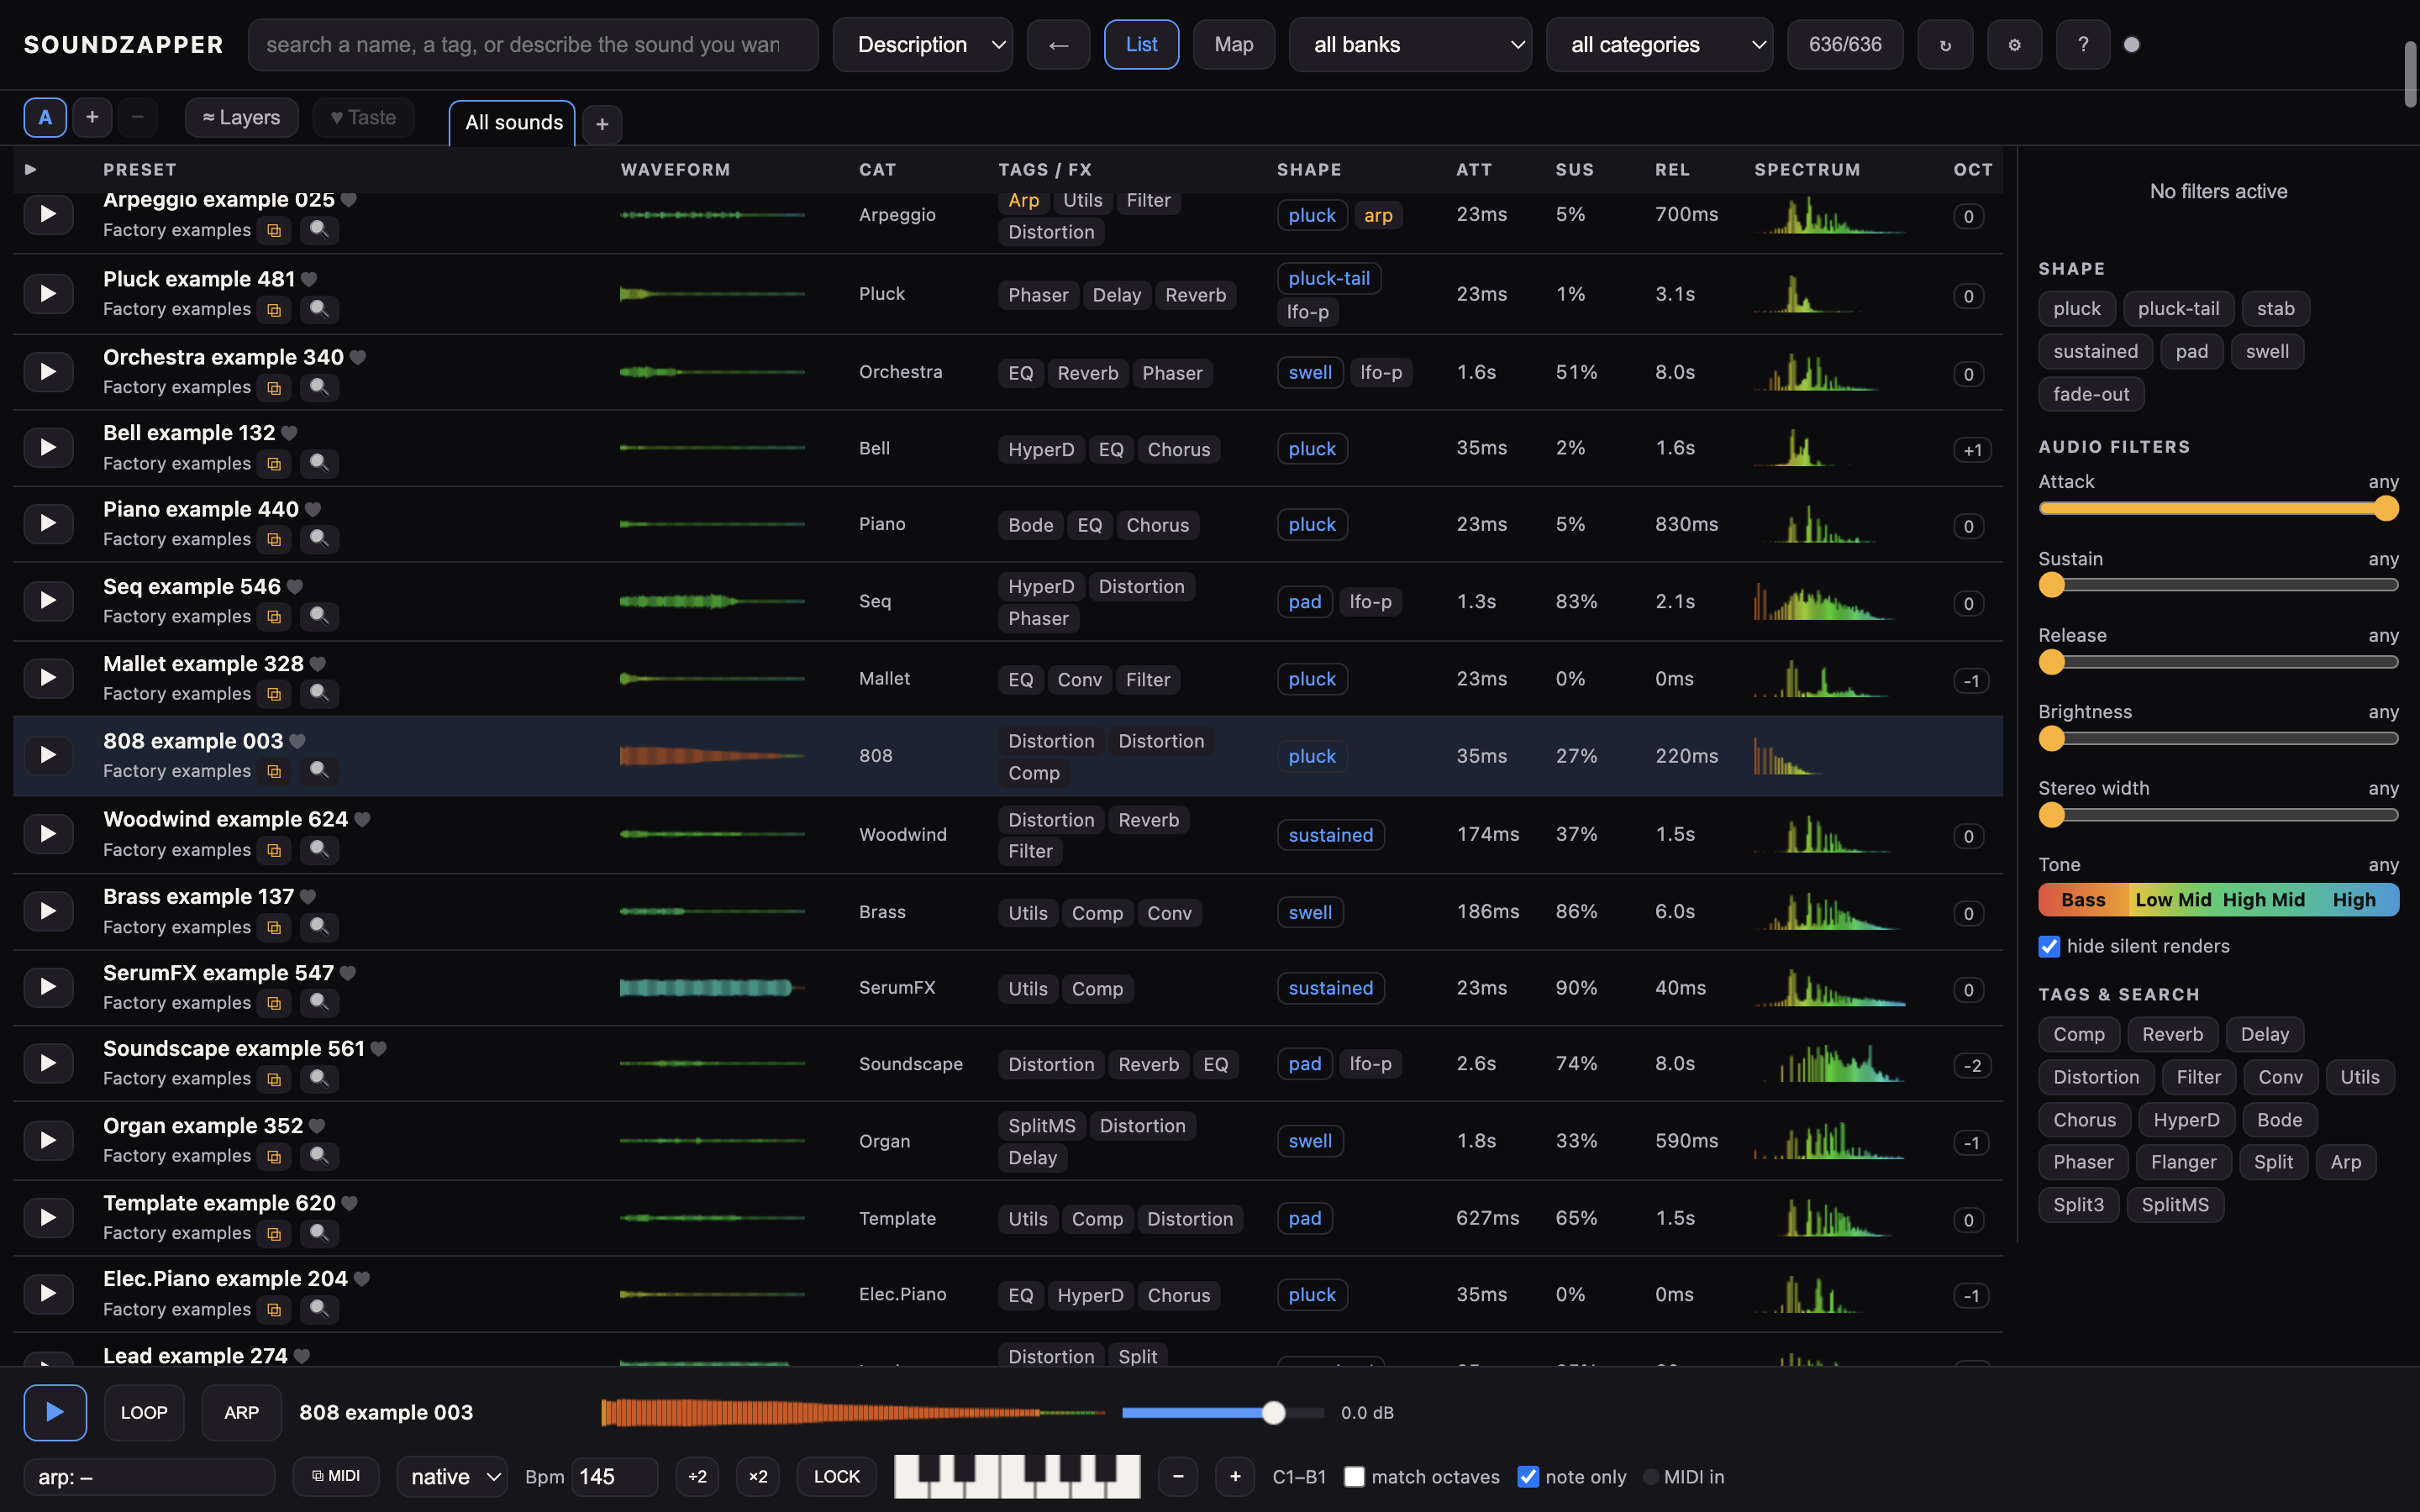
The player bar at the bottom controls playback.
Left to right it runs: play/pause, LOOP, ARP, the preset name, the waveform and the volume fader; then the arp group (arp pattern, ⧉ MIDI, note length); then the tempo group (Bpm, ÷2, ×2, LOCK, the little keyboard and its octave − / + with the locked-note readout); and finally the match octaves and note only toggles.
On a narrow window everything past the volume wraps onto a second row in that same order.
7.2 Play / pause button
click to start or stop. It glows green while a sound is playing and blue when stopped. Space does the same.
7.3 Loop
keep the preview repeating over and over.
7.4 Volume fader
drag to set the level. Double-click it to snap back to normal (0 dB).
7.5 The little keyboard
Click a piano key to lock the audition note; click it again to unlock. With no sound selected, a key plays the first sound in your current list.
Every preset then auditions at that note. Note names follow Ableton Live: middle C is C3. The octave buttons move the root up or down.
Pitch-locked arps retain their tempo. An instant preview plays first, followed by the fully rendered pitch-shifted sound a moment later. Plain tones use a quick pitch shift.
7.6 Octave − / +
shift the locked note (and the arp) up or down an octave.
7.7 note only
on by default, this plays just the held note. Turn it off to hear the little intro run (a quick note flourish) before the held note.
7.8 match octaves
some presets sound much higher or lower than the note you press. Turn this on to pull them all into the same range so they're easy to compare. It adjusts both recorded previews and the notes SoundZapper sends to Serum, so switching between WAV and Serum keeps the same sounding range.
What you export is what you hear: ⌘C, shift+drag of the player name, Copy wav and the arp MIDI/audio export all carry the same adjustment, so a pasted clip sits at the pitch you just auditioned.
7.9 one-shot (arp off)
appears when an arp is on. It plays the sound through once instead of looping the arp round and round.
7.10 Bpm and LOCK
type your track's tempo in the Bpm box and press LOCK to hear previews in time with your song, without changing their pitch. The ÷2 and ×2 buttons next to it halve or double the tempo in one tap (handy for half-time feels). Tempo lock pauses while a piano key is locked or match octaves needs to shift the selected sound. Its tooltip explains why; unlock the key and turn off match octaves to use tempo lock again.
7.11 The waveform
click anywhere on it to jump to that spot in the sound.
7.12 Compare A / B / C
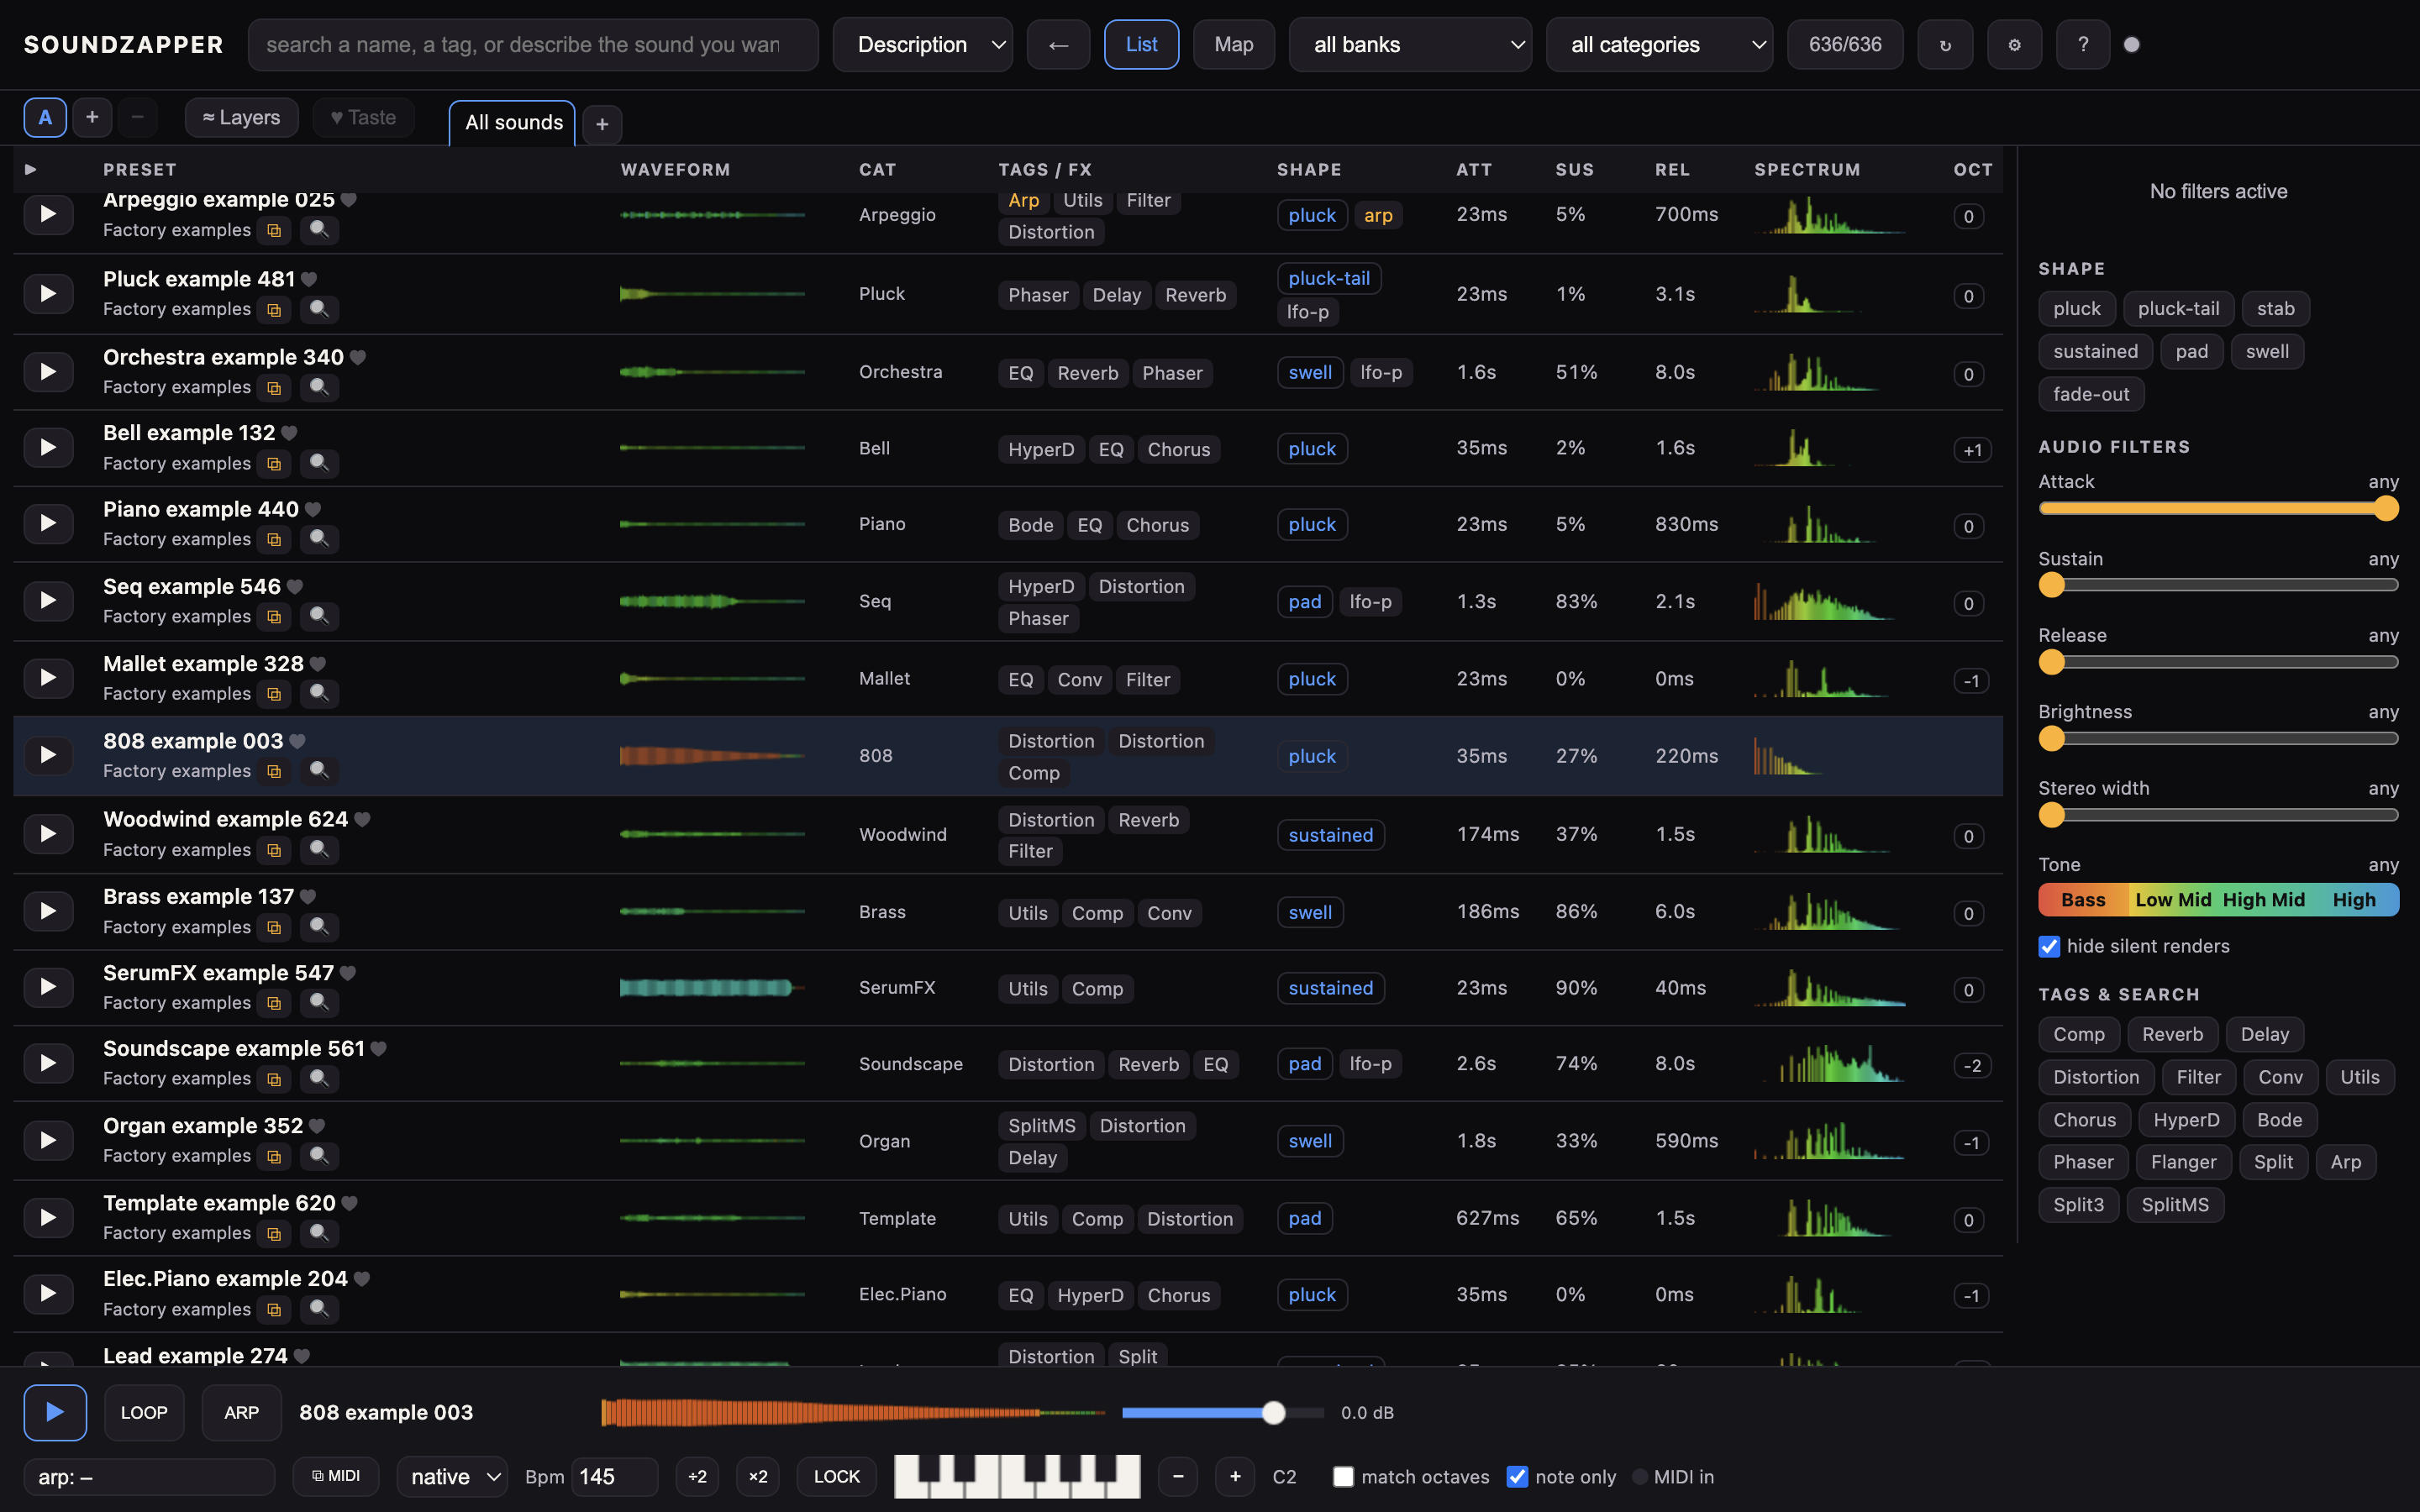
Compare A / B / C one sound at a time
- Choose slot A, then pick a candidate sound.
- Click an empty B or C slot before choosing another sound. A new choice replaces the sound in the current blue-bordered slot.
- Click A, B or C to recall one candidate at a time. Normal slot recall does not turn on a layer stack.
Use a consistent note and octave setting when comparing. Add or remove slots with + / −; press and hold a slot, then drag, to export its preset.
7.13 Try another set with Randomize
Randomize changes every populated slot, including when preview layers are off. It does not start playback. Save unsaved Serum edits before browsing or randomizing: preset switching replaces the plugin’s current sound.
Chapter 8Arps
Melodies imported from Ableton projects are grouped by project and named after their MIDI track, for example LD Space 1 and LD Space 2. Only melodic patterns with multiple pitches and note onsets enter these project packs; single hits and one-pitch rhythms stay out.
Source projects are read-only and are copied into the app project’s temporary folder before extraction.
8.1 Turn a single sound into a moving pattern.
An arp (arpeggio) plays a repeating run of notes instead of one held note. SoundZapper gathers patterns from your own presets, plus a few basic ones.
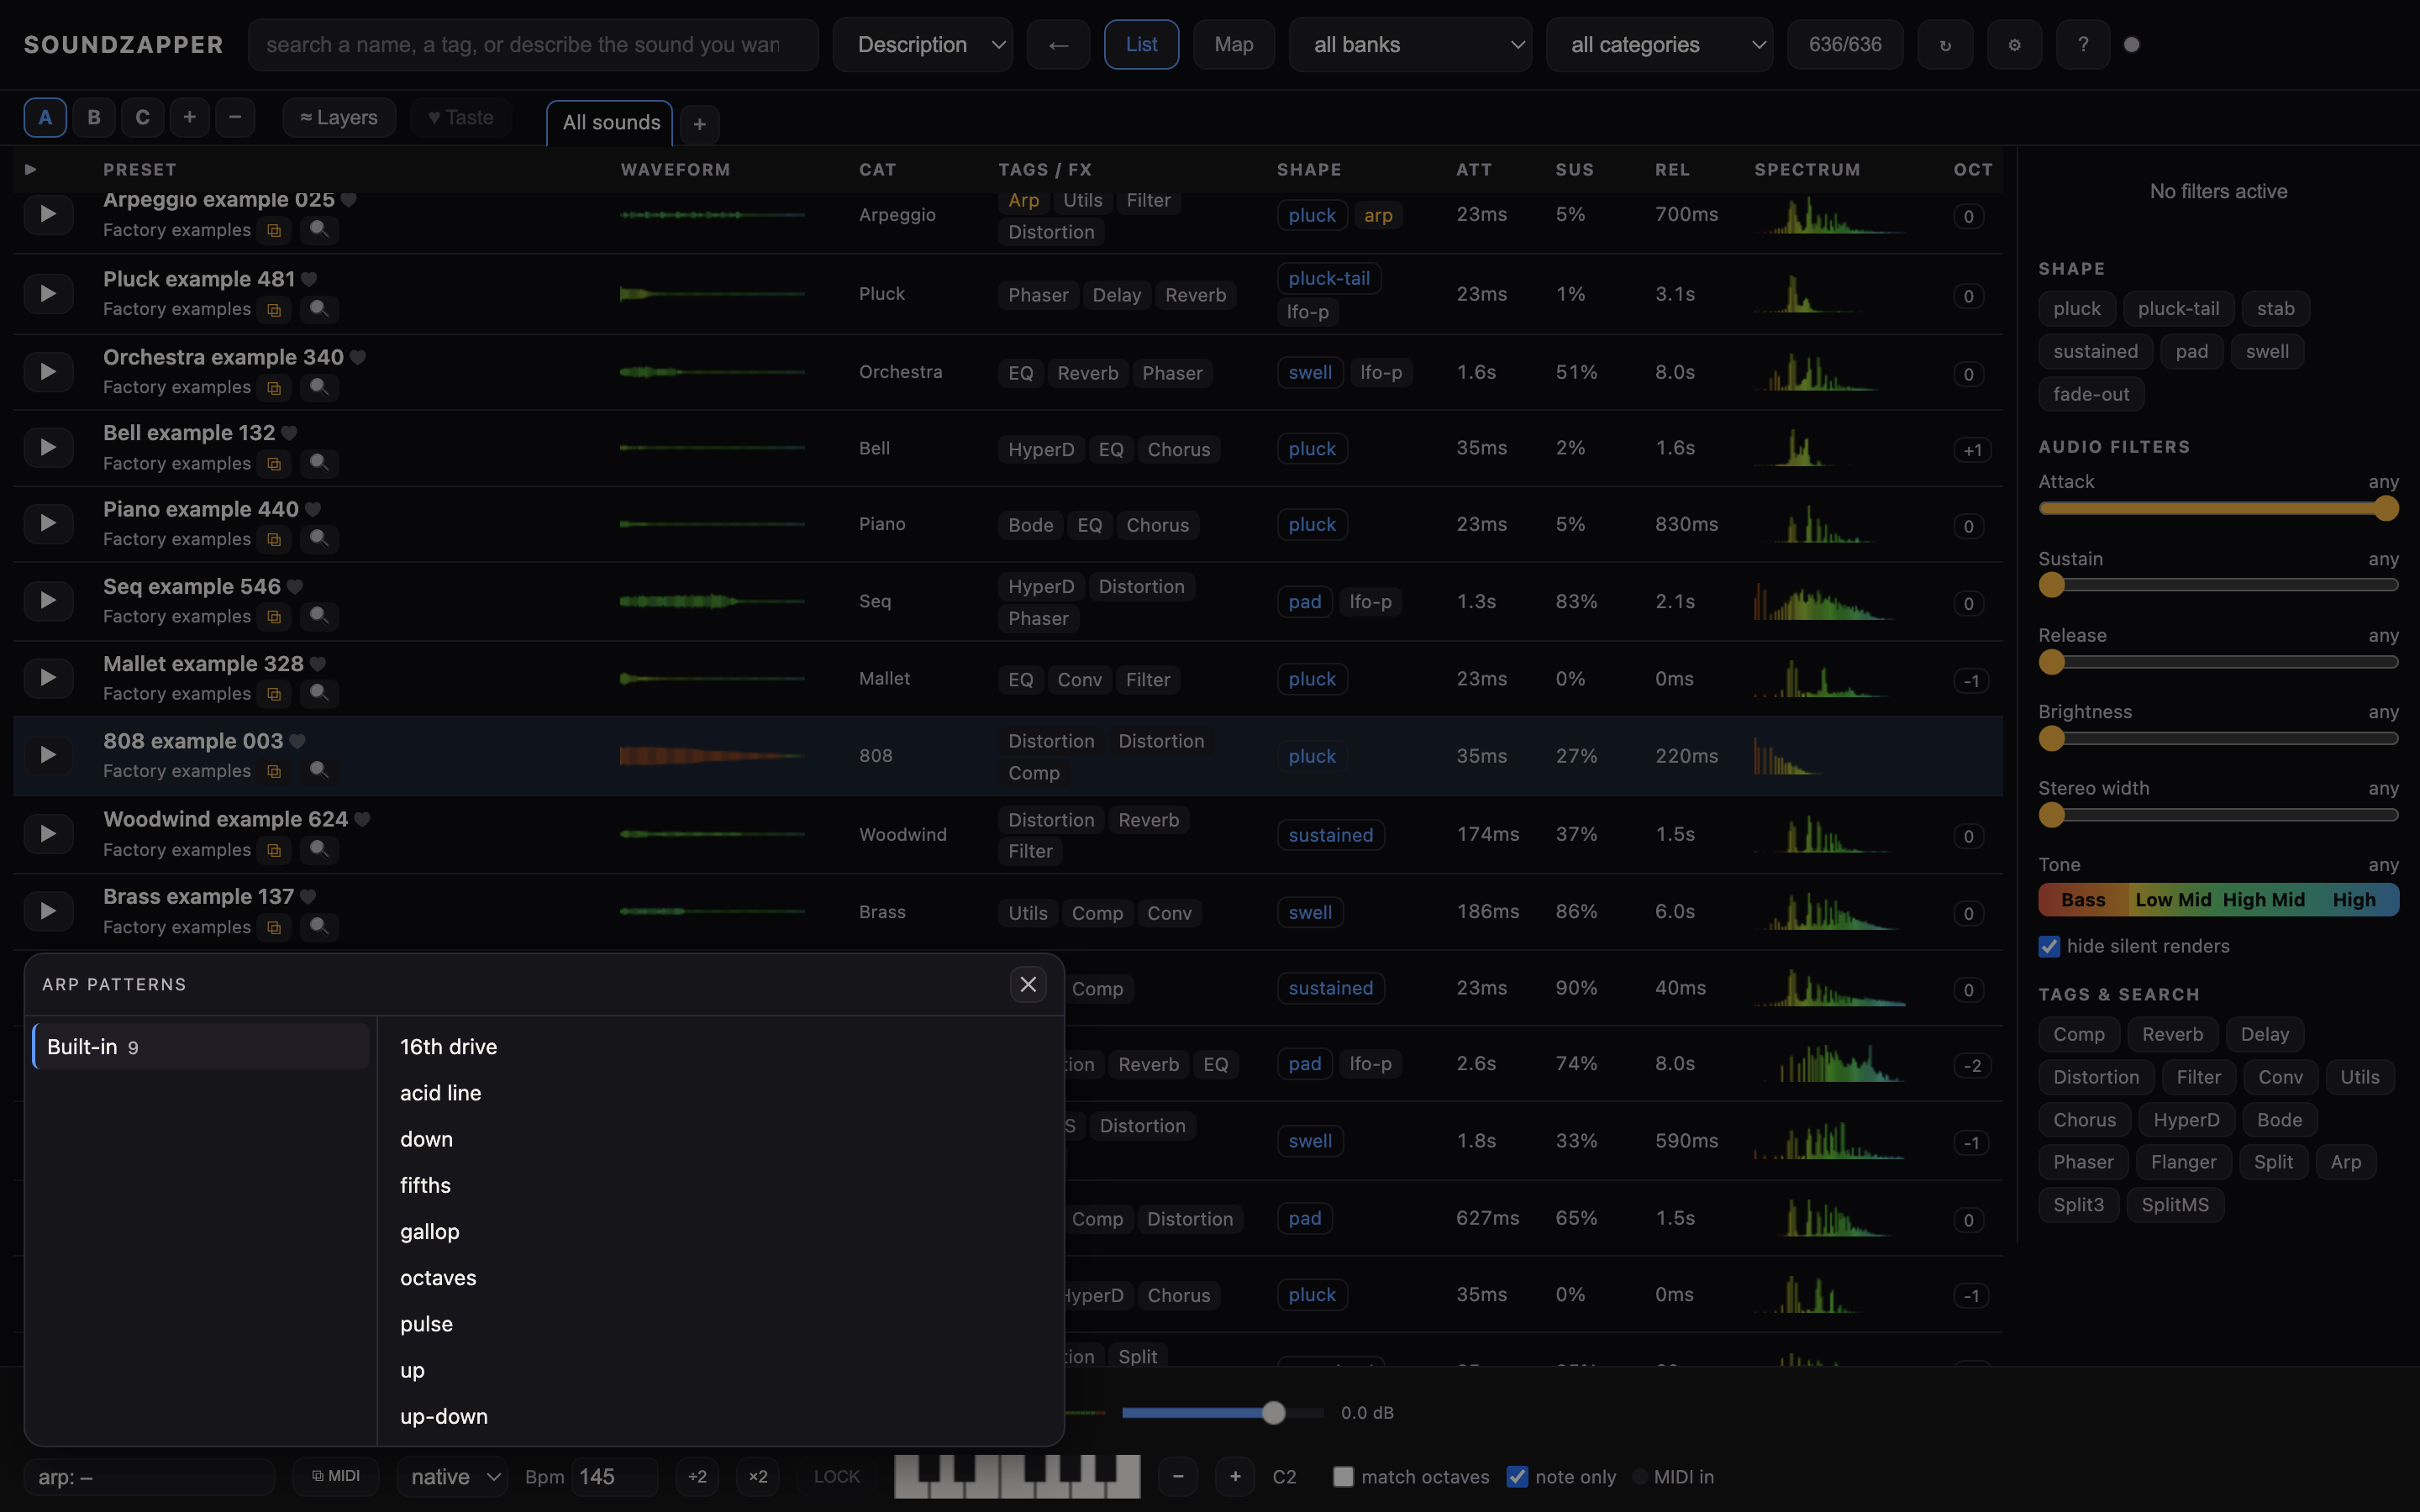
- Pick a pattern from the arp: button. It opens a two-column browser: on the left the packs (Built-in shapes, Preset arps harvested from your presets, then one pack per song), on the right the arps in the pack you're hovering. Song packs show the source MIDI track name and variation number, without repeated headings. Preset arps follow the library folders, which expand on hover. Click an arp to hear the selected sound played through it.
- Make your own packs — drop a folder of MIDI files into the custom_arps folder inside your storage folder (the one you picked in Settings) and it shows up as its own pack automatically. Each sub-folder becomes one pack. The song packs are filled the same way when you extract MIDI from your Ableton projects.
- Note length sets how fast the steps go. native keeps the pattern's own speed (it also shows that speed as a division, e.g. native (1/8)); or choose 1/16, 1/8, 1/4 and so on to match your track.
- ⧉ MIDI — copy the pattern as a MIDI clip. Paste or drag it straight onto a MIDI track in your song to keep the exact notes.
- Flip through arps with Shift+↑ / Shift+↓ (it crosses from one pack into the next), or jump a whole pack with ⌥+Shift+↑ / ↓. Hovering the arp button shows a little preview of the pattern. Esc or a click outside closes the browser.
Chapter 9MIDI from your DAW
9.1 Play incoming MIDI
Feed notes from Ableton (or any MIDI keyboard) into SoundZapper — two easy ways.
9.2 Drop a clip
Drag a MIDI clip straight out of Live onto SoundZapper's list or map (Live hands over a .alc clip file). You can also drop a project .als (all its clips come in, pick the one you want in the arp browser) or a plain .mid file.
SoundZapper turns the notes into a custom arp, names it after the clip, and immediately plays it on the sound you have selected — the status line says "loaded … as an arp — playing it on the current sound".
The new pattern lives in a Dropped clips pack in the arp browser so you can reuse it later. Or just export the clip as MIDI from Live and drop that — same result.
9.3 Play it live (like a Push)
SoundZapper listens to MIDI keyboards and to Ableton over the Mac's built-in IAC bus. One-time setup: open Audio MIDI Setup, double-click the IAC Driver and tick "Device is online"; back in Live, set a MIDI track's MIDI To to IAC Driver. Now the notes you play (or the clip you run) sound the selected preset at those pitches.
A small MIDI in dot in the player bar lights up while notes arrive. Notes play polyphonically — hold a chord and it rings. Recorded previews use the held-note part of the sound, so holding a key does not run into other notes from its introductory phrase.
9.4 Master switch: live MIDI or the built-in sample
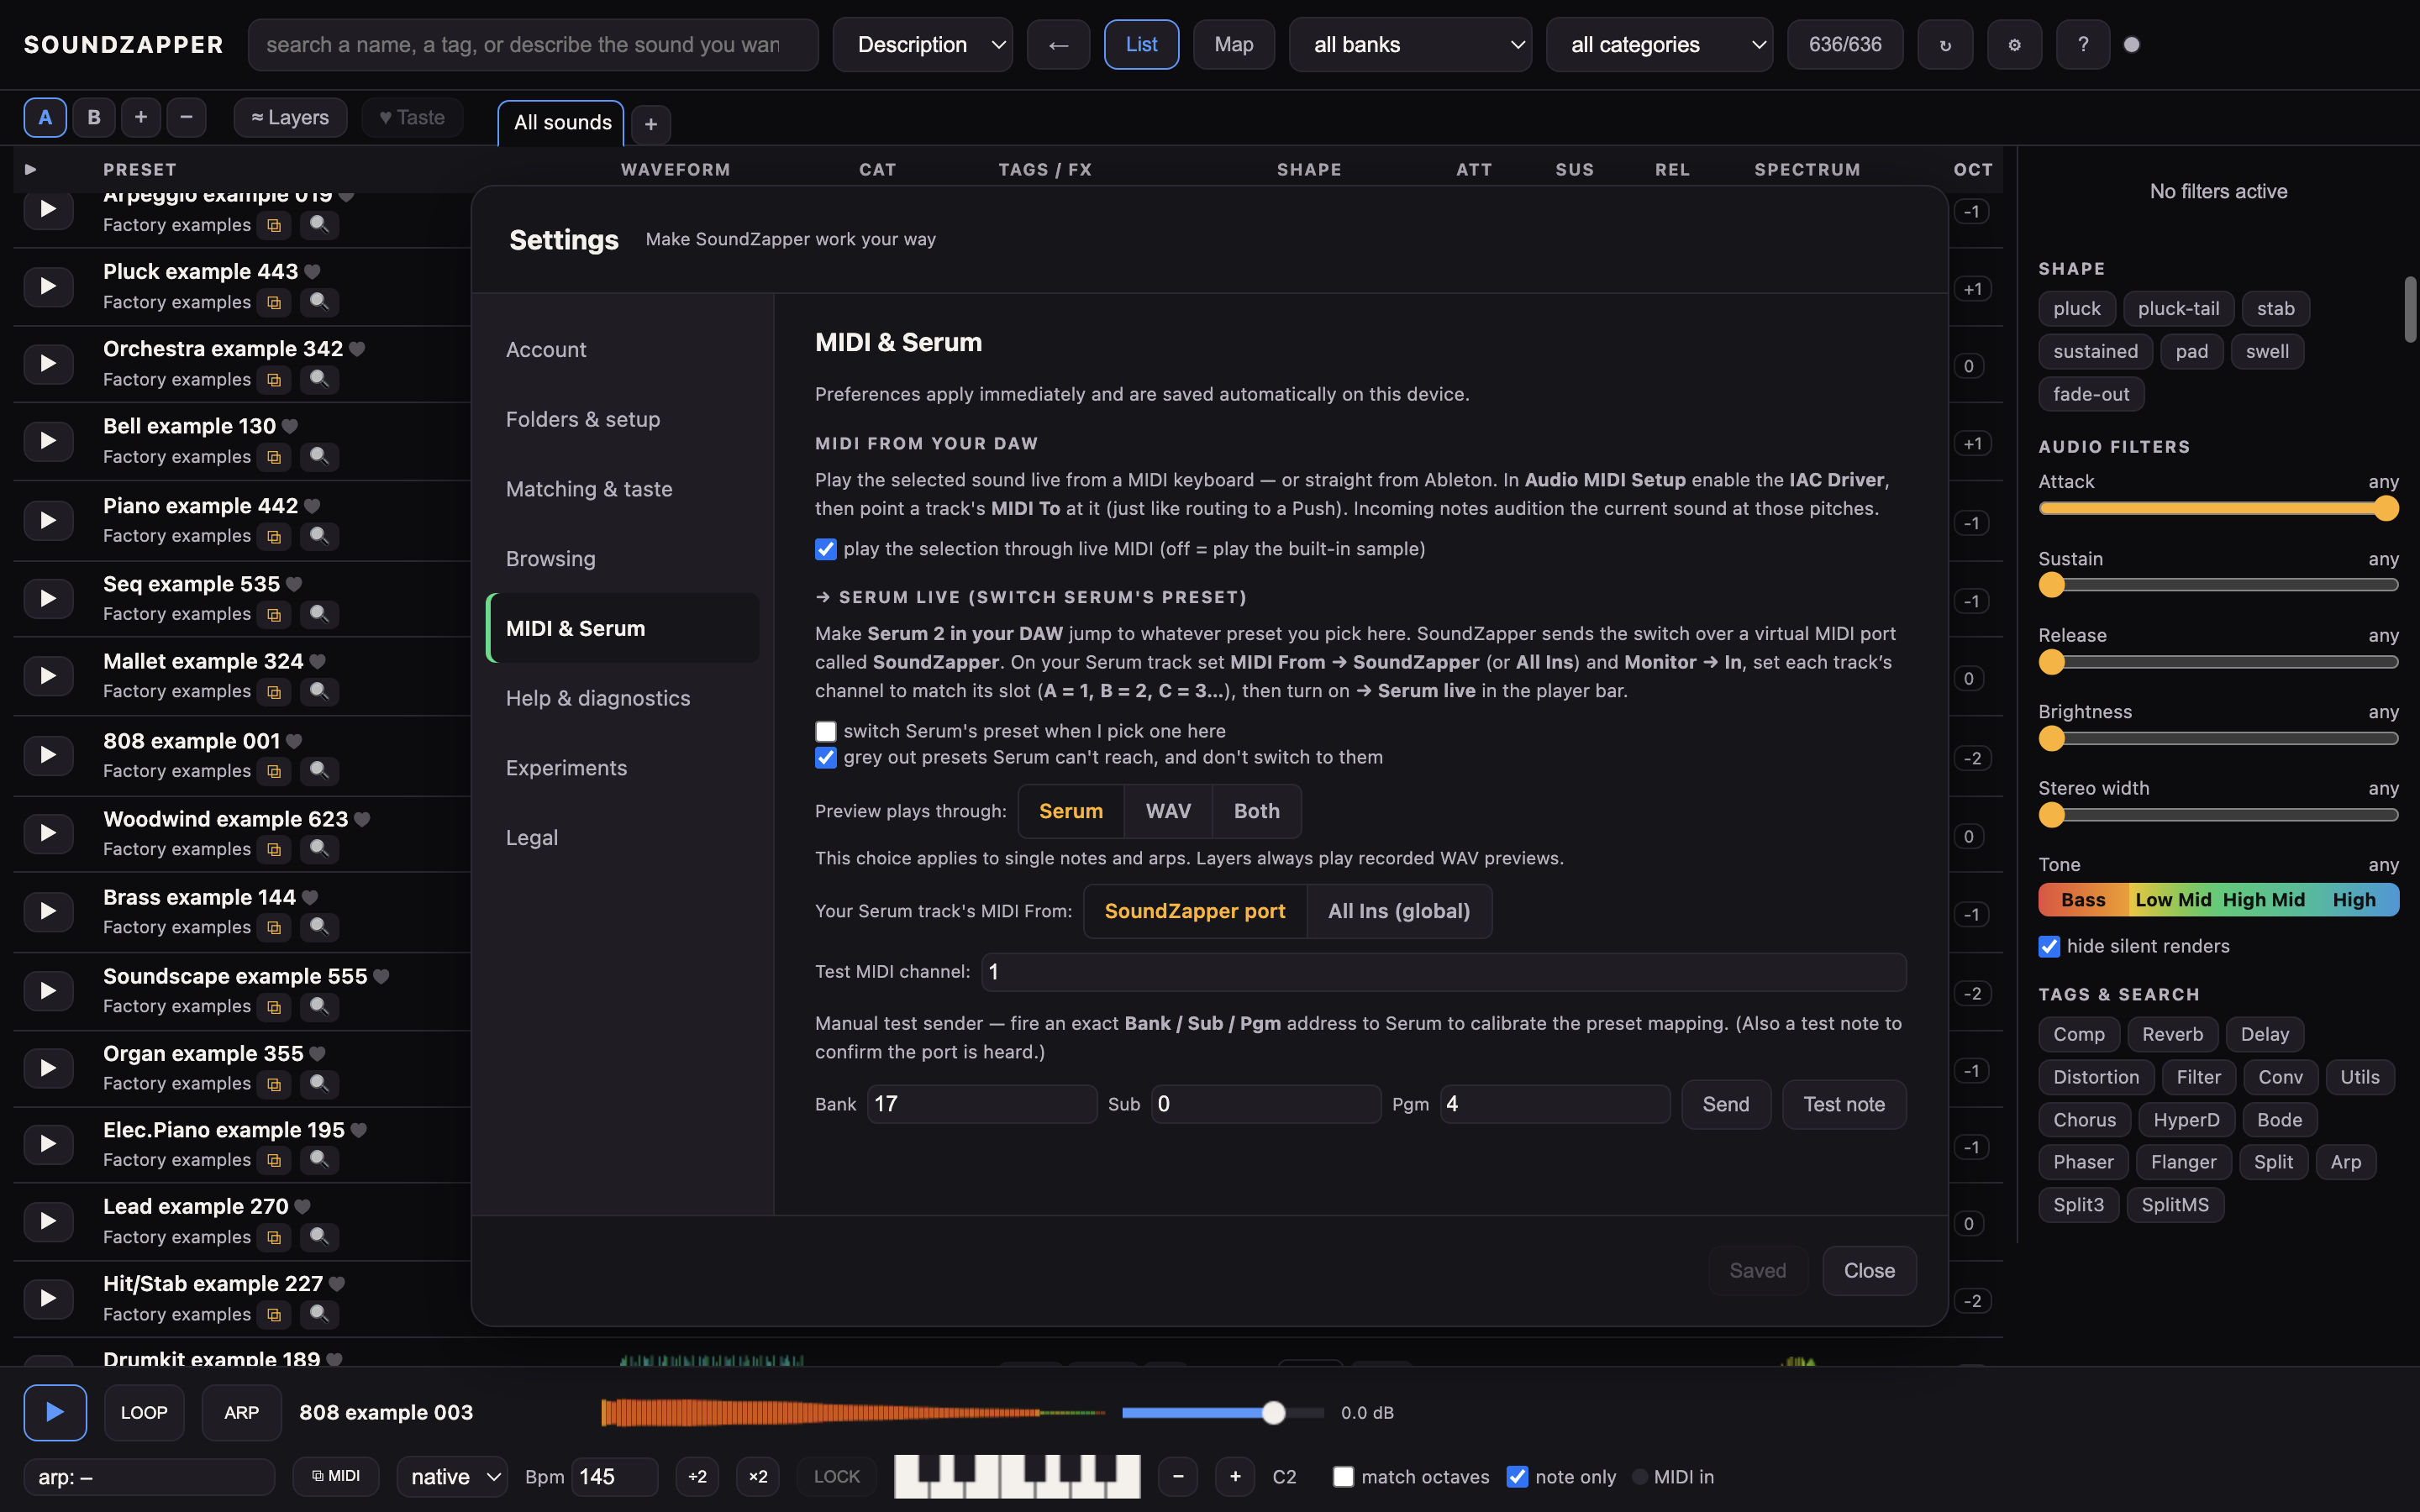
The Settings → MIDI & Serum → play the selection through live MIDI checkbox decides where the selected sound plays. On (the default): Play and any incoming MIDI note play the selection through live MIDI — into Serum 2 when → Serum live is on, otherwise SoundZapper's own preview.
Off: the selection plays from SoundZapper's built-in sample instead, no notes are sent to Serum, and MIDI keyboards are ignored. Switching Serum's preset when you pick one (→ Serum live) is independent — it still follows your selection either way, silently.
This is for auditioning — hearing a preset under your own playing. It uses the same quick previews as the little keyboard, so it's not a zero-latency instrument and it doesn't record back into your DAW.
Chapter 10→ Serum live
Choose a topic · 10 short sections
10.1 Hear presets in your track
Make Serum 2 in your DAW jump to whatever preset you pick in SoundZapper, so you can browse here and hear it through your own track, effects and mix.
10.2 One-time routing
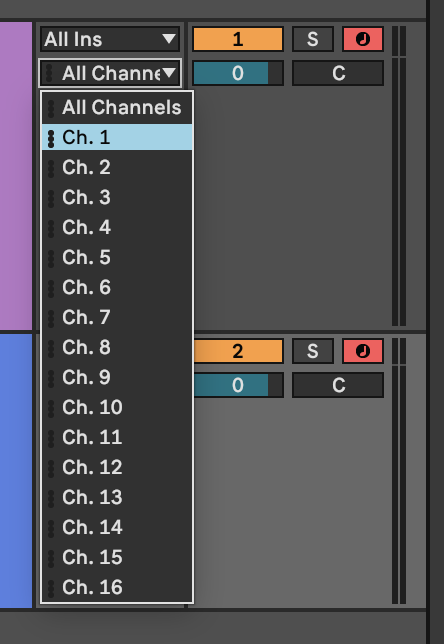
SoundZapper creates a virtual MIDI port called SoundZapper (it appears in your DAW like a plugged-in controller). On the track that hosts Serum 2, set MIDI From → SoundZapper (or All Ins if you'd rather leave it open to everything) and set Monitor → In so the track listens even when it isn't armed.
Pick which one you use under Settings → MIDI & Serum → Your Serum track's MIDI From so the on-screen hint matches your setup.
10.3 One channel per slot
- Load Serum 2 on a MIDI track in Ableton.
- Set MIDI From to SoundZapper, or use All Ins.
- Choose Ch. 1 for slot A, Ch. 2 for B, Ch. 3 for C, and so on, when separate Serum tracks should follow separate slots. Choose All Channels when you do not need that separation.
- Set Monitor → In for continuous auditioning, including while clips play. With Monitor → Auto, use the red arm button and stop any playing clip on that track. SoundZapper does not arm DAW tracks for you.
- Enable → Serum live in SoundZapper, then select a sound in the intended populated slot.
The manual test channel in Settings affects only the test sender. Normal preset changes still use the slot’s channel. MIDI routing does not automatically build a multi-Serum layer stack.
10.4 Turn it on
Flip → Serum live in the player bar. Now every preset you select here — by clicking a dot on the map, arrowing through the list, or picking a row — tells Serum to switch to the matching preset. The preset switch is sent as a MIDI message.
If a preset can't be matched yet you'll see a quiet note in the status line and nothing is sent (the mapping is still being calibrated).
10.5 Layers use recorded previews
The Serum / WAV / Both choice below applies to single-note and arp previews. Choose WAV or Both to hear the full recorded layer stack. Serum-only auditioning plays the selected slot; MIDI routing does not automatically create a multi-Serum stack.
10.6 Choose Serum, WAV or Both
When Serum live is on, Play can audition the real plugin in your DAW.
While → Serum live is on, hitting Play (or the spacebar) can sound the actual Serum in your DAW instead of SoundZapper's rendered preview — no render wait, the plugin itself. Choose what you hear under Settings → MIDI & Serum → Preview plays through:
- Serum (the default while → Serum live is on): Play sends the note straight into Serum and mutes SoundZapper's own preview, so you hear the real plugin.
- WAV: Play the rendered preview like normal. Serum still switches to the picked preset when you select it — it just doesn't play notes into Serum.
- Both: play the rendered preview and drive the real Serum together, handy to A/B them. Two sources at once can sound a little phasey — that's expected.
It works for a single note and for the arp: turn the arp on (the ARP button or the a key) and the pattern plays into Serum, transposed to your locked root just like the on-screen arp.
Because Serum has one preset loaded at a time, the arp drives the selected preset only (it ignores layer slots when it plays into Serum). Both the single note and the arp wait a split second after switching preset before they sound, so the preset has time to load and the opening notes aren't clipped.
When → Serum live is off, Play always uses the WAV.
10.7 Silence controller mode without losing preset-switching
If you'd rather Serum not play notes at all — only follow your selection so you can trigger it from your own DAW clips — turn off Settings → MIDI & Serum → play the selection through live MIDI.
With that off, Play plays SoundZapper's built-in sample, nothing is sent into Serum, but → Serum live still switches Serum's preset every time you pick one.
10.8 Which presets Serum can reach
Preset switching uses MIDI Bank and Program-Change addresses. Serum can reach the first 127 folders and the first 128 presets in each folder. Later entries have no switch address.
- While → Serum live is on, unreachable presets are greyed and selecting them does not switch Serum. A status note explains why.
- Choose WAV to hear an unreachable preset in SoundZapper. Serum remains silent until you choose a reachable preset.
- Grey out presets Serum can’t reach can be turned off in Settings → MIDI & Serum. This changes their appearance, never the address limit or the refusal to send notes.
- If you want more presets within MIDI reach, reorganise your own library into fewer, smaller folders, or hide sounds you do not need live with H / Settings → Browsing. SoundZapper does not rearrange library files.
The first activation with out-of-range presets explains this limit; Do not show again hides future reminders. If no presets are reachable, the status line points out that the library may need a rescan.
10.9 Calibrate / test
Under the toggle in Settings there's a manual test sender: type a Bank / Sub / Pgm and hit Send to fire that exact address at Serum, or Test note to confirm your Serum track actually hears the SoundZapper port. Use the MIDI channel box (default 1) if your track filters by channel.
10.10 Follow Ableton’s timing (optional)
Changing tempo while an arp runs adjusts the ongoing phrase without restarting it. The updated bridge supplies Ableton timing; the virtual MIDI port alone does not.
With the updated SoundZapper Max for Live bridge loaded, the app follows Ableton’s tempo. Live Serum auditions start on the next boundary of Ableton’s Global Launch Quantization, including triplets and bar lengths in your time signature. The pattern’s note division remains your choice. This is best-effort audition timing, not sample-accurate recording.
Long waits show a message; press Space to stop. If Ableton is stopped, quantization is None, or timing is missing or stale, the sound starts without waiting for the DAW. The app keeps the last tempo, and you can still set tempo and division yourself.
The virtual MIDI connection alone does not supply DAW timing; other DAWs continue with local timing.
This feature lives in the desktop app (it needs the built-in MIDI bridge). In a plain browser tab the toggle simply doesn't appear.
Chapter 11Layering sounds
Choose a topic · 11 short sections
11.1 Build a layer stack
11.2 The slots (A / B / C…)
the letter bar under the top holds presets you've parked. Whatever you click always lands in the current slot (the one with the blue border). Click a letter to bring that preset back. Use + and − to add or remove slots.
Press and hold a slot for a moment, then drag, to pull its preset file straight into Serum or Finder.
11.3 Arm layers to stack them
Shift+click a slot (or press Shift+A…H) to turn it green. Green slots are layered, so pressing Play sounds them all together at once. A plain click on any letter clears the layering and goes back to playing one sound at a time.
11.4 Find great partners
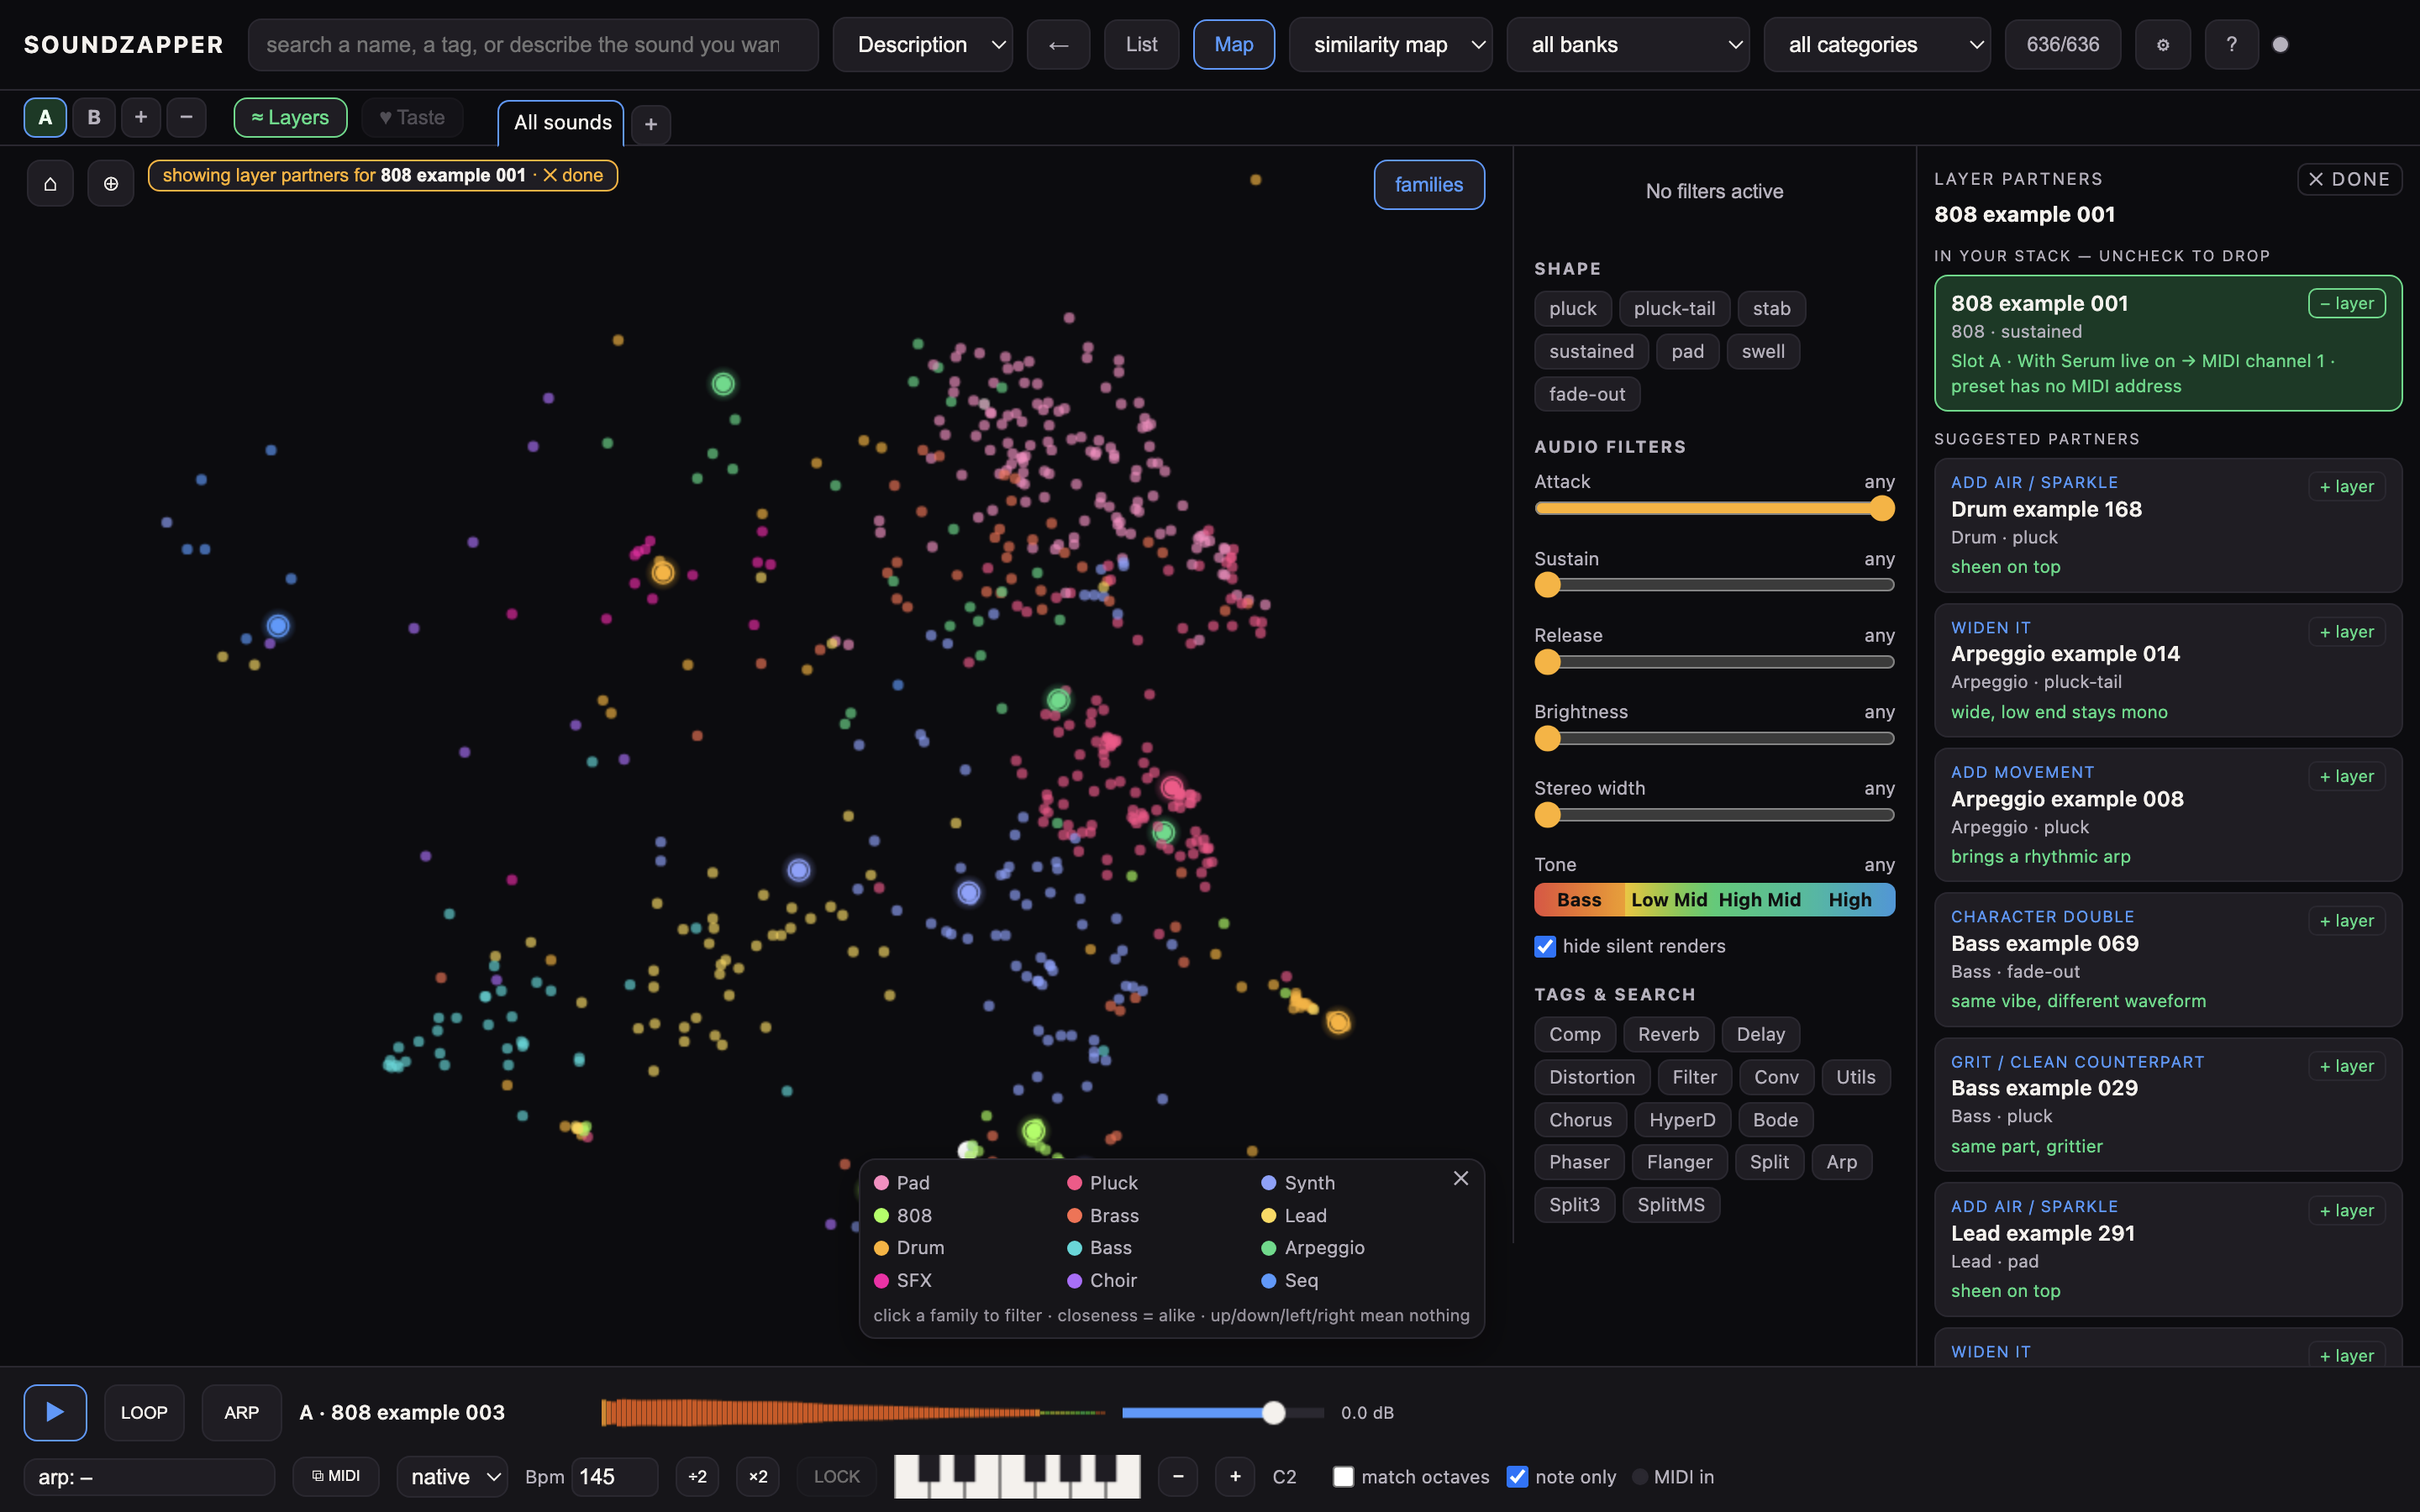
Press the ≈ Layers button (or press L). A panel opens next to the filters and the map makes room for it. It lists presets that would stack well with your current sound — sounds that fill the gaps instead of fighting each other. On the Map those partners also glow.
Click a suggestion to hear it layered under your sound (click again to stop); tap + layer to keep it. The list never runs out: just keep scrolling and more ideas load.
11.5 It matches the sound of the whole stack
The partners aren't chosen from one seed preset — SoundZapper actually mixes the green (layered) sounds together and finds presets that match that combined timbre, balanced the same way playback is. So two layers that together read as a bright pluck get bright-pluck partners, even if neither one alone would.
With a single sound armed it's the same as finding partners for that one sound. (Building the mix takes a moment, so the panel briefly shows a busy label while it works.)
11.6 The active slot is the root
Whichever slot is current (and whichever slots are green) is what the partners are ranked against. Click a slot letter and the suggestions and the glowing map dots re-root live to that stack.
Click a dot on the Map and that sound fills the current slot and immediately shows up in your stack, with fresh partners underneath — one sound per slot (a new pick replaces what was there).
11.7 Every suggestion tells you why
Instead of one long ranked list, the partners are sorted into the moves a producer actually makes, and each row says which one it is in plain words:
- Add sub weight — anchors the low end when your stack has no sub. Kept mono; a wide low sound is flagged "high-pass for mono safety".
- Reinforce body — fills a hole in the mids (roughly 250 Hz–2 kHz) with a same-vibe sound.
- Add air / sparkle — sheen on top when the stack rolls off dark.
- Add attack / bite — a short, percussive front for a sound with a slow attack (with a note on whether to align the onsets to fuse them or nudge them apart to stay distinct).
- Widen it — a wide sound when the stack is narrow. Above the low end only, so the bass stays mono.
- Add movement — a sweep or an arp when everything in the stack sits still.
- Character double — the same vibe on a different waveform, to thicken without phasing.
- Grit / clean counterpart — the same part in the opposite texture (a gritty version of a clean sound, or the reverse).
A few hard rules run underneath, not as sliders: only one sub layer, keep everything below ~200 Hz mono, prefer partners whose main frequencies land in a gap in your stack, and a caution when two sounds both crowd the harsh 2–5 kHz zone ("scoop mids on one").
11.8 It follows your stack
Once you tap + layer, the kept sound is pinned at the top of the panel and the suggestions re-rank around the whole mixed stack, not just the sound you started from — so after you add a sub, it stops suggesting more subs and starts offering air or movement instead.
Uncheck a pinned sound to drop it again.
11.9 Drag straight out
Every row is a real file: drag it into Serum or Finder to keep the preset, exactly like a row in the list.
11.10 Arm layers to hear them together
The kept sounds live in the green slots (see above), so pressing Play sounds the whole stack at once. A plain click on any slot letter clears the layering and goes back to one sound at a time.
11.11 Recall one sound or hear the stack
With ≈ Layers open, clicking a slot toggles layer membership without Shift. Closing the panel returns slot clicks to one-sound recall.
Leaving ≈ Layers with its button, ✕ done or L stops the stack and returns to your starting sound alone. The slots keep their presets.
Chapter 12Getting sounds into your music
12.1 Move a sound from SoundZapper into your project.
12.2 Drag a preset into Serum
drag a preset name (or a Map dot) straight onto Serum to load it. On the map, dragging a dot exports it right away; drag empty space to pan.
12.3 Drag a waveform onto an Ableton track
drag the small waveform in the player bar (or in a row) onto an audio track in Live to drop in the sound as audio.
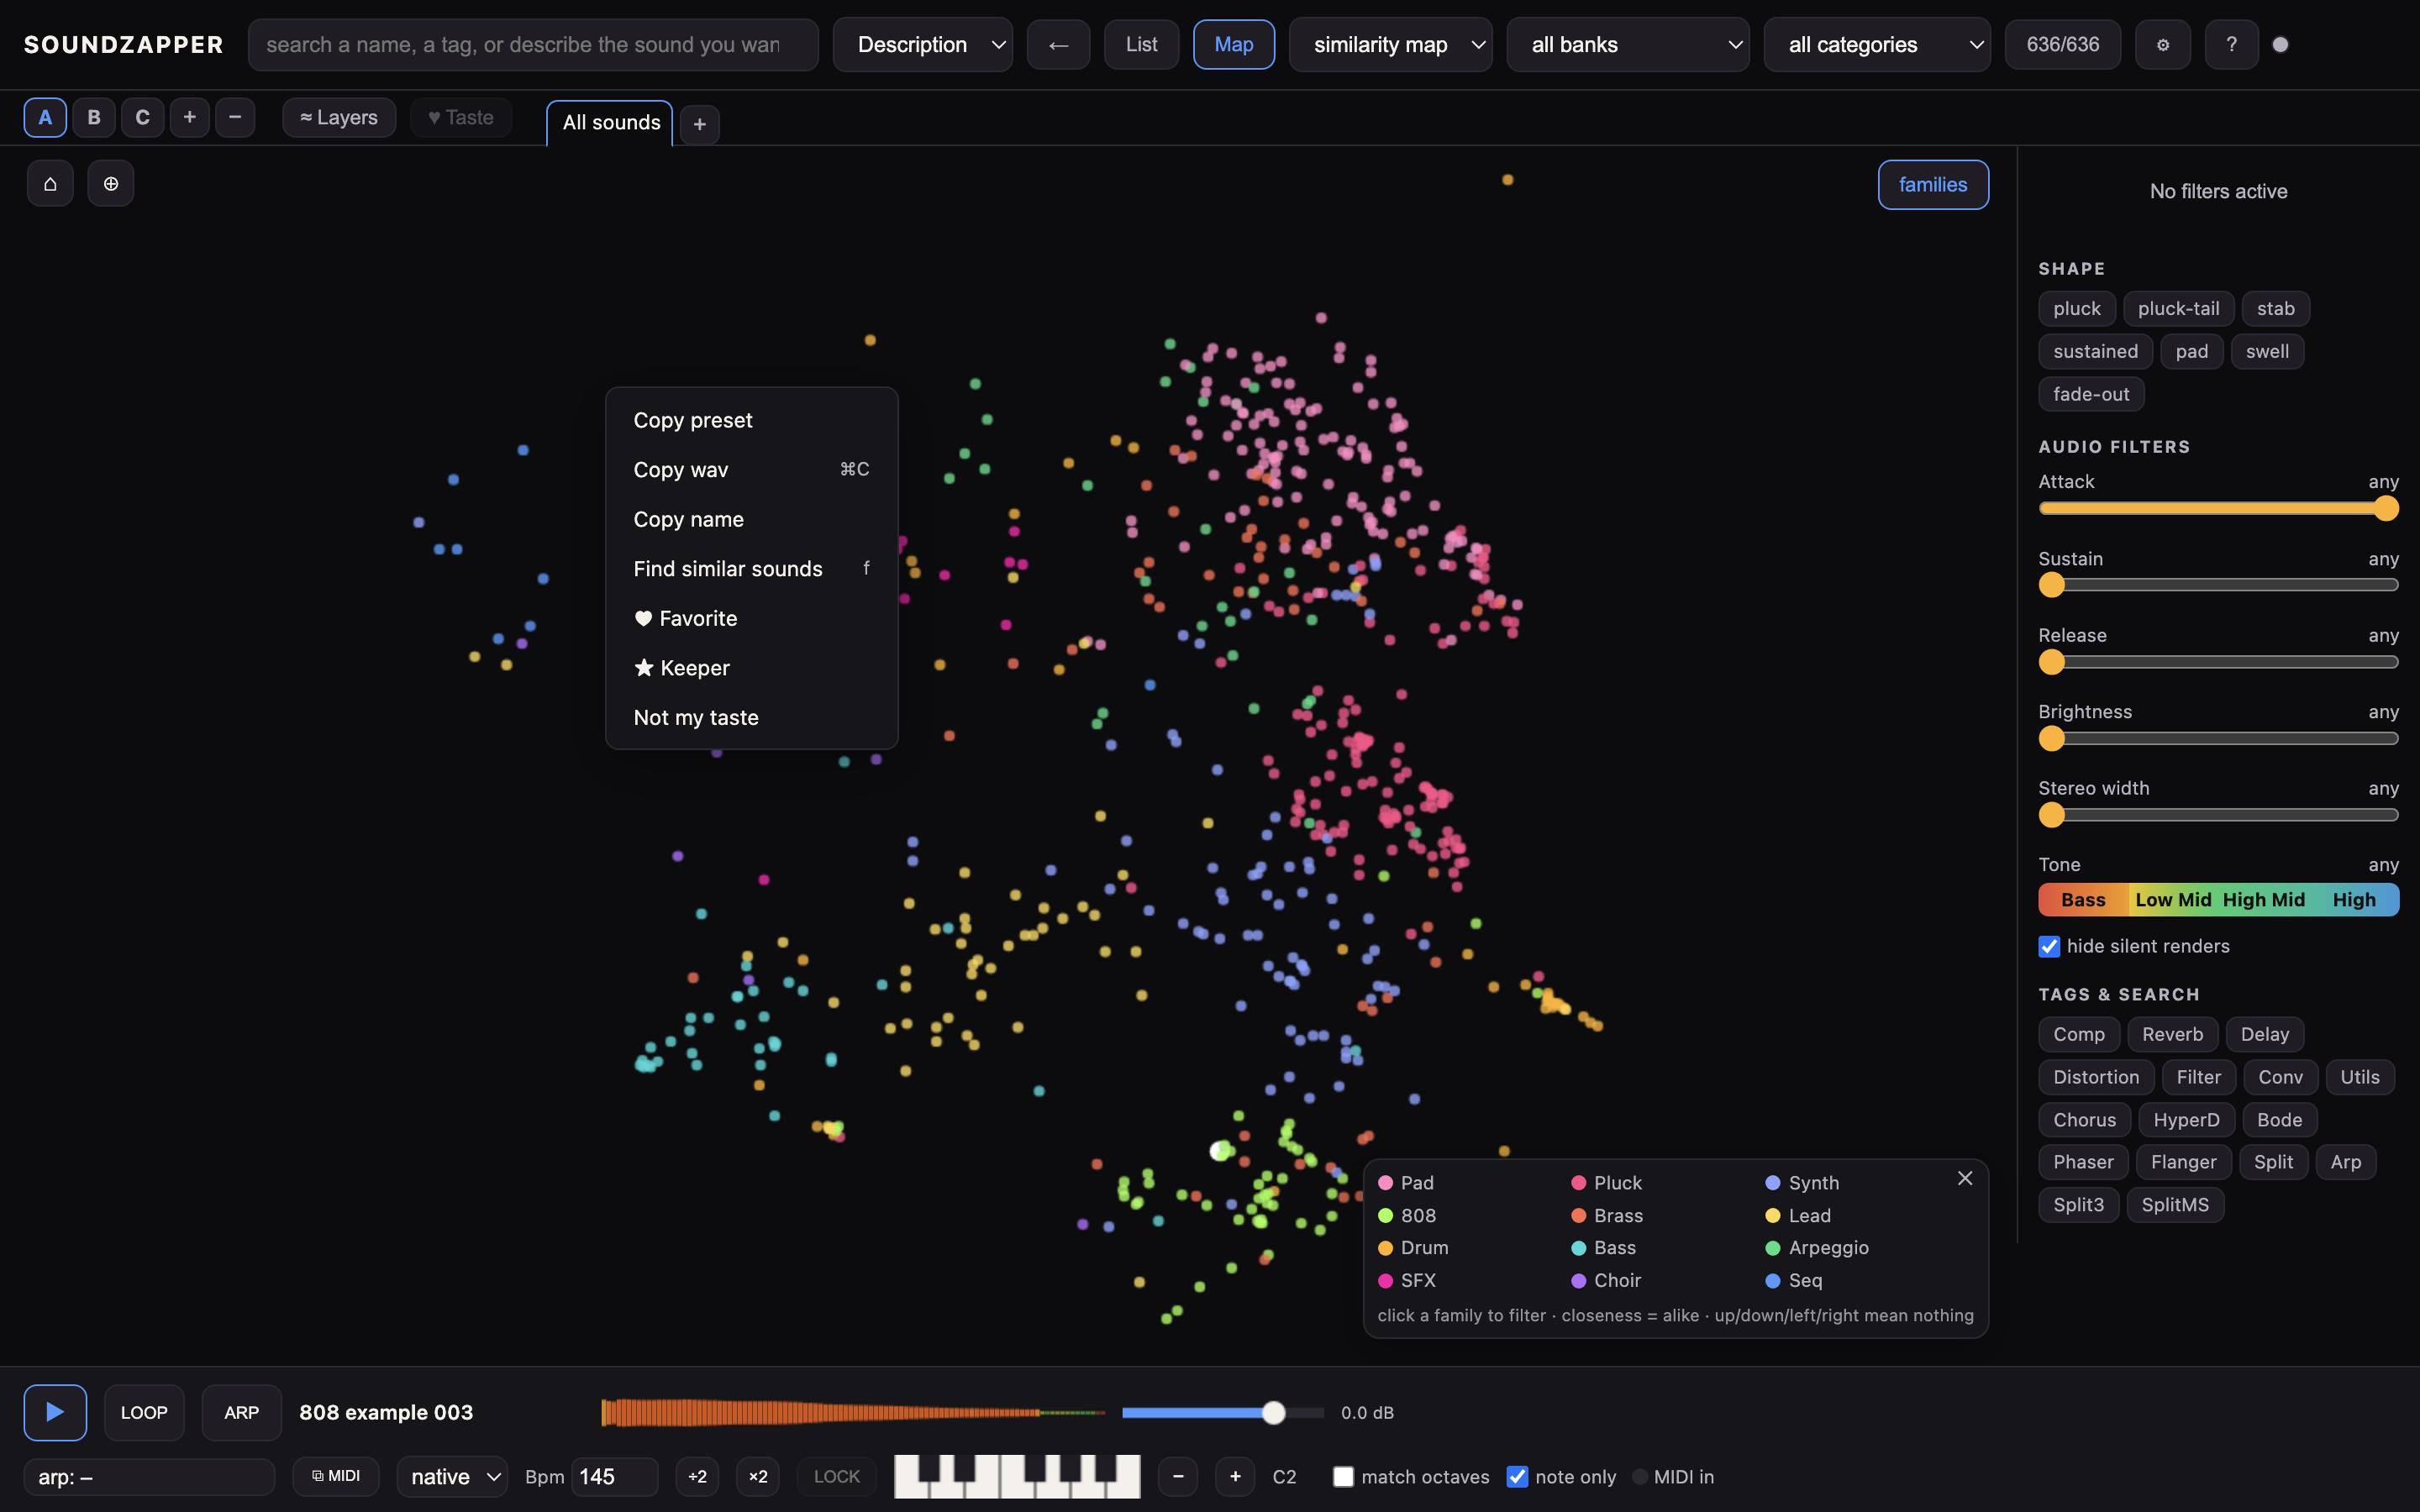
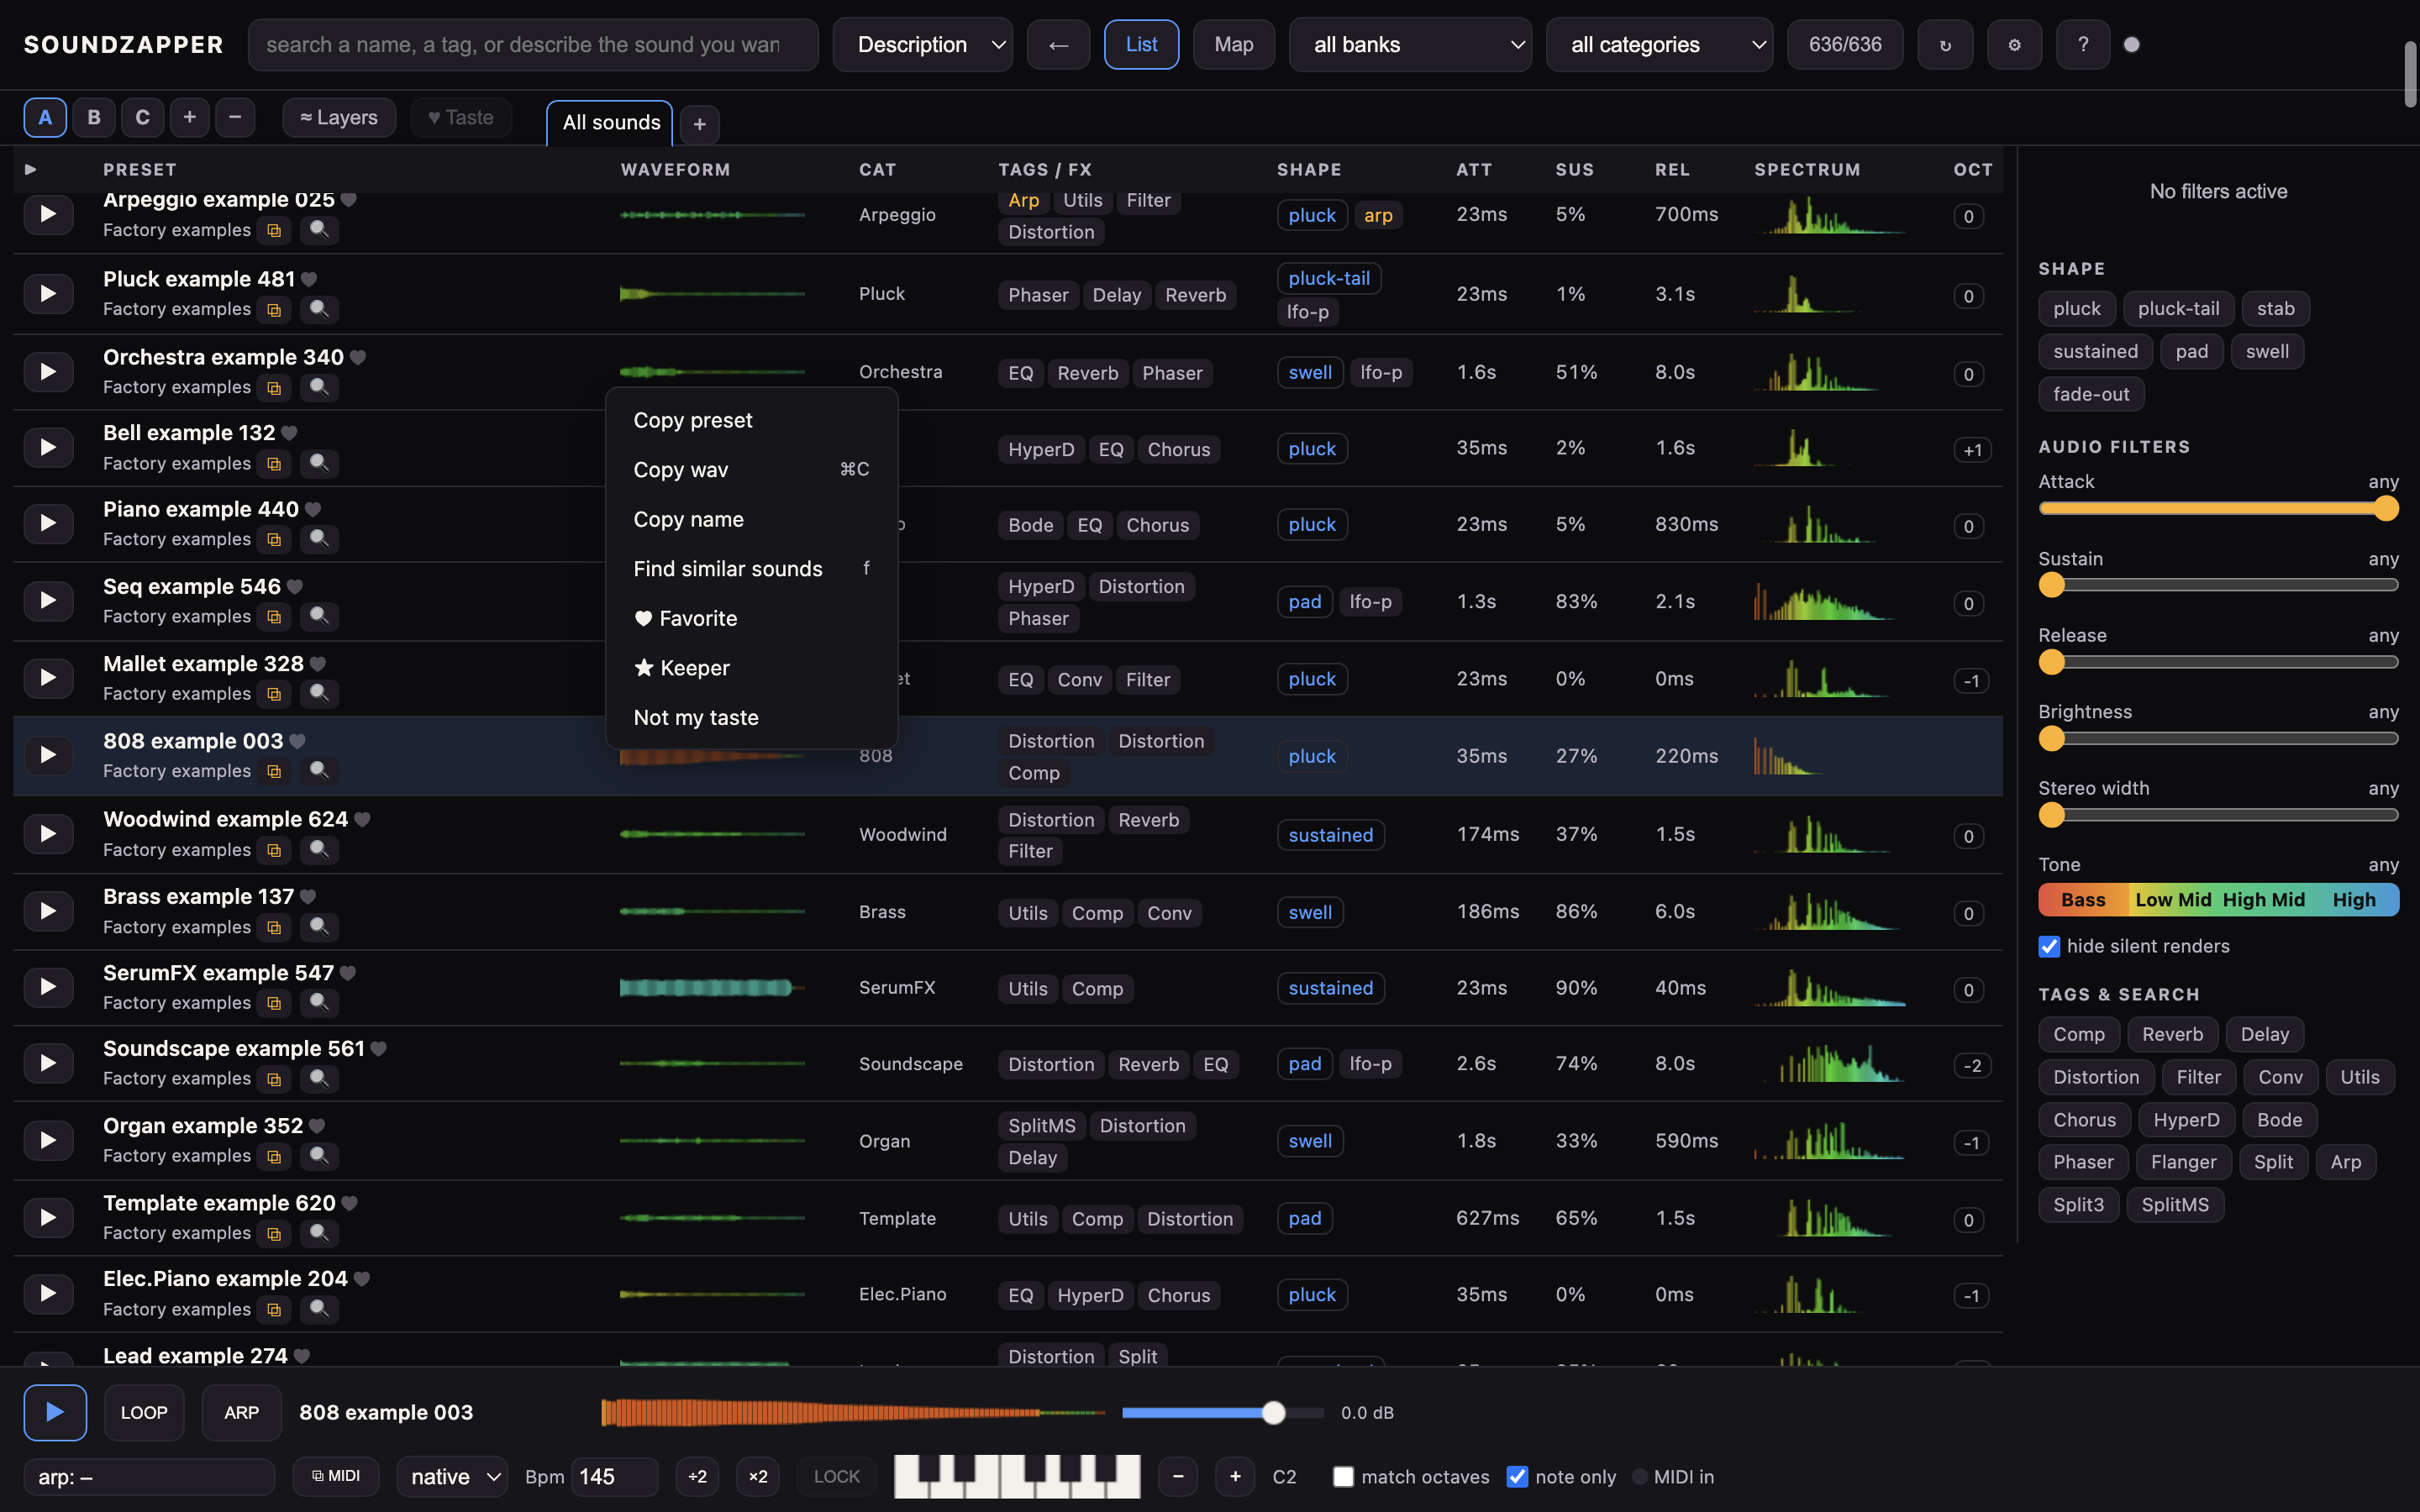
12.4 Right-click for quick copies
right-click a preset for:
- Copy arp MIDI — the MIDI file keeps the preset’s name, without an app-name prefix. Browse preset patterns through Preset arps → folder → subfolder → preset; hover over folders to open nested menus, then click a preset. Clicking a folder also opens it; use the folder trail at the top to go back. This action appears when this preset has an extracted pattern. Copies that preset’s own MIDI notes and rests, transposed to the selected piano key and octave at the current tempo. The menu shows the destination note. With no key locked, it uses C in the selected octave.
- Copy preset — copies the preset file, ready to paste in Finder.
- Copy wav — copies the sound as a 24-bit clip (exactly what you hear: the full held note and its complete tail), ready to paste in Finder or onto an Ableton track. If you've set a pitch lock, SoundZapper truly re-renders the sound at that key through Serum (so it sounds just like the preview at that note, not a sped-up/slowed-down version); if Serum isn't installed it falls back to a quick pitch preview and tells you. Copying a sound and dropping it back gives the same matches as Find similar sounds — unless you repitched it (pitch lock) or arp'd it first, in which case it honestly matches the different sound you exported. For a fresh full-length render of the exact sound (or the selected arp), use ⌘C instead.
- Copy name — copies the preset's name.
- Find similar sounds — right-click any sound → Find similar sounds ranks the whole library against it, exactly like dropping its audio. A ♫ chip with the preset name appears and the blend/sensitivity controls work the same way as a dropped sample. F does the same on the selected sound.
- Copy arp (MIDI) — only on presets that carry their own arp: copies that arp as a MIDI file, ready to paste onto a Live MIDI track (same as ⌘⇧C for the currently selected arp).
- Use arp — only on presets that carry their own arp: plays THAT preset's arp on the currently selected sound (picks it in the arp browser for you).
- ♥ Favorite / ♥ Unfavorite — your own love-mark on a sound (pink in the list, a pink ring on the map). Also teaches “My taste”. Independent of ★ Keeper, so a sound can be both.
- ★ Keeper / Not my taste — teach “My taste” which sounds you like or want hidden (see Layering and the taste tools in the slot bar).
12.5 Per-row icons
every list row also carries small icons: ⧉ copies the name (paste it into Serum's own browser search) and 🔍 reveals the actual preset file in Finder (needs the app's helper running).
Dragging a preset, copying its sound and revealing its file need the app helper running. See If something looks wrong.
Chapter 13Your account & access
Choose a topic · 8 short sections
13.1 Get invited and set up access
Access is approved personally. Join the waiting list on our website. When invited, set your password from the invitation email and download SoundZapper. Regular invitations include a 14-day trial after account setup and once the installer is available. The trial starts once and cannot be restarted by signing in again.
After it ends, an active subscription keeps the app available. Personally invited free access remains free until we change that grant. Creating an account alone does not open the app.
13.2 Log in or register
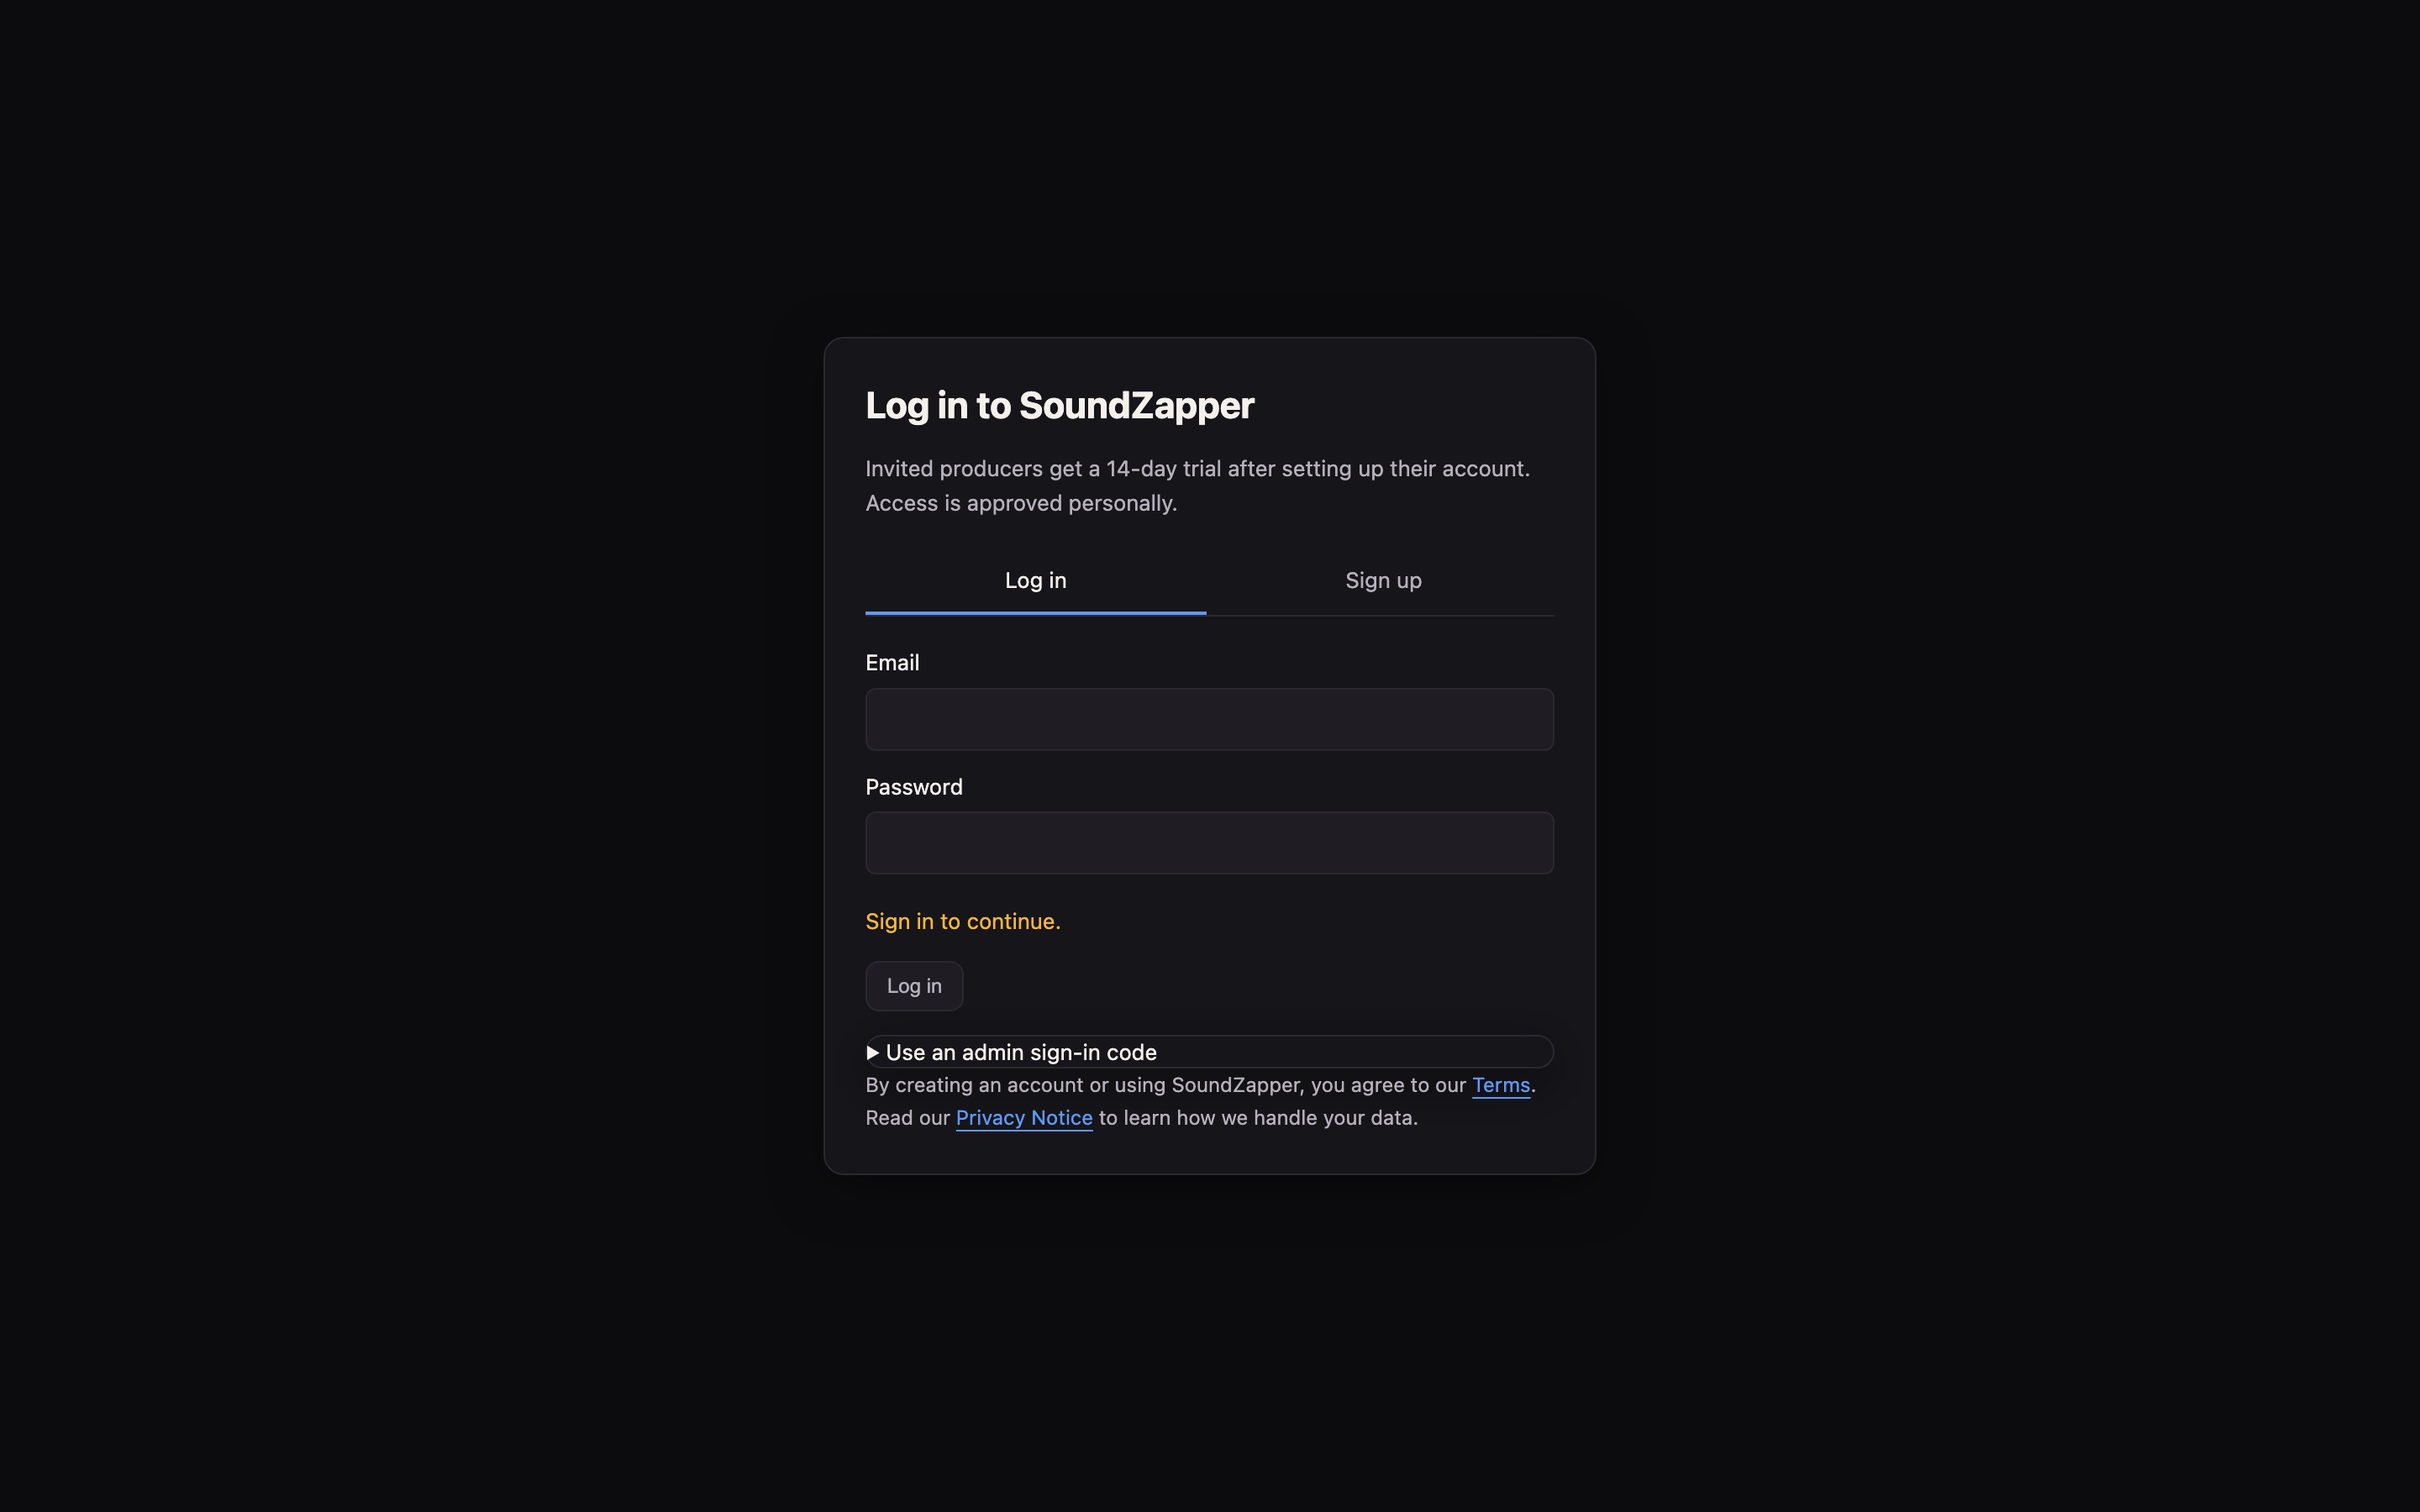
Use the sign-in screen when you open SoundZapper, or open Settings → Account. Choose the Log in tab for an existing account, or Sign up for a new one. Sign up asks you to type your password twice to catch typos.
Your password is sent once to sign in and is never kept on your computer — a short-lived access token and an OS-protected remembered session keep you signed in. Normal restarts and time away do not sign you out.
Choose Log out to end this device’s session; password changes, suspension or a deliberate security revocation can also require a new login.
13.3 Invitations and trial time
If your account still needs setup, finish setting your password using the invitation email. The account line shows the trial days remaining. When the trial ends, SoundZapper explains that a subscription is needed. A blocked or withdrawn account cannot continue with a saved offline window after the server confirms the change.
Approved accounts can download the installer independently of trial or payment status.
13.4 Creating a password
Use at least 10 characters and choose something hard to guess. Strong shorter passwords and longer passphrases are welcome; there is no required mix of capitals, numbers or symbols. Predictable passwords are rejected even when they contain all three. Passwords found in known data breaches are also blocked when creating or resetting an account password.
If that check is temporarily unavailable, try again shortly; existing sign-ins still work. Spaces are welcome. Existing passwords still work for sign-in. If your email already has an account, choose Sign in instead of creating another account.
13.5 Working offline — 3 days
After a successful account check on this computer, approved access works offline for 3 days. The private beta deliberately uses this short window.
- Local work continues: search, Map, playback, dragging sounds, sample matching, favourites, My taste, ≈ Layers and scanning.
- See the remaining time: Settings → Account shows “working offline” and the days left. The final day also has a status reminder.
- Access deadlines still apply: offline use ends by the trial or paid-access deadline, even before the three days have passed.
- Reconnect to refresh: a successful quiet background check resets the window to three days while your access remains valid.
13.6 What needs the internet
The Store (buying, topping up points, downloading a sound you bought) and your invite link talk to our server, so those are the only things that pause while you are offline — they say so plainly and work again the moment you reconnect.
13.7 If the 3 days run out
SoundZapper asks for a connection before it keeps going: it explains that it has not been able to check your account for 3 days, and that connecting once brings everything straight back. Nothing is deleted or changed — your library, previews, favourites and taste are all exactly where you left them.
If your computer's date has been set earlier than the last check, SoundZapper cannot tell how long it has been offline, so it asks the same thing; fixing the date or connecting once resolves it.
13.8 If your account cannot be verified at all
a first sign-in on this computer, a password change, a suspension, or a deliberate security revocation — the sign-in screen blocks access. SoundZapper tries reconnecting automatically first, gradually slowing to one attempt every 30 seconds, and keeps trying while you are offline. Retry connection becomes available if you want to try sooner.
Logging out returns to this screen and ends the offline window; your local files remain unchanged.
Chapter 14The Store (beta)
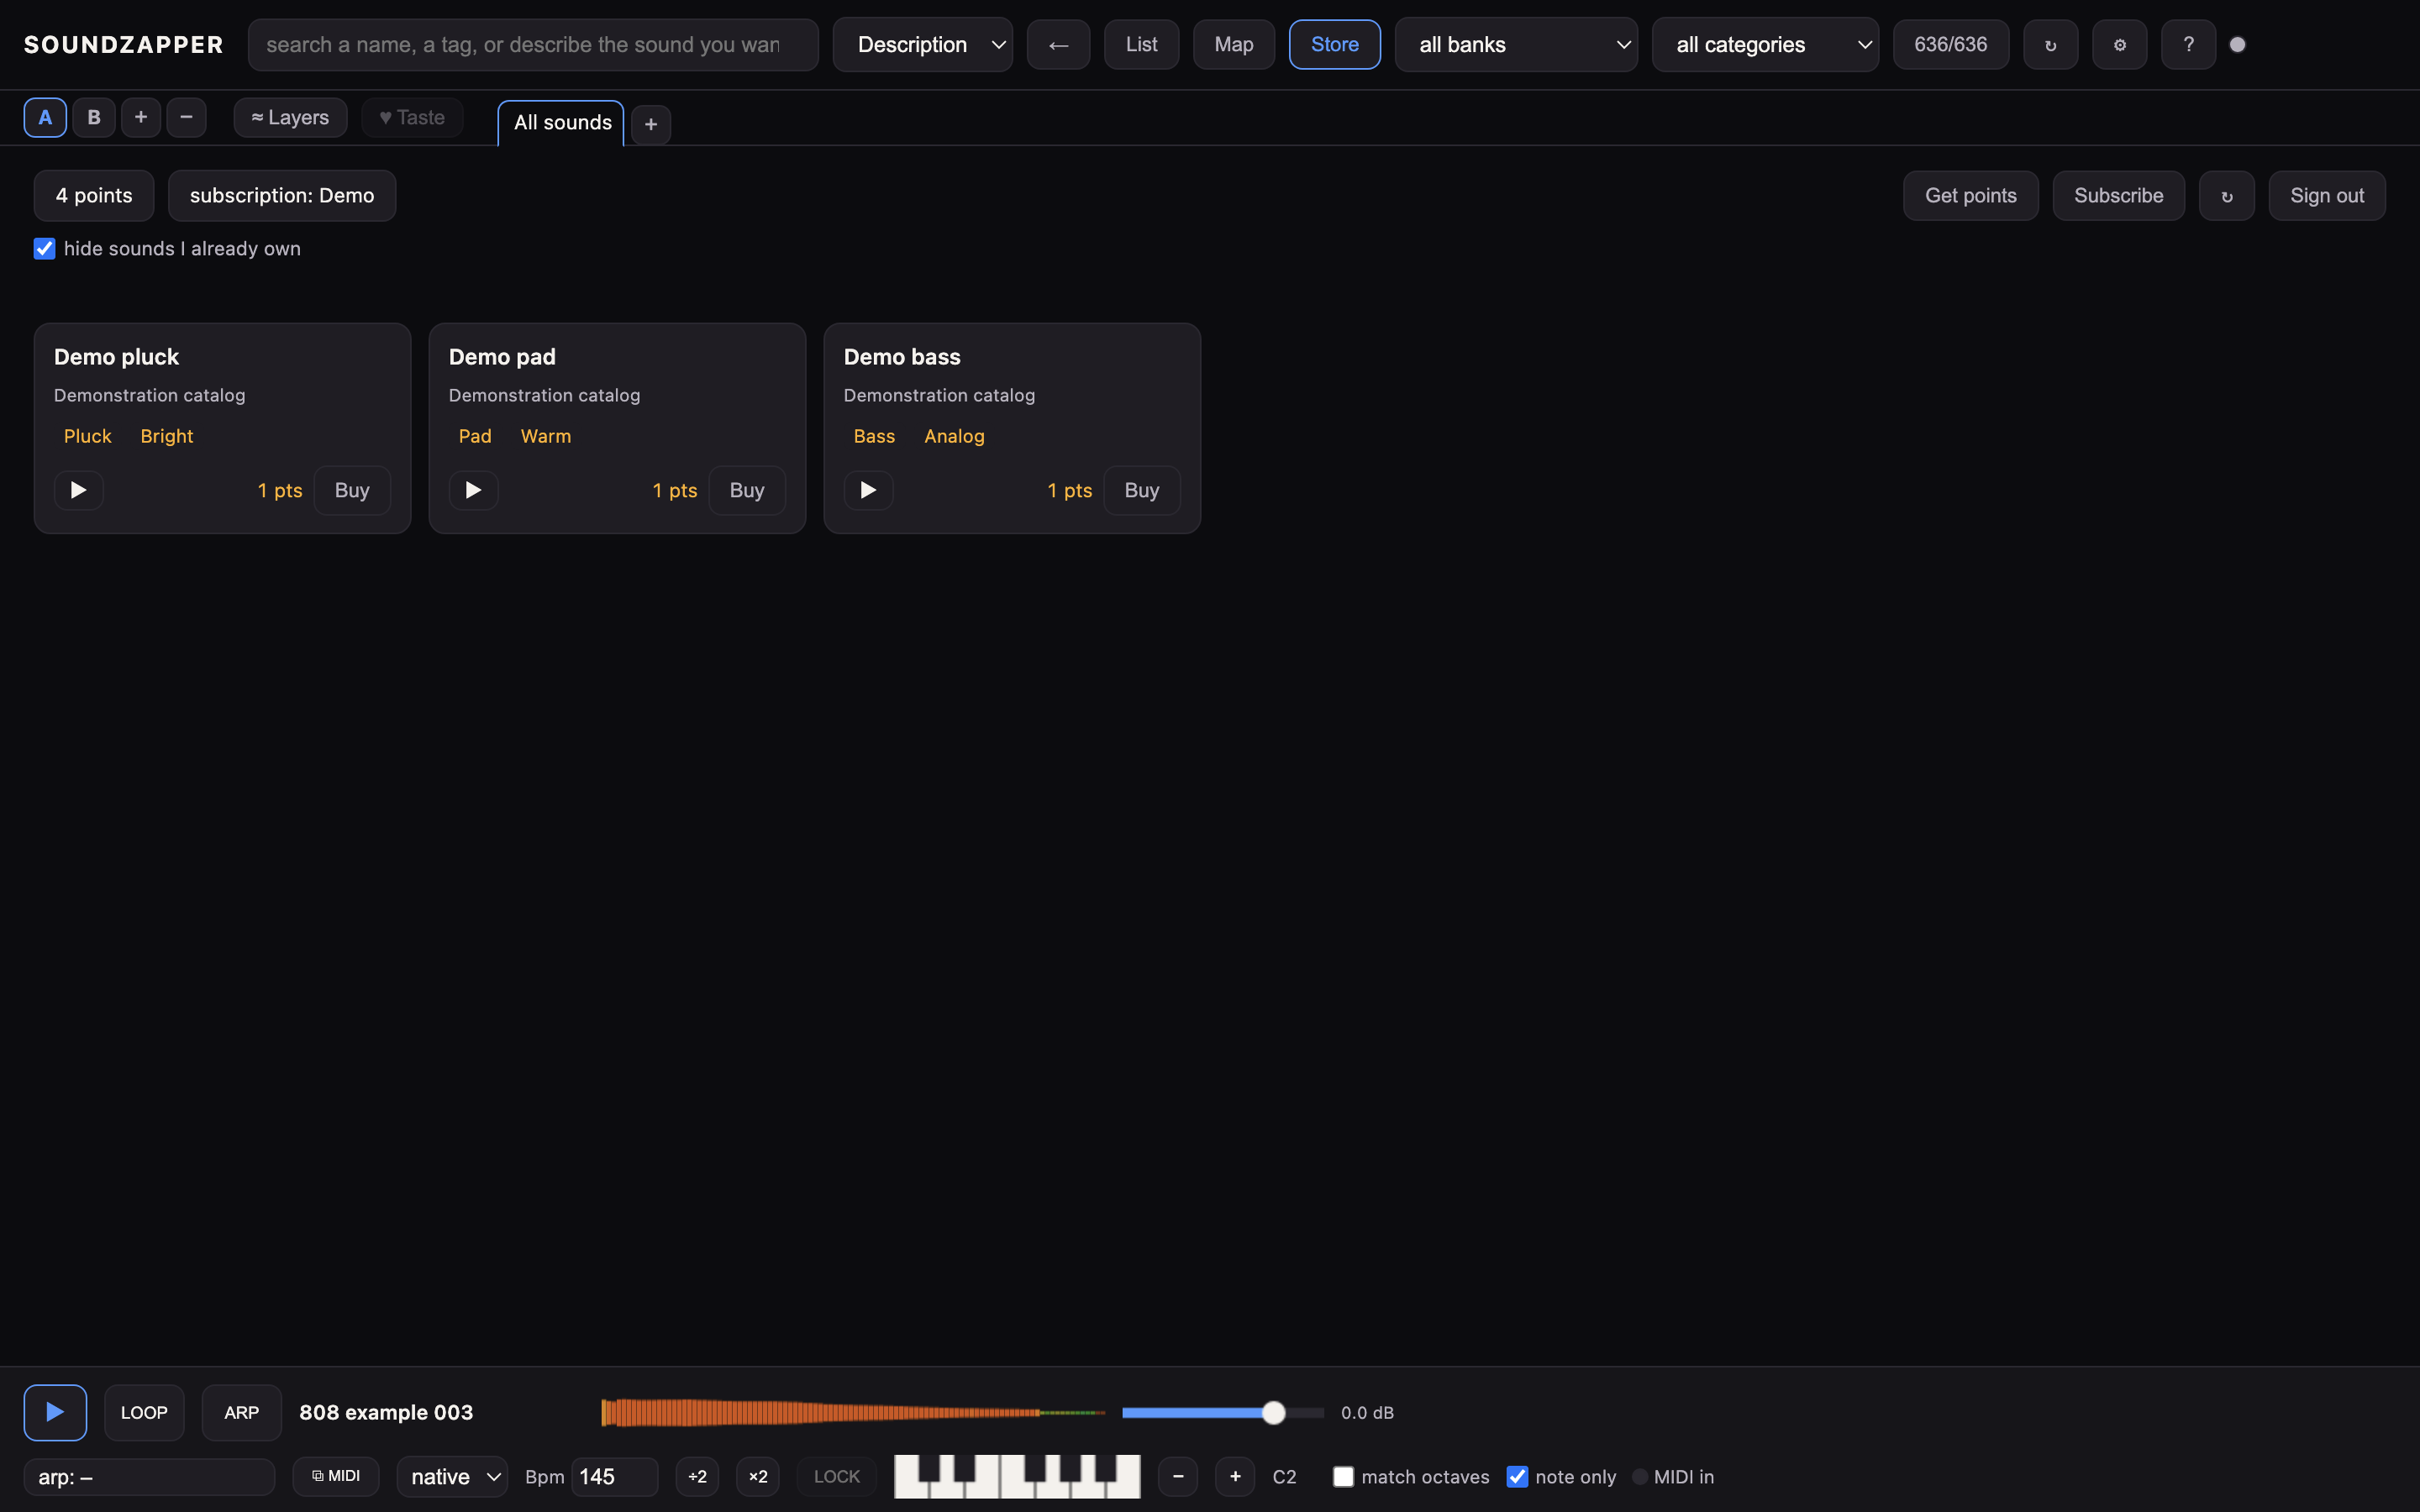
14.1 Browse extra sounds
The Store appears when configured for your app.
Browse and buy extra sounds that drop straight into your library.
The Store is an optional add-on. It shows up only when it's set up and reachable — if there's no store, your approved SoundZapper account still opens the local sound-discovery tools, with no Store button at all.
14.2 Sign in
Open the Store view and enter your store email and password. Your password is sent once to sign in and is never kept on your computer — only a login token is saved so you stay signed in.
14.3 Points
Buying a sound costs points. Most single sounds are one point, but a pack or a premium sound can cost more — each Buy button shows its own price. Your balance and subscription show at the top. Get points and Subscribe open a secure checkout in your browser; a subscription gives you a monthly points allowance.
14.4 Preview and buy
Press ▶ on any sound to hear it first. Buying takes two clicks so you never spend by accident: the first click on Buy turns it amber and restates the price (Buy · N pts?), and a second click within a few seconds confirms. On success it downloads and joins your library automatically.
If you can't afford it the Buy button is greyed out and says so.
14.5 Hide what you own
A hide sounds I already own toggle at the top is on by default, so the grid only shows sounds you don't have yet. Untick it to see everything, owned sounds included.
14.6 Filter by tag
Each store card shows its tags. Click a tag to narrow the grid to just the store sounds carrying it (it lights up); click it again to clear. Click several tags to combine them.
14.7 Where purchases land
Downloaded sounds go to Serum ▸ User ▸ SoundZapper ▸ Purchased (grouped by pack). Nothing else in your library is touched. SoundZapper then re-scans so the new sound shows up on the map, in search and in layering like any other.
14.8 Why some sounds are hidden
The Store never offers you a sound you already have. Anything already in your library — or that you've already bought — is hidden, so you never pay twice for the same sound (even if it's sold both in a pack and on its own).
Chapter 15Settings & scanning
Choose a topic · 11 short sections
15.1 Choose folders and scan
Point SoundZapper at your presets, then let it work.
Settings shows the installed SoundZapper version and, for packaged builds, the recorded build date and time in UTC. Development builds show that the build time is unavailable.
Open ⚙ Settings. There you:
15.2 Add your preset folders
the folders where your Serum presets live. They are only ever read; the app never changes or deletes anything in them.
15.3 Choose a storage folder
Owned storage holds the previews the app makes and needs free disk space. 📂 Open folder reveals it in Finder.
If the drive is unavailable
The app pauses and offers Quit or Choose a new folder. Reconnecting the original drive clears the warning. Canceling the picker keeps your current setting.
A replacement is checked before saving. The original library stays untouched; scanning starts only when requested. Restart SoundZapper after changing storage so sound search uses the new library. In a browser, enter the full folder path when prompted.
Move a library yourself
- Quit SoundZapper.
- Copy the whole storage folder with all its contents.
- Choose the copied folder in Settings, then restart. Existing previews can be reused.
15.4 Scan now
the app plays and listens to every preset. A progress bar shows how it's going. It runs in the background and picks up where it left off if you stop it. A rescan also cleans up after presets you've deleted from your library: their sounds drop off the map, out of the list and out of search, and their preview files are freed.
(If a whole folder is offline — an external drive unplugged — nothing is removed; the app waits until it's reachable again.)
15.5 Matches your taste
SoundZapper learns from sounds you use: drag a sound into your DAW, copy it with ⌘+C, or choose ★ Keeper in its right-click menu.
Open your taste zone
The ♥ Taste button lights up after at least 5 keepers. While learning, it stays grey; clicking it explains your current count and how to add more.
Taste is a filter. It shows your favorites and keepers with their closest-sounding neighbours, ordered by closeness. A few marks make a tight zone; a larger collection opens it to a few hundred sounds. The 15 closest have amber map rings.
The status line gives the number of sounds and tells you to turn ♥ off to see everything. Turn it off to return to the full library.
Review or change what it learned
- Right-click ♥ Taste, or choose Show kept sounds in Settings, to open the ledger.
- Click a ledger row to play it; use ✕ to forget that sound.
- Reset taste asks first, then clears local choices. It cannot be undone.
- Not my taste steers suggestions away from a sound. Mark it ★ Keeper again to bring it back.
15.6 Your Serum stars
- 4–5 Serum stars: teach My taste automatically.
- 1 star: exclude the sound from Taste suggestions. It stays available in ordinary browsing and searching.
- 2–3 stars or none: add no preference.
SoundZapper reads these ratings without changing Serum files. They apply on the next Taste check or suggestion request; no scan or render is needed. Imported stars do not create manual hearts or repeated keeper events.
Your choices take priority
Keep or favorite a sound to bring it back; reject it to exclude it; forget it in the taste list to ignore the imported rating. Reset taste clears local choices and lets Serum’s stars apply again.
15.7 Favorites vs Keepers
- ♥ Favorite: a deliberate mark for a sound you love. Click the heart in a list row or use the right-click menu. Its name is pink and its map dot has a pink ring.
- ★ Keeper: SoundZapper notices usage through dragging, copying or an explicit Keeper action. Keepers are amber; their map dots grow in three capped steps as you use them.
A sound can have both marks. Favoriting teaches My taste; removing a heart does not erase that learning.
15.8 Similarity matches
how wide to cast the net when you drop a sample to find similar presets. Tight (the default) keeps only the closest matches — the white-ringed ones (top 15). Narrow widens to the closest cluster (~60, about 1% of the library), Medium ~250, Wide the full ranked list (up to 800). Applies live to an active drop, no re-analysis. Too tight a setting widens on its own to keep at least 10 matches on screen.
15.9 Similarity blend
this slider isn't in Settings: it appears right in the filter panel, next to the ♫ chip, whenever a similarity result is open. It decides how the closest-sound ranking is measured, from Sound type on the left to Character on the right:
- Sound type matches what the sound is — its musical role (a lead, a pad, a zap, a pluck). This is the tried-and-true match the app has always used.
- Character matches how the sound sounds — its timbre (bright, gritty, hollow, airy), read from deep inside the sound model.
The default sits at 90% type / 10% character — mostly "what it is", with a touch of "how it sounds". Slide toward Character for material where the texture matters more than the instrument type. The readout shows the exact split. Drag it while a similarity result is already open and it re-ranks that same drop live (no re-drop needed).
If the character half isn't built yet the status line says so and the app falls back to pure Sound type for that drop.
15.10 Setup assistant
reopen the guided setup any time to re-check Serum, adjust folders and storage, or start a fresh scan (see Getting started).
15.11 Experiments
An experiment row is already ON. Uncheck it to hear the previous behavior. Its own Compare A/B button opens side-by-side tabs: A = old, B = new.
Each row has its own comparison and a tooltip explaining what to try. Your work is preserved when switching back.
- Clearer notes when changing pitch: pitch-lock a pad by ±12 semitones; compare watery/phased sound and attack clarity. Blind test runs 10 random rounds: Play A / Play B, choose the cleaner sound, then see the result and which used the new preview version.
- Smarter taste ranking: turn on ♥ Taste and compare whether the new zone feels more like your taste.
- More balanced sound matching: compare the map’s family separation; correlated brightness-like features should not count twice.
Chapter 16Keyboard shortcuts
16.1 Find a shortcut
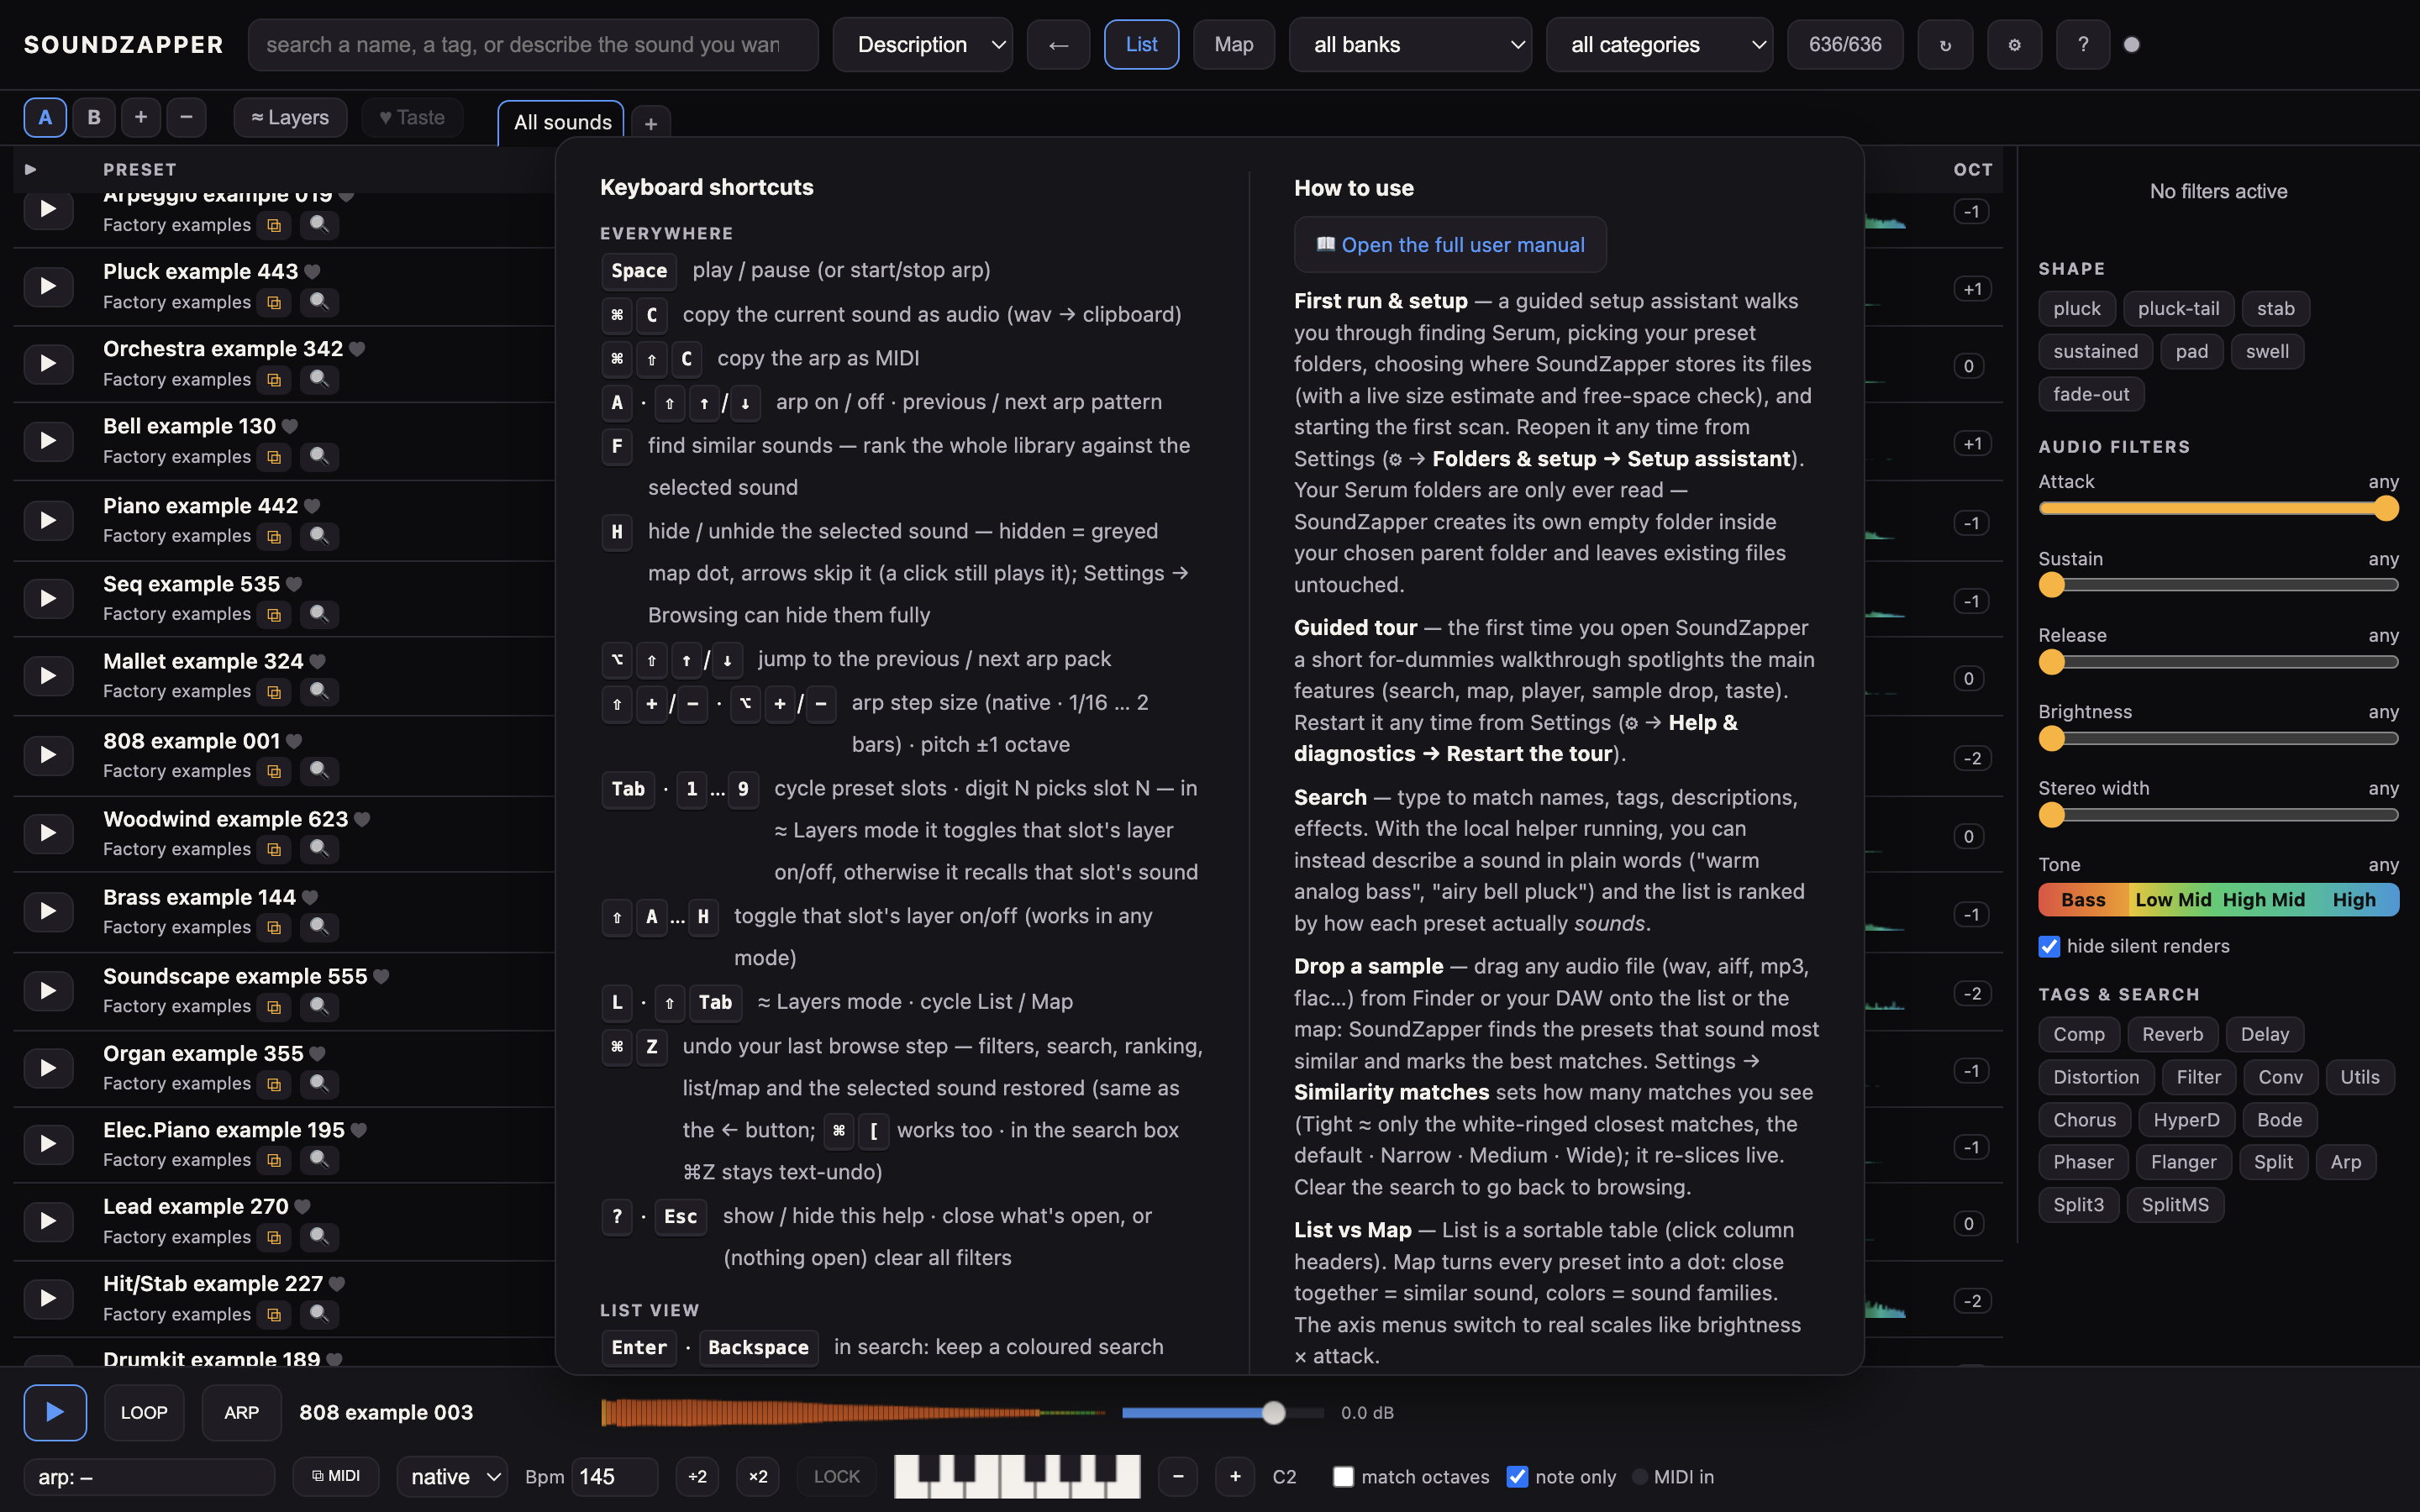
The in-app ? overlay shows these grouped by where they work, and by default only lists the ones for the view you're in (with a “show all shortcuts” toggle). Here is the full list, grouped the same way.
| Everywhere | |
|---|---|
| Space | Play / pause the current sound (or start / stop the arp) |
| ⌘+C | Copy the current sound as audio (freshly rendered at the note you are hearing, or the selected arp) to the clipboard |
| ⌘+Shift+C | Copy the selected arp as a MIDI clip |
| A | Arp on / off (remembers the last pattern) |
| F | Find similar sounds — rank the whole library against the selected sound (same as right-click → Find similar sounds) |
| H | Hide / unhide the selected sound — hidden sounds show as greyed map dots and the arrows skip them (a direct click still plays them). Settings → Browsing can hide them fully or unhide all. See Hiding presets. |
| Shift+↑ / ↓ | Previous / next arp pattern (across packs) |
| ⌥+Shift+↑ / ↓ | Jump to the previous / next arp pack |
| Shift++ / − | Arp step size (native · 1/16 · 1/8 · 1/4 · 1 bar · 2 bars) |
| ⌥++ / − | Shift the locked note (and the arp) up / down one octave |
| Tab | Cycle through the preset slots (A → B → C…) |
| 1…9 | Pick slot N — in ≈ Layers mode it toggles that slot's layer on / off (press again = off); otherwise it recalls that slot's sound (repeat presses just re-select it) |
| Shift+A…H | Turn that slot's layer on / off (works in any mode) |
| L | Toggle ≈ Layers mode |
| Shift+Tab | Switch between List and Map |
| ⌘+Z | Undo your last browse step — filters, search, ranking, list/map, the active tab and the selected sound all restored (lost a dot on the map? ⌘Z brings you back to it). Same as the ← button in the top bar (⌘+[ works too; inside the search box ⌘Z stays normal text-undo). |
| ? | Show / hide the quick help |
| Esc | Close whatever is open (a menu, popover, dialog or the hover card). When nothing is open, a bare Esc clears all filters — the same reset as the ✕ Clear-all-filters button, or clicking the results counter. |
| List view | |
| ↑ / ↓ | Previous / next preset |
| ⌘+R | Shuffle the list — a fresh mix of packs and categories (off while a similarity / taste ranking is active) |
| Map view | |
| ← ↑ ↓ → | Jump to the nearest sound in that direction |
| 0 | Zoom toggle — if you're zoomed in (or panned), snap back to the whole map; if you're already showing the whole map, zoom in on the selected sound (same as the ⌂ / ⊕ buttons) |
| In the search box / on a search chip | |
| Enter | Keep the draft as a Words, Tags or Description chip. |
| Alt+Enter | Exclude a real metadata tag. |
| Backspace | In an empty search, remove the last chip. |
| Delete / Backspace | On a focused chip, remove that chip from both copies. |
Chapter 17If something looks wrong
17.1 Find the cause